This guide provides an overview and deployment configuration of DOCA containers for NVIDIA® BlueField® DPU.
Introduction
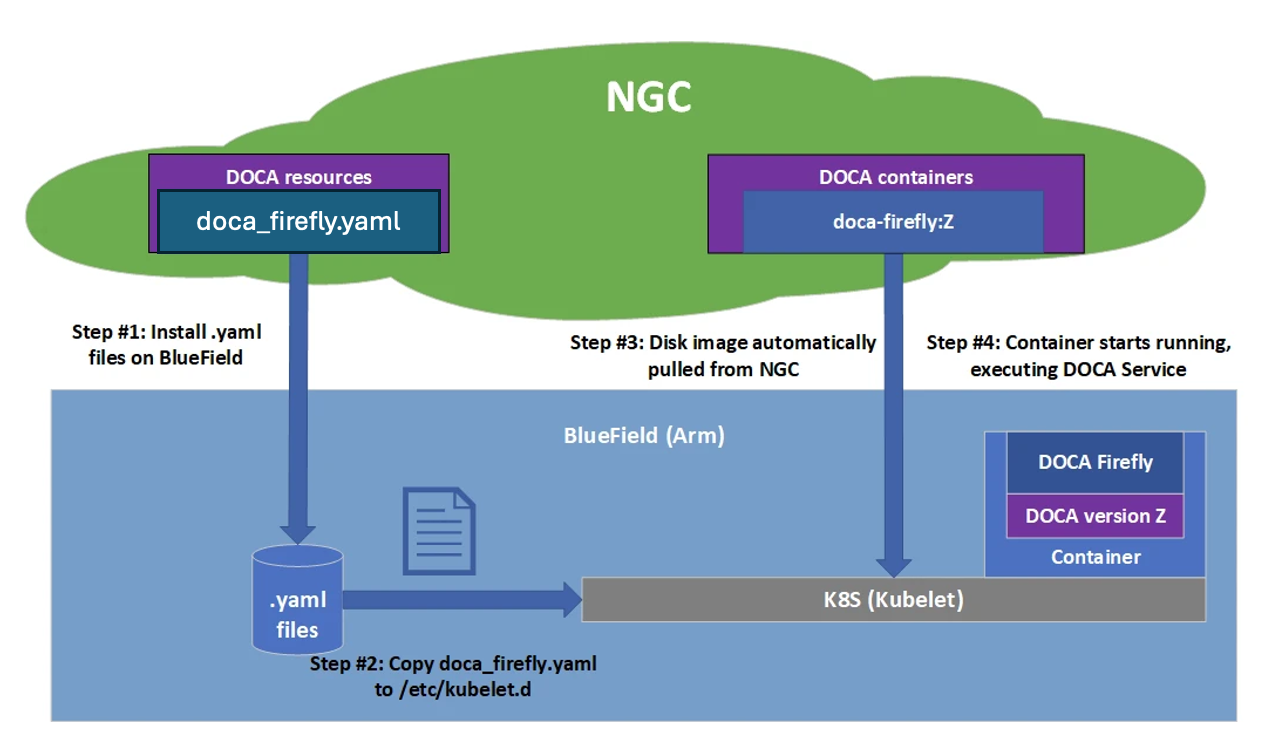
DOCA containers allow for easy deployment of ready-made DOCA environments to the DPU, whether it is a DOCA service bundled inside a container and ready to be deployed, or a development environment already containing the desired DOCA version.
Containerized environments enable the users to decouple DOCA programs from the underlying BlueField software. Each container is pre-built with all needed libraries and configurations to match the specific DOCA version of the program at hand. One only needs to pick the desired version of the service and pull the ready-made container of that version from NVIDIA's container catalog.

The different DOCA containers are listed on NGC, NVIDIA's container catalog, and can be found under both the "DOCA" and "DPU" labels.
Prerequisites
-
Refer to the DOCA Installation Guide for Linux for details on how to install BlueField related software
-
BlueField image version required is 3.9.0 and higher
Container deployment based on standalone Kubelet, as presented in this guide, is currently in alpha version and is subject to change in future releases.
Container Deployment
Deploying containers on top of the BlueField DPU requires the following setup sequence:
-
Pull the container
.yamlconfiguration files. -
Modify the container's
.yamlconfiguration file. -
Deploy the container. The image is automatically pulled from NGC.
Some of the steps must only be performed once, while others are required before the deployment of each container.
What follows is an example of the overall setup sequence using the DOCA Firefly container as an example.
Pull Container YAML Configurations
This step pulls the .yaml configurations from NGC.
To pull the latest resource version, download the NVIDIA NGC CLI.
For more information regarding the NGC CLI, please refer to the NGC Catalog User Guide.
Container-specific Instructions
Some containers require specific configuration steps for the resources used by the application running inside the container and modifications for the .yaml configuration file of the container itself.
Refer to the container-specific instructions listed under the container's relevant page on NGC.
Structure of NGC Resource
Each DOCA service has a corresponding NGC resources page, referenced in the "DOCA Container Deployment Guide | Pull Container YAML Configurations" section. This resource contains a configs directory, which includes a dedicated subdirectory for each DOCA service version. The latest version contains all available .yaml configuration files and scripts.
DOCA Firefly example:
doca_firefly_1.6.13
├── configs
│   ├── 1.6.0
│   │   ...
│   └── 1.7.1
│     ├── doca_firefly.yaml
In addition, the resource may contain a scripts directory, where services can provide helper scripts and additional configuration files.
Example folder structure for scripts directory:
+ doca_firefly_1.6.13
+-+ configs
| +--  ...
+-+ scripts
  | +-+ 1.6.0
  | | +-- ...
  | +-+ 1.7.0
  | | +-- ...
Users can deploy older DOCA service versions by accessing the relevant YAML file under configs and the associated scripts under the matching version directory in scripts.
Spawn Container
Once the desired .yaml file is updated, copy it to Kubelet's input folder. The following example uses doca_firefly.yaml, which corresponds to the DOCA Firefly service:
cp doca_firefly.yaml /etc/kubelet.d
Kubelet automatically pulls the container image from NGC and spawns a pod that runs the container. In this example, the DOCA Firefly service begins execution immediately, and its output can be viewed in the container logs.
Review Container Deployment
Follow the following steps to verify a new container deployment and troubleshoot any issues.
-
View currently active pods and their IDs:
sudo crictl podsIt may take up to 20 seconds for the pod to start.
Look for a line matching your container, for example:
POD ID              CREATED             STATE   NAME                      NAMESPACE   ATTEMPT   RUNTIME
06bd84c07537e       4 seconds ago       Ready   doca-firefly-my-dpu       default     0         (default)
-
If no matching pod appears, view Kubelet logs for errors:
sudo journalctl -u kubelet --since -5mOnce the issue is resolved, proceed to the next steps.
For more troubleshooting tips, refer to the NVIDIA BlueField Platform Software Troubleshooting Guide.
-
Verify the container image was downloaded from NGC:
sudo crictl imagesExample output:
IMAGE                              TAG                 IMAGE ID            SIZE
k8s.gcr.io/pause                   3.9                 829e9de338bd5       268kB
nvcr.io/nvidia/doca/doca_firefly   1.1.0-doca2.0.2     134cb22f34611       87.4MB
-
List active containers:
sudo crictl psLook for a line matching your deployed container (boot time varies by image size):
CONTAINER           IMAGE               CREATED             STATE               NAME                     ATTEMPT             POD ID              POD
b505a05b7dc23       134cb22f34611       4 minutes ago       Running             doca-firefly             0                   06bd84c07537e       doca-firefly-my-dpu
-
If the container is not running, list all recent container deployments:
sudo crictl ps -aYou may find that the container exited immediately due to an error:
CONTAINER           IMAGE               CREATED             STATE               NAME                     ATTEMPT             POD ID              POD
de2361ec15b61       134cb22f34611       1 second ago        Exited              doca-firefly             1                   4aea5f5adc91d       doca-firefly-my-dpu
-
View container logs. Logs are available during the container’s lifetime and for a short time after it exits:
sudo crictl logs <container-id>Example:
$ sudo crictl logs de2361ec15b61
Starting DOCA Firefly - Version 1.1.0
...
Requested the following PTP interface: p10
Failed to find interface "p10". Aborting
For more information on crictl, refer to the Kubernetes documentation.
Stop Container
The recommended way to stop a pod and its containers is as follows:
-
Delete the YAML configuration file to instruct Kubelet to stop the pod:
rm /etc/kubelet.d/<file name>.yaml
-
Stop the pod directly (only if it still shows
Ready)sudo crictl stopp <pod-id>
-
Once the pod has stopped, it may also be necessary to stop the container itself:
sudo crictl stop <container-id>
Troubleshooting Common Errors
This section provides a list of common errors that may be encountered when spawning a container. These account for the vast majority of deployment errors and are easy to verify first before trying to parse the Kubelet journal log.
For more troubleshooting tips, refer to the NVIDIA BlueField Platform Software Troubleshooting Guide.
Yaml Syntax
The syntax of the .yaml file is extremely sensitive and minor indentation changes may cause it to stop working. The file uses spaces (' ') for indentations (two per indent). Using any other number of spaces causes an undefined behavior.
Huge Pages
The container only spawns once all the required system resources are allocated on the DPU and can be reserved for the container. The most notable resource is huge pages.
-
Before deploying the container, make sure that:Huge pages are allocated as required per container.Both the amount and size of pages match the requirements precisely.
-
Once huge pages are allocated, it is recommended to restart the container service to apply the change:
sudo systemctl restart kubelet.service
sudo systemctl restart containerd.service
-
Once the above operations are completed successfully, the container could be deployed (YAML can be copied to
/etc/kubelet.d).
Advanced Troubleshooting
Manual Execution from Within Container - Debugging
The deployment described in this section requires an in-depth knowledge of the container's structure. As this structure might change from version to version, it is only recommended to use this deployment for debugging, and only after other debugging steps have been attempted.
Although most containers define the entrypoint.sh script as the container's ENTRYPOINT, this option is only valid for interaction-less sessions. In some debugging scenarios, it is useful to have better control of the programs executed within the container via an interactive shell session. Hence, the .yaml file supports an additional execution option.
Uncommenting (i.e., removing # from) the following 2 lines in the .yaml file causes the container to boot without spawning the container's entrypoint script.
# command: ["sleep"]
# args: ["infinity"]
In this execution mode, users can attach a shell to the spawned container:
crictl exec -it <container-id> /bin/bash
Once attached, users get a full shell session enabling them to execute internal programs directly at the scope of the container.
Air-gapped Container Deployment
Container deployment on the BlueField DPU can be done in air-gapped networks and does not require an Internet connection. As explained previously, per DOCA service container, there are 2 required components for successful deployment:
-
Container image – hosted on NVIDIA's NGC catalog
-
YAML file for the container
From an infrastructure perspective, one additional module is required:
-
k8s.gcr.io/pausecontainer image
Pulling Container for Offline Deployment
When preparing an air-gapped environment, users must pull the required container images in advance so they could be imported locally to the target machine:
docker pull <container-image:tag>
docker save <container-image:tag> > <name>.tar
The following example pulls DOCA Firefly 1.1.0-doca2.0.2:
docker pull nvcr.io/nvidia/doca/doca_firefly:1.1.0-doca2.0.2
docker save nvcr.io/nvidia/doca/doca_firefly:1.1.0-doca2.0.2 > firefly_v1.1.0.tar
Some of DOCA's container images support multiple architectures, causing the docker pull command to pull the image according to the architecture of the machine on which it is invoked. Users may force the operation to pull an Arm image by passing the --platform flag:
docker pull --platform=linux/arm64 <container-image:tag>
Importing Container Image
After exporting the image from the container catalog, users must place the created *.tar files on the target machine on which to deploy them. The import command is as follows:
ctr --namespace k8s.io image import <name>.tar
For example, to import the firefly .tar file pulled in the previous section:
ctr --namespace k8s.io image import firefly_v1.1.0.tar
Examining the status of the operation can be done using the image inspection command:
crictl images
Built-in Infrastructure Support
The DOCA image comes pre-shipped with the k8s.gcr.io/pause image:
/opt/mellanox/doca/services/infrastructure/
├── docker_pause_3_9.tar
└── enable_offline_containers.sh
This image is imported by default during boot as part of the automatic activation of DOCA Telemetry Service (DTS).
Importing the image independently of DTS can be done using the enable_offline_container.sh script located under the same directory as the image's *.tar file.
This image can also be pulled and imported manually, using the following instructions:
-
To export the image:
docker pull k8s.gcr.io/pause:3.9 docker save k8s.gcr.io/pause:3.9 > docker_pause_3_9.tar -
To import the image:
ctr --namespace k8s.io image import docker_pause_3_9.tar
crictl images
IMAGE                              TAG                 IMAGE ID            SIZE
k8s.gcr.io/pause                   3.9                 829e9de338bd5       268kB
DOCA Services for Host
A subset of the DOCA services is available for host-based deployment as well. This is indicated in those services' deployment and can also be identified by having container tags on NGC with the *-host suffix.
In contrast to the managed DPU environment, the deployment of DOCA services on the host is based on docker. This deployment can be extended further based on the user's own container runtime solution.
Docker Deployment
DOCA services for the host are deployed directly using Docker.
-
Make sure Docker is installed on your host. Run:
docker versionIf it is not installed, visit the official Install Docker Engine webpage for installation instructions.
-
Make sure the Docker service is started. Run:
sudo systemctl daemon-reload sudo systemctl start docker -
Pull the container image directly from NGC (can also be done using the
docker runcommand):
Visit the NGC page of the desired container.Under the "Tags" menu, select the desired tag and click the paste icon so it is copied to the clipboard.The docker pull command will be as follows: sudo docker pull <NGC container tag here> For example: sudo docker pull nvcr.io/nvidia/doca/doca_firefly:1.1.0-doca2.0.2-host For DOCA services with deployments on both DPU and host, make sure to select the tag ending with -host. -
Deploy the DOCA service using Docker:
-
The deployment is performed using the following command:
sudo docker run --privileged --net=host -v <host directory>:<container directory> -e <env variables> -it <container tag> /entrypoint.shFor more information, refer to Docker's official documentation.
-
The specific deployment command for each DOCA service is listed in their respective deployment guide.
-
Container Deployment Using DMS
DOCA Management Service (DMS) is a client-server service that can run either on the host system or on BlueField Arm, and it can be accessed locally or remotely through gRPC-based management interfaces.
When deploying containers with DMS, follow the same methodology described earlier on page:
-
Pull the relevant YAML configuration
-
Apply any container-specific changes.
-
Deploy the container.
-
Verify that the pod and container started successfully.
On the DPU, this flow is based on standalone kubelet, while host-based DOCA services are deployed directly using Docker.
For more information about DMS architecture, configuration, and client commands, see the DOCA Management Service Guide.
Last updated: