1. Introduction
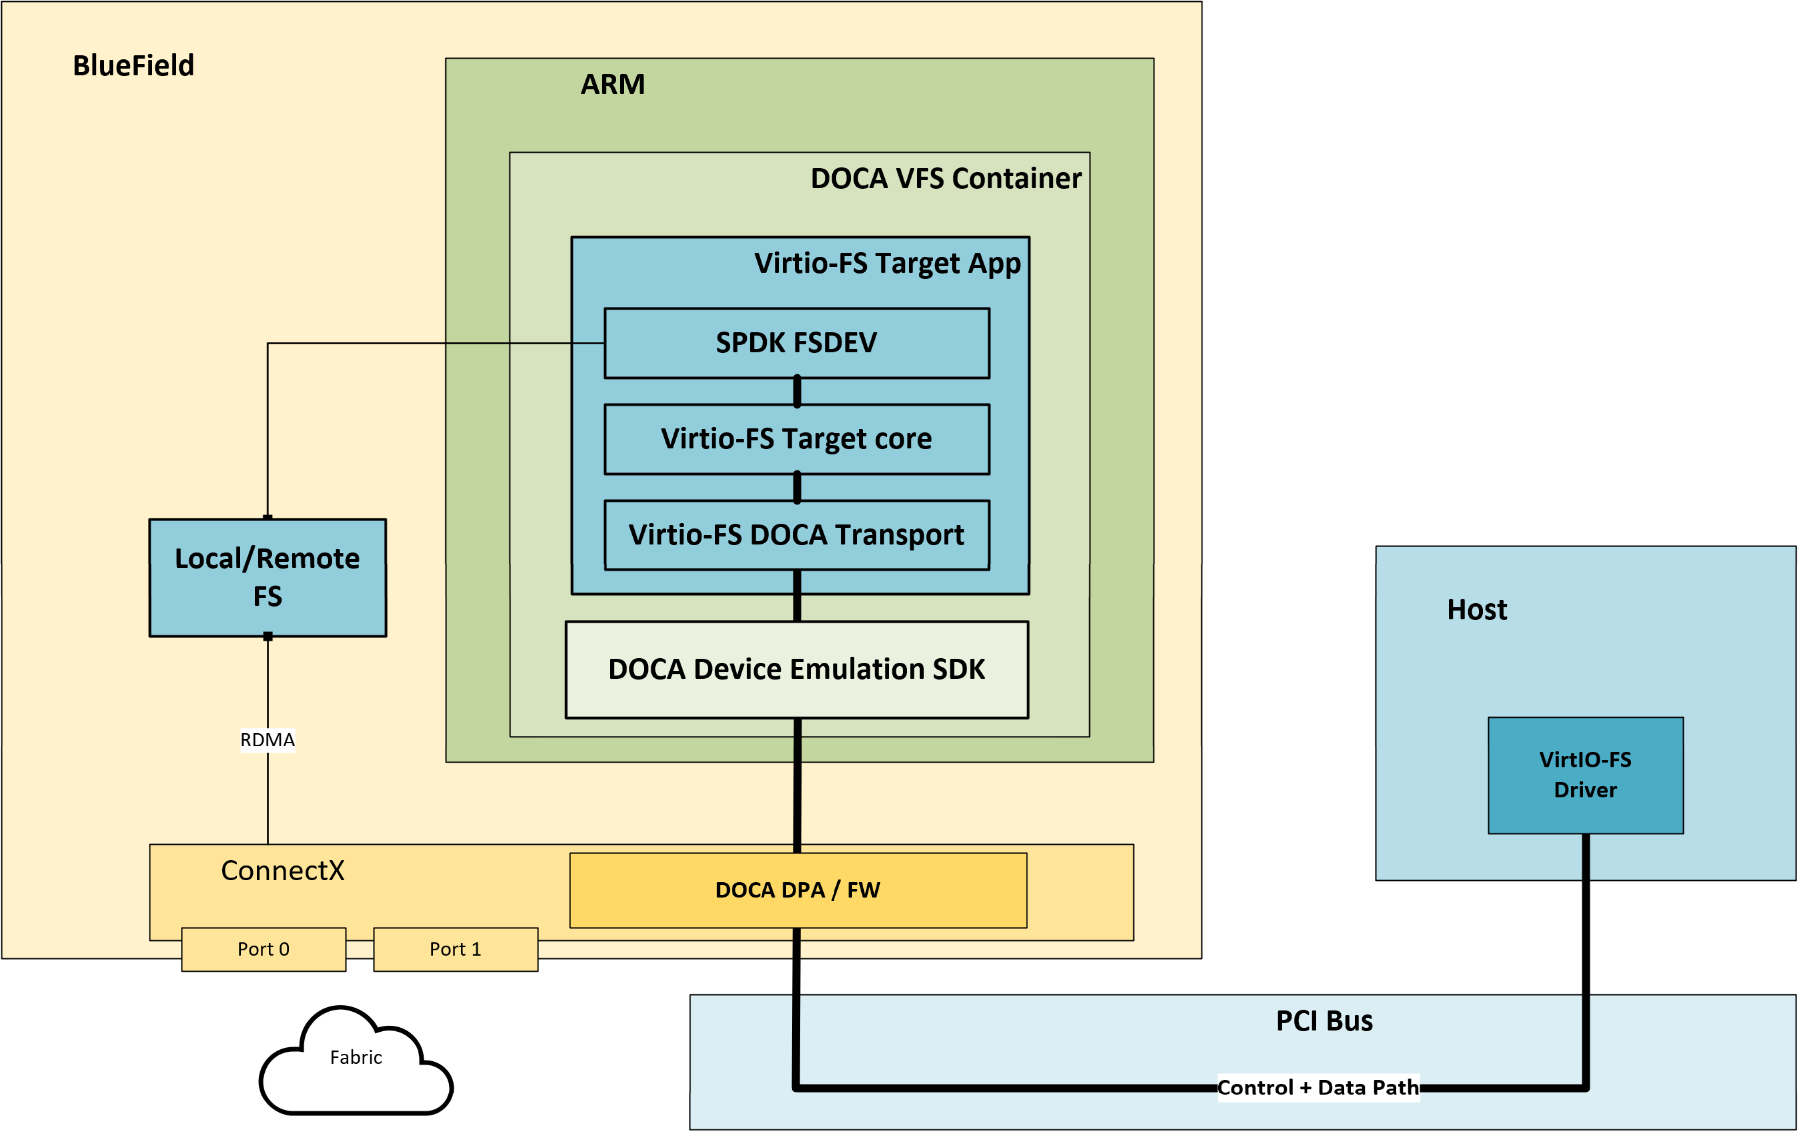
NVIDIA BlueField enables hardware-accelerated, software-defined virtio-fs PCIe device emulation. This leverages the power of BlueField networking platforms (DPUs or SuperNICs) to provide high-performance file system access in bare-metal and virtualized environments. Using BlueField, users can offload and accelerate networked file system operations from the host/guest, freeing up resources for other tasks and improving overall system efficiency. In this solution, the host/guest uses its own standard virtio-fs driver which is fully isolated from the networked filesystem mounted within the BlueField.
Built upon the DOCA and SPDK frameworks, virtio-fs device emulation on BlueField devices offers a comprehensive set of libraries for BlueField-based solutions and for storage solutions. This architecture consists of several key components:
-
DOCA DevEmu subsystem and DOCA Virtio-fs library – These core libraries are responsible for the low-level hardware management and the translation of virtio descriptors carrying FUSE (filesystem in userspace) requests into abstract virtio-fs requests, which are then processed by the SPDK virtio-fs DOCA transport component.
-
SPDK virtio-fs transport – This component is responsible for the interaction with the low-level DOCA components and translating the incoming abstract DOCA SNAP Virtio-fs requests into generic virtio-fs request which are then processed by the virtio-fs target core.
-
SPDK virtio-fs target – This component implements and manages the virtio-fs device, transports, and the interface with a backend file system. Upon arrival on a new generic virtio-fs request from the transport, it processes and translates the requests according to virtio-fs and FUSE specifications, translating FUSE-based commands into the generic filesystem protocol.
-
SPDK fsdev – This component provides generic filesystem abstraction and interfaces with the low-level filesystem modules implementing a specific backend filesystem protocol.
1.1. DOCA SNAP Virtio-fs as Container
The DOCA SNAP Virtio-fs container image may be downloaded from NVIDIA NGC and easily deployed on the BlueField using a YAML file. The YAML file points to the docker image that includes DOCA SNAP Virtio-fs binaries aligned with the latest spdk.nvda version.
DOCA SNAP Virtio-fs is not pre-installed on the BFB but can be downloaded manually on demand. For instructions on how to install the DOCA SNAP Virtio-fs container, refer to DOCA SNAP Virtio-fs Container Deployment.
2. DOCA SNAP Virtio-fs Deployment
This section describes how to deploy DOCA SNAP Virtio-fs as a container.
DOCA SNAP Virtio-fs does not come pre-installed with the BFB bundle.
The default virtio-blk emulation provider is set to DPU. In this mode, SNAP Virtio-fs and SNAP Virtio-blk can operate simultaneously only if they are assigned to different DPA execution units (EUs).
This separation is achieved by setting the environment variable dpu_helper_core_mask=0x1fffe, which is configured in the set_environment_variables.sh script included in the SNAP Virtio-fs package.
2.1. Installing Full DOCA Image on BlueField
To install the BFB on BlueField:
[host] sudo bfb-install --rshim <rshimN> --bfb <image_path.bfb>
For more information, refer to "Installing Full DOCA Image on DPU" in the NVIDIA DOCA Installation Guide for Linux.
2.2. Firmware Installation
[dpu] sudo /opt/mellanox/mlnx-fw-updater/mlnx_fw_updater.pl --force-fw-update
For more information, refer to "Upgrading Firmware" in the NVIDIA DOCA Installation Guide for Linux.
2.3. Firmware Configuration
Firmware configuration may expose new emulated PCIe functions, which can be later used by the host's OS. As such, the user must make sure all exposed PCIe functions (static/hotplug) are backed by a supporting virtio-fs software configuration. Otherwise, these functions would malfunction and host behavior would be anomalous.
-
Clear the firmware configuration before implementing the required configuration:
[dpu] mst start [dpu] mlxconfig -d /dev/mst/mt41692_pciconf0 reset -
Verify the firmware configuration:
[dpu] mlxconfig -d /dev/mst/mt41692_pciconf0 queryOutput example:
mlxconfig -d /dev/mst/mt41692_pciconf0 -e query | grep VIRTIO_FS
Configurations:                                      Default              Current              Next Boot
*        VIRTIO_FS_EMULATION_ENABLE                  False(0)             True(1)              True(1)
         VIRTIO_FS_EMULATION_NUM_VF                  0                    0                    0
*        VIRTIO_FS_EMULATION_NUM_PF                  0                    2                    2
         VIRTIO_FS_EMU_SUBSYSTEM_VENDOR_ID           6900                 6900                 6900
         VIRTIO_FS_EMULATION_SUBSYSTEM_ID            4186                 4186                 4186
*        VIRTIO_FS_EMULATION_NUM_MSIX                2                    3                    3
The output provides 5 columns (listed from left to right):
-
Non-default configuration marker (
*) -
Firmware configuration name
-
Default firmware value
-
Current firmware value
-
Firmware value after reboot – shows configuration update pending system reboot
-
-
To enable storage emulation options, BlueField must be set to work in internal CPU model:
[dpu] mlxconfig -d /dev/mst/mt41692_pciconf0 s INTERNAL_CPU_MODEL=1 PF_BAR2_ENABLE=0
PF_BAR2_ENABLEis a deprecated option and must be explicitly disabled. -
To enable the firmware config with virtio-fs emulation PF:
[dpu] mlxconfig -d /dev/mst/mt41692_pciconf0 s VIRTIO_FS_EMULATION_ENABLE=1 VIRTIO_FS_EMULATION_NUM_PF=1 VIRTIO_FS_EMULATION_NUM_MSIX=3
For a complete list of the DOCA SNAP Virtio-fs firmware configuration options, refer to "Appendix – BlueField Firmware Configuration".
Power cycle is required to apply firmware configuration changes.
2.3.1. RDMA/RoCE Firmware Configuration
RoCE communication is blocked for the default interfaces of BlueField OS's (named ECPFs), mlx5_0 and mlx5_1 typically. If RoCE traffic is required, scalable functions (or SFs) must be added which are network functions which support RoCE transport.
To enable RDMA/RoCE:
[dpu] mlxconfig -d /dev/mst/mt41692_pciconf0 s PER_PF_NUM_SF=1
[dpu] mlxconfig -d /dev/mst/mt41692_pciconf0 s PF_SF_BAR_SIZE=8 PF_TOTAL_SF=2
[dpu] mlxconfig -d /dev/mst/mt41692_pciconf0.1 s PF_SF_BAR_SIZE=8 PF_TOTAL_SF=2
This is not required when working over TCP or RDMA over InfiniBand.
When using 64KB page size OS on BlueField, replace PF_SF_BAR_SIZE=8 with PF_SF_BAR_SIZE=10 BAR_PAGE_ALIGNMENT=2.
2.3.2. SR-IOV Firmware Configuration
DOCA SNAP Virtio-fs supports a maximum of 128 total VFs across the system. These VFs can be distributed across up to 4 virtio-fs PFs.
2.3.2.1. Standard SR-IOV Configuration
Use the following command to enable SR-IOV and set the standard link types and scalable functions:
[dpu] mlxconfig -d /dev/mst/mt41692_pciconf0 s SRIOV_EN=1 PER_PF_NUM_SF=1 LINK_TYPE_P1=2 LINK_TYPE_P2=2 PF_TOTAL_SF=1 PF_SF_BAR_SIZE=8
2.3.2.2. Large-Scale Configuration (250 VFs)
Common example:
[dpu] mlxconfig -d /dev/mst/mt41692_pciconf0 s SRIOV_EN=1 PER_PF_NUM_SF=1 LINK_TYPE_P1=2 LINK_TYPE_P2=2 PF_TOTAL_SF=1 PF_SF_BAR_SIZE=8
The following example configures a total of 128 VFs (64 VFs per PF across 2 PFs) with 2 queues allocated per VF:
[dpu] mlxconfig -d /dev/mst/mt41692_pciconf0 s VIRTIO_FS_EMULATION_ENABLE=1 VIRTIO_FS_EMULATION_NUM_VF=64 VIRTIO_FS_EMULATION_NUM_PF=2 VIRTIO_FS_EMULATION_NUM_MSIX=5 VIRTIO_FS_EMULATION_NUM_VF_MSIX=6
2.3.3. Hot-plug Firmware Configuration
When PCIe switch emulation is enabled, BlueField can support PCI_SWITCH_EMULATION_NUM_PORT-1 hotplug virtio-fs function. These PCIe functions are shared among all BlueField users and applications and may hold hot-plugged devices of type NVMe, virtio-blk, virtio-fs, and more (e.g., virtio-net).
To enable PCIe switch emulation and configure 31 hot-plugged ports to be used, run:
[dpu] mlxconfig -d /dev/mst/mt41692_pciconf0 s PCI_SWITCH_EMULATION_ENABLE=1 PCI_SWITCH_EMULATION_NUM_PORT=32
PCI_SWITCH_EMULATION_NUM_PORT equals 1 plus the number of hot-plugged PCIe functions.
On AMD machines, hotplug is not guaranteed to work and enabling PCI_SWITCH_EMULATION_ENABLE may impact SR-IOV capabilities.
2.4. DPA Core Mask
The Data Path Accelerator (DPA) is an auxiliary processor designed to offload and accelerate data-path operations. It consists of a cluster of 16 cores, each containing 16 Execution Units (EUs).
-
Total Capacity: 256 EUs (16 cores × 16 EUs)
-
SNAP Allocation: 170 EUs are specifically available to SNAP (which runs a DPA application to accelerate the
virtio-fsprotocol).
The YAML-Based DPA Execution Unit Management Tool is the default mechanism for controlling DPA EUs. For the standard setup, refer to the DPA Resource Management Default Configuration.
If other DPA applications (e.g., virtio-net) are running concurrently with SNAP, you must explicitly configure the DPA resource YAML file to allocate specific EUs to each application.
For more details, see Single Point of Resource Distribution.
2.4.1. DPA EU Reservation
SNAP supports reserving DPA EUs for virtio-fs controllers. By default, all available EUs (0–170) are shared among all DPA applications on the system, including virtio-fs and virtio-blk.
2.4.2. YAML-based DPA Resource Management
DPA EU allocation is managed via a YAML-based resource file. For more details, see the documentation on Single Point of Resource Distribution.
This method centralizes and enforces consistent EU allocation across applications.
Requirements:
-
Application name in the YAML file must match SNAP's DPA app:
-
doca_devemu_virtio_dpa_app→ forvirtio-fs
-
-
At least one EU must be allocated for the
virtio-fsDPA application. -
EU IDs must be in the range 1–170 (EU 0 is reserved).
-
EU allocations must not overlap between applications.
-
EU groups are not supported.
-
SNAP's DPA application must run on the ROOT partition. EUs allocated to other partitions are not available.
2.4.3. DPA Resource Management Default Configuration
2.4.3.1.1. Default YAML input format for SNAP
---
version: 25.04
---
DPA_APPS:
  doca_devemu_virtio_dpa_app:
    - partition: ROOT
      affinity_EUs: [17-169]
  dpa_helper:
    - partition: ROOT
      affinity_EUs: [1-16]
  dpa_virtq_split:
    - partition: ROOT
      affinity_EUs: [1-169]
  dpa_nvme:
    - partition: ROOT
      affinity_EUs: [1-169]
2.4.4. Usage Instructions
-
Generate the output YAML file using the
dpa-resource-mgmttool:dpa-resource-mgmt
Bashdpa-resource-mgmt config -d mlx5_0 -f ~/DPA_RESOURCE_INPUT.yaml -
Set the
DEVEMU_DPA_RESOURCES_FILE_PATHenvironment variable to point to the generated YAML filedpa-resource-mgmt
Bashexport DEVEMU_DPA_RESOURCES_FILE_PATH=~/ROOT.yaml
If running in a container, ensure the YAML file is exposed to the container (e.g., using a shared folder like
/etc/nvda_snap).
Notes:
-
Do not manually edit the YAML file generated by
dpa-resource-mgmt. -
Each DPA EU supports up to 128 queues (threads).
-
SNAP DPA applications only operate on the ROOT partition.
2.5. Virtio-fs DOCA Host Drive Installation (Optional)
The NVIDIA DOCA host package includes an optimized and extended version of the Virtio-fs driver; it provides better performance and additional features when compared to the upstream package.
-
Optimized performance using Virtio-fs multi-queue with a better locking design.
-
Support for a notification queue, allowing for a more accurate cached view of the filesystem by the host when remote changes happen.
-
Support for GPU Direct Storage, allowing for zero-copy transfers between storage devices and GPUs.
Virtio-fs DOCA host package supports FLR only with Ubuntu 25.04
DOCA Host optimized virtiofs module support starts at kernel version 6.6
2.5.1. Supported OS
Optimized virtio-fs driver support is available for:
-
Ubuntu 24.04
-
Ubuntu 25.04 (with FLR)
-
RHEL 10
-
CentOS 10 (same package as RHEL10)
-
OpenEuler 24.03
Debian does not support the optimized driver. Debian users have to fallback on the inbox drivers (no FLR, no notification queue).
2.5.2. Installation
To install DOCA host, install the following package:
-
Install the doca repo
[host] apt install doca-host_<version>-ubuntu2404_amd64.deb -
Update the package cache list:
[host] apt update -
Install NVIDIA virtio-fs:
[host] apt install virtiofs-dkms
Install OFED version 25.04-0.2.3.0 or later.
The virtio-fs DOCA host driver takes over your system version of the virtio-fs driver. It does not affect your system version of FUSE. Existing FUSE-based application should run unaffected.
2.5.3. Configuration
Once installed, configure your DPU to run a SNAP Virtio-fs service and reboot the host. The host system will be stuck during the boot process until the SNAP Virtio-fs service becomes available.
You can confirm you are running Virtio-fs DOCA Host driver by looking in your kernel log for mentions of it:
[host] dmesg | grep 'virtio-fs' virtio-fs: Loading NVIDIA-virtiofs +mq +lockless +nvq
You can now mount your Virtio-fs drive as usual:
[host] mount -t virtiofs <tagname> /mnt/virtiofs/
2.5.4. Advanced Configuration to Optimize Virtiofs Performance
Beginning with package virtiofs-dkms version 25.07-OFED.25.07.0.2.3.1, the sysfs file used to display CPU mappings has become writable. This means user can now manually assign CPUs to queues to adjust the default mapping.
Additionally, a new file called irq_affinity is now available under procfs for each queue. This file allows the user to specify one or more CPUs to direct that queue’s interrupts accordingly. Note that user can only write to this file; to verify its impact, the user will need to manually check the system’s interrupts.
These features allow users to experiment with and optimize CPU-to-queue mappings.
Example usage:
Assign CPUs 4, 5, and 6 to queue 4 (removing them from any previous assignment)
[host] echo 4,5,6 > /sys/fs/virtiofs/5/mqs/4/cpu_list
Direct queue 4’s interrupts to CPUs 4, 5, and 6
[host] echo 4,5,6 > /sys/fs/virtiofs/5/mqs/4/irq_affinity
2.5.5. Uninstallation
If you wish to remove the Virtio-fs DOCA Host driver, you can do so with the following command. It will also remove packages automatically installed as dependencies:
[host] apt purge --autoremove virtiofs-dkms
2.6. DOCA SNAP Virtio-fs Container Deployment
DOCA SNAP Virtio-fs container is available on the DOCA SNAP Virtio-fs NVIDIA NGC page.
To deploy DOCA SNAP Virtio-fs container on top of BlueField, the following procedure is required:
-
Setup preparation and DOCA SNAP Virtio-fs resource download for container deployment. See section "Preparation Steps" for details.
-
Adjust the
doca_vfs.yamlfor advanced configuration if needed according to section "Adjusting YAML Configuration". -
Deploy the container. The image is automatically pulled from NGC. See section "Spawning DOCA SNAP Virtio-fs Container" for details.
2.6.1. Preparation Steps
2.6.1.1. Step 1: Allocate Hugepages
Allocate 8GiB hugepages for the DOCA SNAP Virtio-fs container according to the DPU OS's Hugepagesize value:
-
Query the
Hugepagesizevalue:[dpu] grep Hugepagesize /proc/meminfoIn Ubuntu22 and Ubuntu24, the value should be 2048KB. In Ubuntu24 with 64k page size, the value should be 524288KB.
-
For OS with 2048KB hugepage, use the
doca-hugepagestool to configure the requested hugepages:[dpu] doca-hugepages config --app snap --size 2048 --num 4096 -
For OS with 524288KB hugepage, use the
doca-hugepagestool to configure the requested hugepages:[dpu] doca-hugepages config --app snap --size 524288 --num 16 -
Reload the hugepages configuration for all applications based on the current database settings:
[dpu] doca-hugepages reload
If other applications are running concurrently within the setup and are consuming hugepages, make sure to allocate a quantity of hugepages appropriate to accommodate all applications.
2.6.1.2. Step 2: Create /etc/virtiofs Folder
The folder /etc/virtiofs is used by the container for automatic configuration after deployment.
The default YAML configuration only mounts the /etc/virtiofs folder for exposure and sharing between the container and the BlueField. This folder is used to expose configuration files or local file backends (e.g., AIO fsdev) from the DPU to the container.
2.6.2. Downloading YAML from NGC
The .yaml configuration file for the DOCA SNAP Virtio-fs container, doca_vfs.yaml, is uploaded to DOCA NGC.
Internet connectivity is necessary to download DOCA SNAP Virtio-fs resources.
2.6.3. Adjusting YAML Configuration
The .yaml file can easily be edited for advanced configuration.
-
The DOCA SNAP Virtio-fs
.yamlfile is configured by default to support Ubuntu setups (i.e.,Hugepagesize= 2048 kB) by using hugepages-2Mi.To support other setups, edit the hugepages section according to the relevant
Hugepagesizevalue for the BlueField OS. For example, to support CentOS 8.x or configureHugepagesizeto 512MB:limits: hugepages-512Mi: "<number-of-hugepages>Gi" -
The following example edits the
.yamlfile to request 6G memory for the DOCA SNAP Virtio-fs container:resources: requests: memory: "6Gi" limits: memory: "6Gi"On Ubuntu 24.04, DOCA SNAP Virtio-fs with a high number of queues requires more memory than the default configuration provides.
-
The following example edits the
.yamlfile to request 8 CPU cores for the DOCA SNAP Virtio-fs container:resources: cpu: "8" limits: cpu: "8" env: - name: APP_ARGS value: "-m 0xff"If all BlueField-3 cores are requested, the user must verify no other containers are in conflict over CPU resources.
-
To automatically configure the DOCA SNAP Virtio-fs container upon deployment:
-
Add the
spdk_rpc_init.conffile under/etc/virtiofs/. File example:fsdev_ aio0 /etc/virtiofs/test virtio_fs_transport_create -t DOCA virtio_fs_transport_start -t DOCA virtio_fs_device_create --transport-name DOCA --dev-name vfsdev0 --tag docatag --fsdev aio0 --num-request-queues 1 --queue-size 32 --driver-platform x86_64 virtio_fs_doca_device_modify --dev-name vfsdev0 --manager mlx5_0 --vuid "MT2251XZ02WZVFSS0D0F3" virtio_fs_device_start --dev-name vfsdev0 -
Edit the
.yamlfile accordingly (uncomment):env: - name: SPDK_RPC_INIT_CONF value: "/etc/virtiofs/spdk_rpc_init.conf"It is user responsibility to make sure DOCA SNAP Virtio-fs configuration matches firmware configuration. That is, an emulated controller must be opened on all existing (static/hotplug) emulated PCIe functions (either through automatic or manual configuration). A PCIe function without a supporting controller is considered malfunctioned, and host behavior with it is anomalous.
-
2.6.4. Spawning DOCA SNAP Virtio-fs Container
Run the Kubernetes tool:
[dpu] systemctl restart containerd
[dpu] systemctl restart kubelet
[dpu] systemctl enable kubelet
[dpu] systemctl enable containerd
Copy the updated doca_vfs.yaml file to the /etc/kubelet.d directory.
Kubelet automatically pulls the container image from NGC described in the YAML file and spawns a pod executing the container.
cp doca_vfs.yaml /etc/kubelet.d/
The DOCA SNAP Virtio-fs Service starts initialization immediately, which may take a few seconds.
To verify whether DOCA SNAP Virtio-fs is running, send spdk_rpc.py spdk_get_version to confirm whether DOCA SNAP Virtio-fs is operational or still initializing.
2.6.5. Debug and Log
View currently active pods, and their IDs (it might take up to 20 seconds for the pod to start):
crictl pods
Example output:
POD ID              CREATED               STATE         NAME
0379ac2c4f34c       About a minute ago    Ready         virtiofs
View currently active containers, and their IDs:
crictl ps
View existing containers and their ID:
crictl ps -a
Examine the logs of a given container (virtio-fs logs):
crictl logs <container_id>
Examine the kubelet logs if something does not work as expected:
journalctl -u kubelet
The container log file is saved automatically by Kubelet under /var/log/containers.
2.6.6. Stop, Start, Restart DOCA SNAP Virtio-fs Container
-
To stop the container, remove the
.yamlfile form/etc/kubelet.d/. -
To start the container, copy the
.yamlfile to the same path:cp doca_vfs.yaml /etc/kubelet.d -
To restart the container (with sig-term), use the
-t(timeout) option:crictl stop -t 10 <container-id> -
To restart the SNAP service without restarting the entire container, the user can either use the
supervictltool or manually terminate the SNAP service process on the DPU. Different termination signals trigger different behaviors. For example, usingpkillwith the-9option sends aSIGKILL, which forcefully stops the process:pkill -9 -f virtiofs
After containers in a pod exit, the Kubelet restarts them using an exponential back-off strategy (e.g., 10s, 20s, 40s), with the delay capped at five minutes. If a container runs successfully for 10 minutes, the Kubelet resets the restart back-off timer for that container.
The termination of the virtiofs service may take time, as it must release all allocated resources. The duration depends on the scale of the use case and whether other applications are sharing resources with SNAP. Kubelt may display errors if the container termination timeout is shorter than the actual time required for cleanup.
2.8. DOCA SNAP Virtio-fs with SNAP Support
The DOCA SNAP virtio-fs container, along with its associated packages, natively supports DOCA SNAP-4, which is implemented as an SPDK subsystem module. This design enables the concurrent operation of both virtio-fs, virtio-blk and NVMe as a unified service. Additionally, DOCA SNAP is integrated as part of the DOCA SNAP virtio-fs deployment.
DOCA SNAP deployment sets snap, snap_nvme, and snap_vblk as SPDK subsystems which can be disabled as needed.
Refer to DOCA SNAP-4 Service Guide documentation for more information.
DOCA SNAP RPCs can be used as an SPDK plugin, the recommended method for running RPCs with the SPDK RPC script. Users may need to set the PYTHONPATH environment variable to include the path to snap_rpc.py.
This command creates a Virtio block controller using the DOCA SNAP RPC plugin, specifying --pf_id 0 and using Null0 as the block device:
spdk_rpc.py --plugin snap_rpc virtio_blk_controller_create --pf_id 0 --bdev Null0
For further details on using RPC plugins, refer to the SPDK official documentation.
3. RPC Commands
Like other standard SPDK applications, the remote procedure call (RPC) protocol is used to control the DOCA SNAP Virtio-fs Service and supports JSON-based RPC protocol commands to control any resources and create, delete, query, or modify commands easily from the CLI.
DOCA SNAP Virtio-fs supports all standard SPDK RPC commands in addition to an extended DOCA SNAP Virtio-fs command set. Standard SPDK commands are executed by the spdk_rpc.py tool.
Virtio-fs-specific command set is implemented as a separate RPC plugin. When working with container, this RPC plugin is loaded automatically on spdk_rpc.py execution. When working with sources, users must explicitly load the plugin by adding the --plugin rpc_virtio_fs_tgt flag to the SPDK's spdk_rpc.py command.
The following is an example of an RPC when using DOCA SNAP Virtio-fs from the source:
/opt/nvidia/spdk-subsystem/src/spdk/install-$(hostname)/bin/spdk_rpc.py --plugin rpc_virtio_fs_tgt --help
You may need to define the path to the folder with rpc_virtio_fs_tgt.py using the PYTHONPATH environment variable. It is normally located in the root of virtio-fs sources folder. More details on the RPC plugins can be found in SPDK's official documentation.
Full spdk_rpc.py command set documentation can be found in the SPDK official documentation site.
DOCA SNAP Virtio-fs extended commands are detailed in the following subsections.
3.1. Using JSON-based RPC Protocol
The JSON-based RPC protocol can be used with the spdk_rpc.py script inside the DOCA SNAP Virtio-fs container and crictl tool.
The DOCA SNAP Virtio-fs container is CRI-compatible.
-
To query the active container ID:
crictl ps -s running -q --name virtiofs -
To post RPCs to the container using
crictl:crictl exec <container-id> spdk_rpc.py -v <RPC-method>The flag
-vcontrols verbosity. For example:crictl exec 0379ac2c4f34c spdk_rpc.py -v virtio_fs_doca_get_functionsAlternatively, an alias can be used:
crictl exec -it $(crictl ps -s running -q --name virtiofs) spdk_rpc.py -v virtio_fs_doca_get_functions -
To open a bash shell to the container that can be used to post RPCs:
crictl exec -it <container-id> bash
3.2. PCIe Function Management
Emulated PCIe functions are managed through DOCA devices called emulation managers. Emulation managers have special privileges to control, manipulate, and expose the emulated PCIe devices towards the host PCIe subsystem.
To operate a virtio-fs device/function by the DOCA transport, it is necessary to locate the appropriate emulation manager for it. The emulation manager maintains a list of the emulated PCIe functions it controls. Each of those functions is assigned a globally unique serial called a vendor unique identifier or VUID (e.g., MT2251XZ02WZVFSS0D0F2), which serves as unambiguous reference for identification and tracking purposes.
3.2.1. virtio_fs_doca_get_managers
List existing emulation managers for virtio-fs. This method has no input parameters.
Example response:
{
  "jsonrpc": "2.0",
  "id": 1,
  "result": [
    {
      "name": "mlx5_0"
    }
  ]
}
3.2.2. virtio_fs_doca_get_functions
List functions for virtio-fs with their characteristics. The user may specify no parameters to list all emulated virtio-fs functions managed by any emulation manager device, or specify an emulation manager device name to list virtio-fs functions managed by that emulation manager device.
Example response:
{
  "jsonrpc": "2.0",
  "id": 1,
  "result": [
    {
      "manager": "mlx5_0",
      "Function List": [
      {
        "hot pluggable": "false",
        "pci_address": "0000:86:00.2",
        "vuid": "MT2306XZ00A7VFSS0D0F2",
        "function_type": "PF",
        "total_vfs": 2
      },
      {
        "hot pluggable": "false",
        "pci_address": "0000:86:04.5",
        "vuid": "MT2306XZ00A7VFSS0D0F2VF1",
        "function_type": "VF",
        "pf_vuid": "MT2306XZ00A7VFSS0D0F2"
      },
      {
        "hot pluggable": "false",
        "pci_address": "0000:86:04.6",
        "vuid": "MT2306XZ00A7VFSS0D0F2VF2",
        "function_type": "VF",
        "pf_vuid": "MT2306XZ00A7VFSS0D0F2"
      }
      ]
    }
  ]
}
|
Parameter Name |
Optional/Mandatory |
Type |
Description |
|---|---|---|---|
|
|
Optional |
String |
Emulation manager device name to list emulated virtio-fs functions specific to it |
3.2.3. virtio_fs_doca_get_possible_managers
List possible emulation managers for virtio-fs. This method has no input parameters.
Example response:
{
  "jsonrpc": "2.0",
  "id": 1,
  "result": [
    {
      "name": "mlx5_0",
    }
  ]
}
3.2.4. virtio_fs_doca_manager_create
Create a virtio-fs emulation manager.
|
Parameter Name |
Optional/Mandatory |
Type |
Description |
|---|---|---|---|
|
|
Mandatory |
String |
Emulation manager device name |
3.2.5. virtio_fs_doca_manager_destroy
Destroy a virtio-fs emulation manager.
|
Parameter Name |
Optional/Mandatory |
Type |
Description |
|---|---|---|---|
|
|
Mandatory |
String |
Emulation manager device name |
The RPC may take a long time to complete or even timeout when many queues (>1000) are created.
3.3. Hot-pluggable PCIe Functions Management
Hotplug PCIe functions are configured dynamically at runtime using RPCs.
The commands outlined in the following subsections hot plug a new PCIe function to the system.
3.3.1. virtio_fs_doca_get_functions
List DOCA transport functions for virtio-fs with their characteristics.
Users may specify no parameters to list all emulated virtio-fs functions managed by any emulation manager device, or an emulation manager device name to list virtio-fs functions managed by a specific emulation manager device.
|
Parameter Name |
Optional/Mandatory |
Type |
Description |
|---|---|---|---|
|
|
Mandatory |
String |
Emulation manager device name for creating a new Virtio FS function |
3.3.2. virtio_fs_doca_function_create
Create a DOCA virtio FS function. The return value of this method is a VUID. This is not needed for static functions as the VUID can be retrieved from virtio_fs_doca_get_functions.
|
Parameter Name |
Optional/Mandatory |
Type |
Description |
|---|---|---|---|
|
|
Mandatory |
String |
Emulation manager device name for creating a new virtio-fs function |
3.3.3. virtio_fs_doca_function_destroy
Destroy a DOCA SNAP Virtio-fs function.
This function should not be associated to any virtio-fs device.
|
Parameter Name |
Optional/Mandatory |
Type |
Description |
|---|---|---|---|
|
|
Mandatory |
String |
Emulation manager device name for destroying a virtio-fs function |
|
|
Mandatory |
String |
VUID of the function to destroy |
3.3.4. virtio_fs_doca_device_hotplug
Hot plug a DOCA SNAP Virtio-fs device. The virtio-fs device must be started.
|
Parameter Name |
Optional/Mandatory |
Type |
Description |
|---|---|---|---|
|
|
Mandatory |
String |
Virtio-fs device name to hot plug |
|
|
Optional |
Flag |
If used, the method waits until the device is visible by the host PCIe subsystem. Otherwise, only issue hot-plug operation and exit. |
3.3.5. virtio_fs_doca_device_hotunplug
Hot unplug a DOCA virtio FS device. The virtio FS device must be started.
|
Parameter Name |
Optional/Mandatory |
Type |
Description |
|---|---|---|---|
|
|
Mandatory |
String |
Virtio-fs device name to hot unplug |
|
|
Optional |
Flag |
If exists, the method waits until the device is non-visible by the host PCIe subsystem. Otherwise, only issue hot-unplug operation and exit. |
3.5. SPDK Fsdev Management
DOCA SNAP Virtio-fs uses the SPDK file system (fsdev) device framework as a backend for its virtio-fs controllers. Therefore, an SPDK fsdev must created and configured in advance.
Although the SPDK fsdev framework is generic and allows different types of the backend file system devices to be implemented. Currently, the only available backend devices are AIO and NFS.
3.5.1. fsdev_get_fsdevs
Get information about the SPDK filesystem devices (fsdevs). The user may specify no parameters to list all filesystem devices, or a filesystem device may be specified by name.
|
Parameter Name |
Optional/Mandatory |
Type |
Description |
|---|---|---|---|
|
|
Optional |
string |
Name of the fsdev of interest |
3.5.2. fsdev_get_iostat
Get I/O statistics of filesystem devices (fsdevs).
|
Parameter Name |
Optional/Mandatory |
Type |
Description |
|---|---|---|---|
|
|
Optional |
string |
Fsdev name |
|
|
Optional |
bool |
Display per channel data. |
If name is not specified, the RPC shows stats for all filesystem devices. If per_channel is not specified, the RPC shows the cumulative per-fsdev stat.
3.5.3. fsdev_reset_iostat
Reset I/O statistics of filesystem devices (fsdevs).
|
Parameter Name |
Optional/Mandatory |
Type |
Description |
|---|---|---|---|
|
|
Optional |
string |
Fsdev name |
If name is not specified, the RPC resets the stats for all filesystem devices.
3.5.4. fsdev_aio_set_options
Set SPDK AIO fsdev module options. This method can be executed only in SPDK STARTUP state, i.e. it requires the service to be started with --wait-for-rpc CLI parameter.
|
Parameter Name |
Optional/Mandatory |
Type |
Description |
|---|---|---|---|
|
|
Optional |
int |
Maximum I/O depth per channel (Default: 256) |
|
|
Optional |
Flag |
|
max_io_depth maximum is dictated by the Linux kernel's /proc/sys/fs/aio-max-nr parameter. Setting this value higher than the default typically has little if any performance impact.
3.5.5. fsdev_aio_create
Create an SPDK AIO fsdev. This is the file system device that provides passthrough access to a local folder using either the Linux-native async I/O or POSIX async I/O. It can also use Linux io_uring APIs for read and write operations. IO uring is disabled by default and can be enabled with fsdev_aio_set_options RPC.
AIO fsdev IO uring implementation requires a compatible kernel version and is only supported with Ubuntu 24.04 and above.
|
Parameter Name |
Optional/Mandatory |
Type |
Default |
Description |
|---|---|---|---|---|
|
|
Mandatory |
string |
|
Name of the AIO fsdev to create |
|
|
Mandatory |
string |
|
Path on the system directory to be exposed as an SPDK filesystem |
|
|
Optional |
bool |
|
Enable extended attributes if set to |
|
|
Optional |
bool |
|
Enable the writeback cache if set to |
|
|
Optional |
int |
|
Max data transfer size in bytes (minimum 4KB, maximum 128KB) |
|
|
Optional |
int |
|
Max readahead size in bytes (minimum 4KB, maximum 128KB) |
|
|
Optional |
bool |
|
Enable skipping read/write IOs if set to For debug purposes only. |
|
|
Optional |
bool |
|
Enable notifications if set to
|
|
|
Optional |
int |
|
File attribute validity time in milliseconds. Used for entry cache. A value of |
AIO fsdev does not support recovery.
When using an aio fsdev backed by a Linux kernel NFS mount, certain file operations may result in 'silly-renamed' files (prefixed with .nfs) that are not automatically removed. These files can only be cleared by dropping caches on the host: echo 3 > /proc/sys/vm/drop_caches.
aio fsdevs currently do not support NFS kernel mounts with NFS targets that have root_squash enabled. It is recommended to use the native nfs fsdev instead.
3.5.6. fsdev_aio_delete
Delete an AIO fsdev.
|
Parameter Name |
Optional/Mandatory |
Type |
Description |
|---|---|---|---|
|
|
Mandatory |
string |
Name of the AIO fsdev to delete |
3.5.7. fsdev_nfs_set_options
Set SPDK NFS fsdev module options. This method can be executed only in SPDK STARTUP state (i.e., it requires the service to be started with --wait-for-rpc CLI parameter).
|
Parameter Name |
Optional/Mandatory |
Type |
Description |
|---|---|---|---|
|
|
Optional |
int |
Minimum source TCP port number |
|
|
Optional |
int |
Maximum source TCP port number |
|
|
Optional |
int |
Maximum number of file objects allowed across all NFS fsdevs (default: 40M, maximum: 40M) |
TCP Source Port Configuration
Defining the minimum and maximum source TCP port numbers is important depending on your specific NFS target:
-
Required: If the NFS target strictly accepts TCP connections from reserved privileged ports (0-1023). Keep in mind that MOUNT connections always use TCP, even when operating over NFS RDMA.
-
Recommended: For NFS TCP targets that require replayed requests to originate from the exact same TCP source port during recovery scenarios.
3.5.8. fsdev_nfs_create
Create an SPDK NFS fsdev:
|
Parameter Name |
Optional/Mandatory |
Type |
Description |
|---|---|---|---|
|
|
Mandatory |
string |
Name of the NFS fsdev to create |
|
|
Mandatory |
string |
NFS server's IP |
|
|
Mandatory |
string |
NFS export's name |
|
|
Optional |
int |
Use this port for NFS instead of using the portmapper |
|
|
Optional |
string |
|
|
|
Optional |
int |
Maximum number of file objects (default: 100K) |
Only NFSv3 is supported.
NFS Target Port Configuration
To establish a successful connection, the NFS fsdev requires one of the following two port configurations:
-
Allow non-privileged ports (target-side) – The NFS server must be configured to accept connections from non-privileged TCP ports. On Linux kernel NFS targets, you can enable this by adding the
insecureflag to your export options. -
Enforce privileged ports (client-side) – You can configure the
fsdevitself to use privileged local ports. To enforce this, specify the exact port range using themin-srcportandmax-srcportparameters within thefsdev_nfs_set_optionsRPC.
FUSE Notifications and File Object Limits
To actively manage capacity, NFS fsdev uses FUSE notifications. Whenever the size of the file object map exceeds 80% of the defined max_fobjects limit, these notifications automatically trigger the host to "forget" (evict) older file objects.
Maximum NFS fsdev Capacity
The system supports a maximum of 34 NFS fsdev instances. Keep in mind that reaching this maximum concurrently depends heavily on your underlying storage performance; you may need to distribute these instances across multiple NFS servers to avoid bottlenecks.
Connection Timeouts with NFS RDMA at Scale
When operating at higher scales (e.g., attaching multiple hotplug PFs or VFs), the Linux Kernel NFS RDMA server may establish incoming connections slowly, which can result in timeouts. To prevent this, add a staggered delay between mounting different hotplug PFs on the host. A 5-second delay is typically sufficient, though you may need to adjust this depending on your specific NFS server's performance and load.
Device Recovery Time
Recovery of 10 virtio-fs/NFS fsdev devices can take up to 20 seconds, with additional devices further increasing recovery time.
Number of File Objects
The total number of file objects across all NFS fsdevs cannot exceed the maximum amount specified in fsdev_nfs_set_options RPC.
3.5.9. fsdev_nfs_delete
Delete an NFS fsdev.
|
Parameter Name |
Optional/Mandatory |
Type |
Description |
|---|---|---|---|
|
|
Mandatory |
string |
Name of the NFS fsdev to delete |
3.6. Virtio-fs Emulation Management
Virtio-fs emulation is a protocol belonging to the virtio family of devices. These mount points are found in virtual environments yet by design look like physical mount points to the user within the virtual machine. Each virtio-fs mount point (e.g., virtio-fs PCIe entry) exposed to the host, whether it is PF or VF, must be backed by a virtio-fs controller.
Probing a virtio-fs driver on the host without an already functioning virtio-fs controller may cause the host to hang until such controller is opened successfully (no timeout mechanism exists).
3.6.1. virtio_fs_transport_create
Create a virtio-fs transport. This RPC includes all the common parameters/options for all transports. The transport becomes operational once it is started.
|
Parameter Name |
Optional/Mandatory |
Type |
Description |
|---|---|---|---|
|
|
Mandatory |
String |
Transport type name. For DOCA SNAP Virtio-fs, |
3.6.2. virtio_fs_transport_destroy
Destroy a virtio-fs transport.
The transport must be stopped for destruction.
|
Parameter Name |
Optional/Mandatory |
Type |
Description |
|---|---|---|---|
|
|
Mandatory |
String |
Transport type name. For DOCA SNAP Virtio-fs, |
3.6.3. virtio_fs_transport_start
Start a virtio-fs transport. This RPC finalizes the transport configuration. From this point, the transport is fully operational and can be used to create new devices.
|
Parameter Name |
Optional/Mandatory |
Type |
Description |
|---|---|---|---|
|
|
Mandatory |
String |
Transport type name. For DOCA SNAP Virtio-fs, |
3.6.4. virtio_fs_transport_stop
Stop a virtio-fs transport. This RPC makes the transport configurable again.
A transport cannot be stopped if any devices are associated to it.
|
Parameter Name |
Optional/Mandatory |
Type |
Description |
|---|---|---|---|
|
|
Mandatory |
String |
Transport type name. For DOCA SNAP Virtio-fs, |
3.6.5. virtio_fs_get_transports
Display virtio-fs transports or requested transport.
|
Parameter Name |
Optional/Mandatory |
Type |
Description |
|---|---|---|---|
|
|
Optional |
String |
Transport type name. For DOCA SNAP Virtio-fs, |
3.6.6. virtio_fs_device_create
Create a virtio-fs device. This RPC creates a device with common parameters which are acceptable to all the transport types. To configure transport-specific parameters, users should use the virtio_fs_doca_device_modify command. The device becomes operational once it is started.
|
Parameter Name |
Optional/Mandatory |
Type |
Description |
|---|---|---|---|
|
|
Mandatory |
String |
Transport type name. For DOCA SNAP Virtio-fs, |
|
|
Mandatory |
String |
Virtio-fs device name to use |
|
|
Optional |
String |
Virtio-fs tag according to the virtio specification. Must be provided during the |
|
|
Optional |
Number |
Virtio-fs |
|
|
Optional |
Number |
The maximal queue size for all virtio queues (default 64; range 8-256) The maximum supported I/O size is influenced by the For example, a 128KB I/O request requires 32 descriptors (one per 4KB block). If |
|
|
Optional |
String |
The name of the SPDK filesystem backend device Must be provided during the RPC does not verify if fsdev is valid. If a wrong fsdev is attached to the device, the user would experience failure during mount of the FS on the host. |
|
|
Optional |
Bool |
Expose packed virtqueues feature to the driver for negotiation. |
|
|
Optional |
String |
Set the driver's platform architecture. Possible values: Using the |
|
|
Optional |
Bool |
Expose notification virtqueue feature to the driver for negotiation |
3.6.7. virtio_fs_device_start
Start a virtio-fs device. This RPC finalizes the device configuration. From this point, the transport is fully operational.
|
Parameter Name |
Optional/Mandatory |
Type |
Description |
|---|---|---|---|
|
|
Mandatory |
String |
Virtio-fs device name |
3.6.8. virtio_fs_device_stop
Stop a virtio-fs device.
|
Parameter Name |
Optional/Mandatory |
Type |
Description |
|---|---|---|---|
|
|
Mandatory |
String |
Virtio-fs device name |
The RPCs virtio_fs_device_stop and virtio_fs_device_start are supported during traffic. The user can stop the device while traffic is ongoing using virtio_fs_device_stop, then restart it using virtio_fs_device_start, and the device would continue handling I/O without any errors.
If the RPC returns an ETIMEDOUT (-110) error, the user is expected to retry the RPC.
3.6.9. virtio_fs_device_destroy
Destroy a virtio-fs device.
The device must be stopped before destruction.
|
Parameter Name |
Optional/Mandatory |
Type |
Description |
|---|---|---|---|
|
|
Mandatory |
String |
Virtio-fs device name |
3.6.10. virtio_fs_device_modify
Modify a virtio-fs device. This RPC is used to modify/set common properties of the device which are acceptable to all the transports.
|
Parameter Name |
Optional/Mandatory |
Type |
Description |
|---|---|---|---|
|
|
Mandatory |
String |
Virtio-fs device name to use |
|
|
Optional |
String |
Virtio-fs tag according to the virtio specification Must be provided during |
|
|
Optional |
Number |
Virtio-fs |
|
|
Optional |
Number |
The maximal queue size for all virtio queues (default 64; range 8-256) |
|
|
Optional |
String |
The name of the SPDK filesystem backend device Must be provided during RPC does not verify if fsdev is valid. If a wrong fsdev is attached to the device, the user would experience failure during mount of the FS on the host. |
|
|
Optional |
Bool |
Expose packed virtqueues feature to the driver for negotiation |
|
|
Optional |
String |
Set the driver's platform architecture. Possible values: Using the |
3.6.11. virtio_fs_get_devices
Display virtio-fs devices with their characteristics.
-
The user may specify no parameters to list the virtio-fs devices associated with all transports
-
The user may specify the name of a transport to list the virtio-fs devices associated with it
-
The user may specify the name of a virtio-fs device to display its characteristics
Transport name and device name parameters should be mutually exclusive.
Example response:
[
  {
    "name": "vfsdev0",
    "transport_name": "DOCA",
    "state": "running",
    "fsdev": "aio0",
    "tag": "doca_pf0",
    "queue_size": 256,
    "num_request_queues": 8,
    "packed_ring": false,
    "notification_vq": false,
    "manager": "mlx5_0",
    "vuid": "MT2306XZ00A7VFSS0D0F2",
    "num_msix": 0,
    "total_vfs": 128,
    "num_vfs": 2,
    "free_msix": 12,
    "free_queues": 138
  },
  {
    "name": "vfsdev0vf0",
    "transport_name": "DOCA",
    "state": "running",
    "fsdev": "aio1",
    "tag": "doca_pf0_vf0",
    "queue_size": 256,
    "num_request_queues": 1,
    "packed_ring": false,
    "notification_vq": false,
    "manager": "mlx5_0",
    "vuid": "MT2306XZ00A7VFSS0D0F2VF1",
    "num_msix": 2
  },
  {
    "name": "vfsdev0vf1",
    "transport_name": "DOCA",
    "state": "running",
    "fsdev": "aio2",
    "tag": "doca_pf0_vf1",
    "queue_size": 256,
    "num_request_queues": 1,
    "packed_ring": false,
    "notification_vq": false,
    "manager": "mlx5_0",
    "vuid": "MT2306XZ00A7VFSS0D0F2VF2",
    "num_msix": 2
  }]
|
Parameter Name |
Optional/Mandatory |
Type |
Description |
|---|---|---|---|
|
|
Optional |
String |
Name of transport whose associated virtio-fs devices to list |
|
|
Optional |
String |
Virtio-fs device name |
3.6.12. virtio_fs_doca_device_modify
Modify a virtio-fs device created from DOCA transport.
Validation of params is not done. If an invalid param is set, virtio_fs_device_start RPC fails.
This RPC is for configuring DOCA target specific parameters.
|
Parameter Name |
Optional/Mandatory |
Type |
Description |
|---|---|---|---|
|
|
Mandatory |
String |
Virtio-fs device name |
|
|
Optional (must be provided before start) |
String |
Emulation manager |
|
|
Optional (must be provided before start) |
String |
Vendor unique identifier |
|
|
Optional |
Number |
Total number of MSI-X vectors allocated for the device.
|
3.6.13. virtio_fs_doca_device_reset_dynamic_resources
Reset dynamic MSI-X and doorbell/queue resources assigned to VFs for a started SR-IOV PF.
The PF device must already be started.
This RPC is for configuring DOCA target specific parameters.
|
Parameter Name |
Optional/Mandatory |
Type |
Description |
|---|---|---|---|
|
|
Mandatory |
String |
Virtio-fs PF device name |
|
|
Optional |
Bool |
Skip reset of dynamic MSI-X resources |
|
|
Optional |
Bool |
Skip reset of queue resources |
|
|
Optional |
Number |
Total number of MSI-X vectors allocated for the device.
|
3.6.14. virtio_fs_device_get_stat
Displays stats for a specified virtio-fs device, or for all devices if none is specified.
|
Parameter Name |
Optional/Mandatory |
Type |
Description |
|---|---|---|---|
|
|
Optional |
String |
Virtio-fs device name The statistics of a virtio-fs device are valid only when the device is in "started" state. |
This RPC command cannot be executed in parallel. Only one instance of the command can run at a time.
Example response:
{
jsonrpc": "2.0",
  "id": 1,
  "result": {
	  "devices": [
		{
		  "name": "vfsdev0",
		  "fsdev": "aio0",
		  "state": "running",
		  "transport_name": "DOCA",
		  "transport_specific": {
			"queues": [
			  {
				"queue_id": 0,
				"queue_enabled": 1,
				"queue_depth": 256,
				"queue_inflights": 0,
				"hw_available_index": 8,
				"driver_available_index": 8,
				"hw_used_index": 8,
				"driver_used_index": 8
			  },
			  {
				"queue_id": 1,
				"queue_enabled": 1,
				"queue_depth": 256,
				"queue_inflights": 0,
				"hw_available_index": 104,
				"driver_available_index": 104,
				"hw_used_index": 104,
				"driver_used_index": 104
			  }
			]
		  }
		}
	  ]
	}
}
3.7. Configuration Example
3.7.1. Static Function – Bring up
The following is an example of creating virtio-fs DOCA transport and associating it to a virtio-fs device using a static physical function.
-
In BlueField:
-
Create an AIO fsdev backend:
spdk_rpc.py fsdev_aio_create aio0 /etc/virtiofs -
List possible emulation managers:
spdk_rpc.py --plugin rpc_virtio_fs_tgt -v virtio_fs_doca_get_possible_managers -
Create DOCA transport, emulation manager and start transport:
spdk_rpc.py --plugin rpc_virtio_fs_tgt -v virtio_fs_transport_create -t DOCA spdk_rpc.py --plugin rpc_virtio_fs_tgt -v virtio_fs_doca_manager_create -m mlx5_0 spdk_rpc.py --plugin rpc_virtio_fs_tgt -v virtio_fs_transport_start -t DOCA -
Get transport information:
spdk_rpc.py --plugin rpc_virtio_fs_tgt -v virtio_fs_get_transports -
Get managers information:
spdk_rpc.py --plugin rpc_virtio_fs_tgt -v virtio_fs_doca_get_managers -
Get function information, including their VUIDs:
spdk_rpc.py --plugin rpc_virtio_fs_tgt -v virtio_fs_doca_get_functions -
Create the virtio-fs device associated with DOCA transport:
spdk_rpc.py --plugin rpc_virtio_fs_tgt -v virtio_fs_device_create --transport-name DOCA --dev-name vfsdev0 --tag docatag --fsdev aio0 --num-request-queues 8 --queue-size 256 --driver-platform x86_64 -
Set and modify virtio-fs parameters (VUID must be provided before calling
virtio_fs_device_startRPC):spdk_rpc.py --plugin rpc_virtio_fs_tgt -v virtio_fs_doca_device_modify --dev-name vfsdev0 --manager mlx5_0 --vuid MT2333XZ0VJQVFSS0D0F2 -
Start the virtio-fs device:
spdk_rpc.py --plugin rpc_virtio_fs_tgt -v virtio_fs_device_start --dev-name vfsdev0 -
Get device information:
spdk_rpc.py --plugin rpc_virtio_fs_tgt -v virtio_fs_get_devices
-
-
In VM/host:
-
To mount a device with the tag
docatagand loadvirtio_pcidriver if not loaded:mkdir "/tmp/test" modprobe -v virtiofs mount -t virtiofs docatag /tmp/test
-
3.7.2. Static Function – Teardown
-
In BlueField:
-
Get device information:
spdk_rpc.py --plugin rpc_virtio_fs_tgt -v virtio_fs_get_devices -
Stop and destroy the virtio-fs device:
spdk_rpc.py --plugin rpc_virtio_fs_tgt -v virtio_fs_device_stop --dev-name vfsdev0 spdk_rpc.py --plugin rpc_virtio_fs_tgt -v virtio_fs_device_destroy --dev-name vfsdev0 -
Stop the DOCA transport and destroy emulation manager and transport:
spdk_rpc.py --plugin rpc_virtio_fs_tgt -v virtio_fs_transport_stop -t DOCA
spdk_rpc.py --plugin rpc_virtio_fs_tgt -v virtio_fs_doca_manager_destroy -m mlx5_0
spdk_rpc.py --plugin rpc_virtio_fs_tgt -v virtio_fs_transport_destroy -t DOCA
-
-
In VM/host:
-
To unmount the device:
umount /tmp/test
modprobe -rv virtiofs
-
3.7.3. Hotplug Function
The following is an example of creating virtio-fs DOCA transport, creating a virtio-fs function, associating it to a virtio-fs device, and hot-plugging it:
-
In BlueField:
-
Create AIO fsdev backend:
spdk_rpc.py fsdev_aio_create aio0 /etc/virtiofs -
List possible emulation managers:
spdk_rpc.py --plugin rpc_virtio_fs_tgt -v virtio_fs_doca_get_possible_managers -
Create the DOCA transport and emulation manager and start the transport:
spdk_rpc.py --plugin rpc_virtio_fs_tgt -v virtio_fs_transport_create -t DOCA spdk_rpc.py --plugin rpc_virtio_fs_tgt -v virtio_fs_doca_manager_create -m mlx5_0 spdk_rpc.py --plugin rpc_virtio_fs_tgt -v virtio_fs_transport_start -t DOCA -
Get transport information:
spdk_rpc.py --plugin rpc_virtio_fs_tgt -v virtio_fs_get_transports -
Get managers information:
spdk_rpc.py --plugin rpc_virtio_fs_tgt -v virtio_fs_doca_get_managersSome managers would show hotplug capability.
-
Get functions information:
spdk_rpc.py --plugin rpc_virtio_fs_tgt -v virtio_fs_doca_get_functions -
Create virtio-fs function:
spdk_rpc.py --plugin rpc_virtio_fs_tgt -v virtio_fs_doca_function_create --manager mlx5_0Returns VUID
MT2333XZ0VJQVFSS0D0F2. -
Get functions information:
spdk_rpc.py --plugin rpc_virtio_fs_tgt -v virtio_fs_doca_get_functionsReturns the function that has been created with the appropriate VUID.
-
Create the virtio-fs device associated with DOCA transport:
spdk_rpc.py --plugin rpc_virtio_fs_tgt -v virtio_fs_device_create --transport-name DOCA --dev-name vfsdev0 --tag docatag --fsdev aio0 --num-request-queues 8 --queue-size 256 --driver-platform x86_64 -
Set and modify virtio-fs parameters:
spdk_rpc.py --plugin rpc_virtio_fs_tgt -v virtio_fs_doca_device_modify --dev-name vfsdev0 --manager mlx5_0 --vuid MT2333XZ0VJQVFSS0D0F2The VUID must be provided before calling the
virtio_fs_device_startRPC. -
Start the virtio FS device:
spdk_rpc.py --plugin rpc_virtio_fs_tgt -v virtio_fs_device_start --dev-name vfsdev0 -
Get device information:
spdk_rpc.py --plugin rpc_virtio_fs_tgt -v virtio_fs_get_devicesThe output for
vfsdev0would show it is not yet plugged. -
Hot plug the DOCA device to the host and wait until it becomes visible by the host:
spdk_rpc.py --plugin rpc_virtio_fs_tgt -v virtio_fs_doca_device_hotplug --dev-name vfsdev0 --wait-for-done
-
-
In VM/host:
-
To mount a device with the tag
docatagand loadvirtio_pcidriver if not loaded:mkdir "/tmp/test" modprobe -v virtiofs mount -t virtiofs docatag /tmp/test
-
3.7.4. Hot-unplug Function
The following is an example of cleaning up and destroying the flow described under section "Hotplug Function":
-
In VM/host:
-
To unmount the device:
umount /tmp/test
modprobe -rv virtiofs
-
-
In BlueField:
-
Get device information:
spdk_rpc.py --plugin rpc_virtio_fs_tgt -v virtio_fs_get_devices -
Hot unplug the DOCA device from the host and wait until it becomes non-visible by the host:
spdk_rpc.py --plugin rpc_virtio_fs_tgt -v virtio_fs_doca_device_hotunplug --dev-name vfsdev0 --wait-for-done -
Get device information:
spdk_rpc.py --plugin rpc_virtio_fs_tgt -v virtio_fs_get_devices -
Stop and destroy the virtio-fs DOCA device:
spdk_rpc.py --plugin rpc_virtio_fs_tgt -v virtio_fs_device_stop --dev-name vfsdev0 spdk_rpc.py --plugin rpc_virtio_fs_tgt -v virtio_fs_device_destroy --dev-name vfsdev0 -
Destroy the virtio-fs function:
spdk_rpc.py --plugin rpc_virtio_fs_tgt -v virtio_fs_doca_function_destroy --manager mlx5_0 --vuid MT2333XZ0VJQVFSS0D0F2
-
Stop the DOCA transport and destroy the emulation manager and transport:
spdk_rpc.py --plugin rpc_virtio_fs_tgt -v virtio_fs_transport_stop -t DOCA
spdk_rpc.py --plugin rpc_virtio_fs_tgt -v virtio_fs_doca_manager_destroy -m mlx5_0
spdk_rpc.py --plugin rpc_virtio_fs_tgt -v virtio_fs_transport_destroy -t DOCA
4. RPC Log History
Supported from SPDK version spdk23.01.2-12 and above.
RPC log history (enabled by default) records all RPC requests and their responses in /var/log/virtiofs/rpc-log. This file is also available outside the container at /var/log/snap-log/rpc-log on the DPU.
The file is continuously updated in append mode. Monitor its size, and delete it before launching the SNAP pod if it becomes too large.
5. Saving and Loading Configuration
To recover and reuse configurations for virtio-fs, you can save the desired configuration and load it later using a saved configuration file. This process allows for quick recovery and ensures consistent device/application setup.
To save the configuration of virtio-fs devices:
-
Use RPCs to configure your virtio-fs device/application as needed.
-
Save the configuration after each configuration cycle using the
save_configRPC. This creates a JSON configuration file for future use:Bashspdk_rpc.py save_config -o <json_config>.json
To initiate a configuration cycle, create a new configuration file using the same format as spdk_rpc_init.conf files:
cat <new_config>.conf | spdk_rpc.py
The last line of the <new_config>.conf file must include a call to save the RPC configuration. Example:
--plugin rpc_virtio_fs_tgt -v fsdev_aio_create aio0 /tmp/fsdev-test
--plugin rpc_virtio_fs_tgt -v virtio_fs_transport_create -t DOCA
--plugin rpc_virtio_fs_tgt -v virtio_fs_transport_start -t DOCA
--plugin rpc_virtio_fs_tgt -v virtio_fs_device_create --transport-name DOCA --dev-name vfsdev0 --tag docatest --fsdev aio0 --num-request-queues 1 --queue-size 256 --driver-platform x86_64
--plugin rpc_virtio_fs_tgt -v virtio_fs_doca_device_modify --dev-name vfsdev0 --manager mlx5_0 --vuid MT2306XZ00HKVFSS0D0F4
--plugin rpc_virtio_fs_tgt -v virtio_fs_device_start --dev-name vfsdev0
save_config -o <json_config>.json
Saving configuration at the end of the script ensures the configuration is saved only after all the script changes are successfully applied.
To load a saved configuration for virtio-fs, use the following methods based on your environment:
-
When using virtio-fs from a container, set the following in the YAML configuration file:
YAMLSPDK_RPC_INIT_CONF_JSON: <json_config>.json SPDK_APP_OPTS: "--shm-id 1" -
When using virtio-fs from source, re-run the DOCA SNAP Virtio-fs application, recovering the configuration from the saved file:
YAML/opt/nvidia/spdk-subsystem/src/virtio-fs-target/app/virtio_fs_tgt -c <json_config>.json --json-ignore-init-errors
When modifying controller or function configurations, ensure the host driver remains unloaded until the configuration change is fully applied. If the driver loads before completion, the system may fail to recover from a partial or interrupted configuration.
When using SPDK_RPC_INIT_CONF_JSON, disable other initialization methods such as SPDK_RPC_INIT_CONF to avoid conflicts.
Hotplugged emulation functions persist across process restarts (but not BlueField resets). These functions should be configured once during the process's initial setup. Only controllers created on these functions are saved in the configuration state.
If you specify --wait-for-rpc in your YAML file to enable initial interactive RPC bring-up, you must remove it before enabling automatic recovery from a generated configuration file. Leaving it in place will stall the automated recovery process.
6. Disabling/enabling SPDK Subsystem
Virtio-fs is defined as an SPDK subsystem and can be disabled or enabled as required.
The Virtio-fs subsystem is enabled by default. To disable it:
-
Start the Virtio-fs application in a waiting state for RPC commands:
Bash/opt/nvidia/spdk-subsystem/src/virtio-fs-target/app/virtio_fs_tgt --wait-for-rpc -
Use the following RPC command to disable the
virtio_fssubsystem:Bashspdk_rpc.py framework_disable_subsystem virtio_fs -
Restart the SPDK framework initialization:
Bashspdk_rpc.py framework_start_init
To view the status of all subsystems:
spdk_rpc.py framework_get_subsystems
This subsystem configuration can be saved in SPDK configuration for future use with the command spdk_rpc.py save_config. This ensures the configuration persists across application restarts.
7. SR-IOV
SR-IOV configuration depends on the kernel version and must be handled carefully to ensure device visibility and system stability across both the hypervisor and DPU orchestrators.
7.1. General Setup Procedure
To ensure a safe and stable SR-IOV setup, follow these steps in order:
7.1.1. Step 1: Preconfigure VF Controllers (DPU Side)
Before configuring SR-IOV on the host, ensure that the DPU is properly configured with all required VF devices created and started.
-
Verify Visibility: VF functions are always visible and configurable on the DPU side. Verify the current state:
spdk_rpc.py --plugin rpc_virtio_fs_tgt -v virtio_fs_doca_get_functions -
Lock-in: Once host-side configuration begins, further modifications to these resources may not be possible.
7.1.2. Step 2: Disable Autoprobing
In deployments with many virtual devices (large-scale), autoprobing must be disabled to ensure stable device discovery. Failing to do so may result in incomplete device visibility, system hangs during initialization, or unreliable behavior (specifically with >100 VFs).
Configuration:
# Recommended for large-scale deployments
echo 0 > /sys/bus/pci/devices/<BDF>/sriov_drivers_autoprobe
7.1.3. Step 3: Configure SR-IOV (Host Side)
Enable the Virtual Functions on the host. Note that hot-plugged PFs do not support SR-IOV.
-
Small-scale deployments (<100 VFs):
echo <number_of_vfs> > /sys/bus/pci/devices/<BDF>/sriov_totalvfs -
Newer drivers:
echo <number_of_vfs> > /sys/bus/pci/devices/<BDF>/sriov_numvfs
7.2. Dynamic MSI-X and Queue Management
Message Signaled Interrupts eXtended (MSI-X) provides efficient interrupt handling for high-performance devices. By default, BlueField distributes MSI-X vectors evenly between all virtual PCIe functions (VFs). However, this is often suboptimal for heterogeneous environments where different VMs require different resource footprints.
Dynamic MSI-X Management allows users to manually control the number of MSI-X vectors provided per VF independently.
7.2.1. Behavior & Persistence
Once configured, the MSI-X link to the VFs remains persistent. Configuration changes only when:
-
The PF explicitly reclaims all VF MSI-X vectors back to the pool (after VF destruction).
-
An Arm reboot (FE reset/cold boot) occurs.
Application restarts, crashes, or closing/reopening PFs without dynamic MSI-X support will not change the configuration.
7.2.2. Configuration Workflow
-
Reset Resources to Free Pool: After creating a
virtio-fsPF device, reclaim all MSI-X vectors from the VFs into the PF's free pool.spdk_rpc.py --plugin --plugin rpc_virtio_fs_tgt -v virtio_fs_device_create \ --transport_name DOCA \ --dev_name vfsdev0 \ --tag doca_test \ --fsdev aio0 \ --num_request_queues 1 \ --queue_size 256 \ --driver_platform x86_64 spdk_rpc.py --plugin rpc_virtio_fs_tgt -v virtio_fs_doca_device_modify \ --dev_name <PF_DEV_NAME> \ --manager mlx5_0 \ --vuid <PF_DEV_VUID> \ spdk_rpc.py --plugin rpc_virtio_fs_tgt -v virtio_fs_device_start --dev-name vfsdev0 spdk_rpc.py --plugin rpc_virtio_fs_tgt -v virtio_fs_doca_device_reset_dynamic_resources \ --dev-name vfsdev0-
Prerequisite: No VF devices can be open on the host.
-
-
Assess Available Resources: Query the controller list to determine the constraints for the PF (
free_msixandfree_queues).spdk_rpc.py --plugin rpc_virtio_fs_tgt -v virtio_fs_get_devices -
Create VF with Specific Allocation: Distribute MSI-X and queues to the VF during creation.
-
Create the device with specific queues.
spdk_rpc.py --plugin rpc_virtio_fs_tgt -v virtio_fs_device_create \ --transport_name DOCA \ --dev_name vfsdev0vf1 \ --tag doca_test_vf \ --fsdev aio1 \ --num_request_queues 4 \ --queue_size 128 \ --driver_platform x86_64 -
Modify the device to assign MSI-X vectors.
Modify the device to assign MSI-X vectors spdk_rpc.py --plugin rpc_virtio_fs_tgt -v virtio_fs_doca_device_modify \ --dev_name vfsdev0vf1 \ --manager mlx5_0 \ --vuid <VF_DEV_VUID> \ --num_msix 8 -
Start the device.
spdk_rpc.py --plugin rpc_virtio_fs_tgt -v virtio_fs_device_start --dev-name vfsdev0vf1MSI-X vectors are allocated per virtqueue. A safe calculation for the required MSI-X count is:
1 for BAR config + 1 for high priority queue + 1 for notification queue.
-
-
VF Teardown and Reclamation: When destroying a VF, you may choose to release its resources back to the global pool. This can only be done once all VFs are destroyed.
-
Destroy the VF.
spdk_rpc.py --plugin rpc_virtio_fs_tgt -v virtio_fs_device_destroy --dev_name vfsdev0vf1At this point all VF devices are destroyed.
-
Reclaim resources.
spdk_rpc.py --plugin rpc_virtio_fs_tgt -v virtio_fs_doca_device_reset_dynamic_resources \
       --dev-name <PF_DEV_NAME>
-
-
Enable on Host: Finally, enable SR-IOV on the host driver.
echo <N> > /sys/bus/pci/devices/<BDF>/sriov_numvfsIt is strongly recommended to open all VF controllers in SNAP before binding VFs to the host or guest driver.
-
If you bind VFs to the driver before configuration is complete, the driver may attempt to use resources that are not yet allocated.
-
This can lead to a host deadlock that is only recoverable via a cold boot. Configuring in SNAP first ensures the process remains reversible if you encounter insufficient resource errors.
-
8. NFS/TCP XLIO
XLIO is a high-performance user-space TCP stack that offloads traffic handling from the kernel to achieve significant throughput improvements. NFS over TCP leverages XLIO to deliver enhanced performance, utilizing an XLIO socket module integrated directly into SPDK.
The minimum supported version of libxlio is 3.60.4.
8.1. Configuration and Resource Management
XLIO is enabled by default in the container.
8.1.1. Memory Implications
Because XLIO consumes additional memory, you may wish to disable it in non-TCP configurations to conserve resources.
If XLIO is disabled, the required hugepage allocation for the default configuration can be decreased to 4GiB.
8.1.2. Disabling XLIO
To disable XLIO, set the XLIO_ENABLED environment variable to "0" within the doca_vfs.yaml configuration file:
env:
  - name: XLIO_ENABLED
    value: "0"
9. Appendix – NVIDIA GPUDirect Storage (GDS) Support in VirtioFS
NVIDIA GPUDirect Storage (GDS) is a technology that enables direct data transfer between storage devices and NVIDIA GPUs. By bypassing the CPU and system memory, GDS significantly reduces data transfer latency and improves bandwidth efficiency for I/O-intensive applications. GDS is particularly beneficial for workloads such as deep learning, high-performance computing (HPC), and large-scale data analytics.
See Getting Started with NVIDIA GPUDirect Storage for more information.
9.1. Prerequisites
Make sure the following are available:
-
NVIDIA GPU with GPUDirect storage support (via P2P DMA)
-
Linux kernel with
CONFIG_PCI_P2PDMAenabled. -
NVIDIA-optimized virtio-fs drivers. Refer to Virtio-fs DOCA Host Drive Installation (Optional).
-
NVIDIA CUDA repository (version 13.1 or above). Refer to the CUDA Installation Guide.
-
Installed NVIDIA GPU drivers. Refer to the NVIDIA GPUDirect Storage Troubleshooting Guide for additional details.
-
Properly configured virtio-fs target
9.2. Enabling GDS Support in Virtio-fs
-
Configure the system for GDS support:
-
Enable PCIe peer-to-peer DMA in
libcufile:Bash// Edit /usr/local/cuda/gds/cufile.json: // Enable use_pci_p2pdma property "properties": { ... "use_pci_p2pdma": true ... } // Add "virtiofs" and enable use_pci_p2pdma for it under "fs" "fs": { ... "virtiofs": { "use_pci_p2pdma": true }, ... } -
Configure NVIDIA driver parameters – Create a modprobe configuration file to enable the required parameters for the NVIDIA driver:
Bashecho 'options nvidia NVreg_RegistryDwords="RMForceStaticBar1=1;RmForceDisableIomapWC=1;FORCE_P2P=1"' | sudo tee /etc/modprobe.d/nvidia-gds.conf -
Configure kernel boot parameters – Edit the
GRUB_CMDLINE_LINUX_DEFAULTvariable in/etc/default/grubto add:-
nokaslrto disable Kernel Address Space Layout Randomization. -
Depending on your CPU:
-
For AMD CPUs:
amd_iommu=off -
For Intel CPUs:
intel_iommu=off
-
Bash#For example: GRUB_CMDLINE_LINUX_DEFAULT="console=tty0 nokaslr intel_iommu=off" #After saving the file, update GRUB: sudo update-grubThen, reboot your system for the changes to take effect.
-
-
-
Verify system compatibility:
-
After rebooting, run the following command to check for GDS support:
Bash/usr/local/cuda/gds/tools/gdscheck.py -p | grep -e VIRTIOFS -e properties.use_pci -e virtiofs.use_You should see an output similar to:
BashVIRTIOFS : p2pdma, compat properties.use_pci_p2pdma : true fs.virtiofs.use_pci_p2pdma : true
-
-
Mount the virtio-fs drive with GDS:
-
To enable GDS workloads on your virtio-fs drive, mount it with the
gdsoption.Bashsudo mount -t virtiofs -o gds <tagname> /mnt/vfs/ -
Replace
<tagname>with the appropriate identifier for your setup. Once mounted, test GDS performance using thegdsiotool:Bash/usr/local/cuda/gds/tools/gdsio -T 1 -D /mnt/vfs/ -d0 -I1 -s10m -i1m -w1 -x0This command outputs performance metrics and generates a
cufile.login the current working directory. Check the log for any errors or issues.
-
10. Appendix – BlueField Firmware Configuration
Before configuring DOCA SNAP Virtio-fs, the user must ensure that all firmware configuration requirements are met. By default, virtio-fs is disabled and must be enabled by running both common DOCA SNAP Virtio-fs configurations and additional protocol-specific configurations depending on the expected usage of the application (e.g., hot-plug, SR-IOV, UEFI boot, etc).
After configuration is finished, the host must be power cycled for the changes to take effect.
To verify that all configuration requirements are satisfied, users may query the current/next configuration by running the following:
mlxconfig -d /dev/mst/mt41692_pciconf0 -e query
10.1. System Configuration Parameters
|
Parameter |
Description |
Possible Values |
|---|---|---|
|
|
Enable BlueField to work in internal CPU model Must be set to |
0/1 |
|
|
Enable PCIe switch for emulated PFs |
0/1 |
|
|
The maximum number of hotplug emulated PFs which equals One switch port is reserved for all static PFs. |
[0-32] |
10.2. RDMA/RoCE Configuration
BlueField's RDMA/RoCE communication is blocked for BlueField's default OS interfaces (nameds ECPFs, typically mlx5_0 and mlx5_1). If RoCE traffic is required, additional network functions (scalable functions) must be added which support RDMA/RoCE traffic.
The following is not required when working over TCP or even RDMA/IB.
To enable RoCE interfaces, run the following from within the BlueField device:
[dpu] mlxconfig -d /dev/mst/mt41692_pciconf0 s PER_PF_NUM_SF=1
[dpu] mlxconfig -d /dev/mst/mt41692_pciconf0 s PF_SF_BAR_SIZE=8 PF_TOTAL_SF=2
[dpu] mlxconfig -d /dev/mst/mt41692_pciconf0.1 s PF_SF_BAR_SIZE=8 PF_TOTAL_SF=2
10.3. Virtio-fs Configuration
Before configuring Virtio-fs emulation, ensure the following prerequisites are met:
-
A reliable communication channel (e.g., RShim, serial) is available for accessing the Arm subsystem even if the host fails to boot.
Refer to NVIDIA BlueField DPU BSP documentation for more details.
-
The controller must be created on the static virtio-fs PF using the initial configuration file.
For more information, please refer to section "Virtio-fs Emulation Management".
|
Parameter |
Description |
Possible Values |
|---|---|---|
|
|
Enables virtio-fs device emulation |
0/1 |
|
|
Number of static emulated virtio-fs PFs Misconfiguration may cause the host server OS to fail during boot. Passthrough of PFs to the VM (static hot-plugged) is not allowed. |
[0–30] |
|
|
Number of vitrual functions per PF Currently up to 128 total VFs across all PFs are supported |
[0–128] |
|
|
Number of MSI-X vectors assigned to the emulated virtio-fs PFs or VFs I/O queue requires one MSI-X vector. Additional vectors are required if the following features are enabled:
For example, to support 32 I/O queues:
|
[0–256] |
11. Appendix – Host OS Configuration
With Linux environment on host OS, additional kernel boot parameters may be required to support DOCA SNAP Virtio-fs related features:
-
To use PCIe hotplug,
pci=reallocmust be added -
modprobe.blacklist=virtio_pci,virtiofsfor the virtio-fs driver which is not built-in -
modprobe.blacklist=virtio_pcifor thevirtio_pcidriver which is not built-in
To view boot parameter values, run:
cat /proc/cmdline
It is recommended to use the following command with virtio-fs:
[dpu] cat /proc/cmdline BOOT_IMAGE … pci=realloc modprobe.blacklist=virtio_pci,virtiofs
11.1. Intel Server Performance Optimizations
cat /proc/cmdline
BOOT_IMAGE=(hd0,msdos1)/vmlinuz-5.15.0_mlnx root=UUID=91528e6a-b7d3-4e78-9d2e-9d5ad60e8273 ro crashkernel=auto resume=UUID=06ff0f35-0282-4812-894e-111ae8d76768 rhgb quiet pci=realloc modprobe.blacklist=virtio_pci,virtiofs
11.2. AMD Server Performance Optimizations
cat /proc/cmdline
cat /proc/cmdline BOOT_IMAGE=(hd0,msdos1)/vmlinuz-5.15.0_mlnx root=UUID=91528e6a-b7d3-4e78-9d2e-9d5ad60e8273 ro crashkernel=auto resume=UUID=06ff0f35-0282-4812-894e-111ae8d76768 rhgb quiet pci=realloc modprobe.blacklist=virtio_pci,virtiofs
12. Appendix – Custom Fsdev Modules
This section explains how to extend the Virtio-fs service with custom fsdev modules. Two methods are provided:
-
Building a new production container (recommended for production)
-
Manual build and run inside a development container (ideal for development and testing)
The Dockerfiles and commands provided in this chapter are intended as examples and are designed to work with the external fsdev module example included with SPDK, located at spdk/test/external_code/fsdev_passthru. These examples demonstrate the integration process and should be adapted to suit real-world use cases, including adjustments for custom fsdev modules, deployment environments, and specific application requirements.
12.1. Building a New Production Container
This option allows to create a new container that includes both the original service and the custom fsdev module. The resulting container will run Virtio-fs service with custom functionality built-in.
12.1.1. En`vironment Preparation
This example uses /opt/build as working directory but any other directory can be used.
The working directory should contain the spdk sources and the Dockerfile.
See an example of the Dockerfile in the next section.
root@bf:/# mkdir -p /opt/build
root@bf:/# cd /opt/build
root@bf:/opt/build# git clone https://github.com/Mellanox/spdk --branch v25.01.1.nvda
root@bf:/opt/build# ll
total 16
drwxr-xr-x  3 root root 4096 Dec  2 14:16 ./
drwxr-xr-x  6 root root 4096 Dec  2 13:30 ../
-rw-r--r--  1 root root  723 Dec  2 14:15 Dockerfile
drwxr-xr-x 37 root root 4096 Dec  2 14:01 spdk/
12.1.2. Dockerfile Example
FROM nvcr.io/nvstaging/doca/doca_vfs:1.2.0-2-doca2.10.0 as builder

RUN apt-get update && apt-get install -y autoconf libtool python3-pyelftools libaio-dev libncurses-dev libfuse3-dev patchelf libcmocka-dev make

COPY spdk/test/external_code /external_code

WORKDIR /external_code
ENV SPDK_HEADER_DIR=/opt/nvidia/spdk-subsystem/virtiofs/include
ENV SPDK_LIB_DIR=/opt/nvidia/spdk-subsystem/virtiofs/lib
ENV DPDK_LIB_DIR=/opt/nvidia/spdk-subsystem/virtiofs/include
RUN make fsdev_passthru_shared

FROM nvcr.io/nvstaging/doca/doca_vfs:1.2.0-2-doca2.10.0

COPY --from=builder /external_code/fsdev_passthru/libfsdev_passthru_external.so /opt/nvidia/spdk-subsystem/virtiofs/lib/
ENV VIRTIOFS_LD_PRELOAD=/opt/nvidia/spdk-subsystem/virtiofs/lib/libfsdev_passthru_external.so

COPY --from=builder /external_code/fsdev_passthru/fsdev_passthru.py /usr/lib/python3/dist-packages/spdk/rpc/
ENV SPDK_RPC_PLUGIN="spdk.rpc.rpc_virtio_fs_tgt:spdk.rpc.fsdev_passthru"
12.1.3. Building and Running the Container
-
Build the new container:
Bashdocker build -t doca_vfs_custom_fsdev:latest -f Dockerfile . -
Run the new container with Kubelet service:
Bashdocker save doca_vfs_custom_fsdev:latest > doca_vfs_custom_fsdev.tar ctr -n=k8s.io images import doca_vfs_custom_fsdev.tar # Copy doca_vfs.yaml into /etc/kubelet.d/ # Open doca_vfs.yaml and change "image" section: image: doca_vfs_custom_fsdev:latest -
To configure running container with custom fsdev module:
Bash# DPU mkdir /etc/virtiofs/AIO0 crictl exec $(crictl ps -s running -q --name virtiofs) spdk_rpc.py fsdev_aio_create AIO0 /etc/virtiofs/AIO0 crictl exec $(crictl ps -s running -q --name virtiofs) spdk_rpc.py fsdev_passthru_ext_create --name CUSTOM_FSDEV_PT0 --base-fsdev-name AIO0 crictl exec $(crictl ps -s running -q --name virtiofs) spdk_rpc.py virtio_fs_transport_create -t DOCA crictl exec $(crictl ps -s running -q --name virtiofs) spdk_rpc.py virtio_fs_doca_manager_create -m mlx5_0 crictl exec $(crictl ps -s running -q --name virtiofs) spdk_rpc.py virtio_fs_transport_start -t DOCA crictl exec $(crictl ps -s running -q --name virtiofs) spdk_rpc.py virtio_fs_device_create --transport-name DOCA --dev-name vfsdev0 --tag CUSTOM_FSDEV_PT0 --fsdev CUSTOM_FSDEV_PT0 --num-request-queues 62 --queue-size 64 --driver-platform x86_64 crictl exec $(crictl ps -s running -q --name virtiofs) spdk_rpc.py virtio_fs_doca_device_modify --dev-name vfsdev0 --manager mlx5_0 --vuid MT2334XZ0LEDVFSS0D0F3 crictl exec $(crictl ps -s running -q --name virtiofs) spdk_rpc.py virtio_fs_device_start --dev-name vfsdev0 # x86 modprobe -v virtio_pci modprobe -v virtiofs test -d /tmp/CUSTOM_FSDEV_PT0 || mkdir -p /tmp/CUSTOM_FSDEV_PT0 mount -t virtiofs CUSTOM_FSDEV_PT0 /tmp/CUSTOM_FSDEV_PT0
12.2. Manual Build and Run in a Development Container
This approach is suitable for development workflows where frequent updates, builds, and tests are required. It sets up a development container with the necessary environment to manually build and run the Virtio-fs service with a custom fsdev module.
12.2.1. Environment Preparation
This example uses /opt/build as working directory but any other directory can be used.
The working directory should contain the spdk sources and the Dockerfile.
See an example of the Dockerfile in the next section.
root@bf:/# mkdir -p /opt/build
root@bf:/# cd /opt/build
root@bf:/opt/build# git clone https://github.com/Mellanox/spdk --branch v24.01.4.nvda
root@bf:/opt/build# ll
total 16
drwxr-xr-x  3 root root 4096 Dec  2 14:16 ./
drwxr-xr-x  6 root root 4096 Dec  2 13:30 ../
-rw-r--r--  1 root root  723 Dec  2 14:15 Dockerfile
drwxr-xr-x 37 root root 4096 Dec  2 14:01 spdk/
12.2.2. Dockerfile Example
FROM nvcr.io/nvstaging/doca/doca_vfs:1.2.0-2-doca2.10.0 as builder

RUN apt-get update && apt-get install -y autoconf libtool python3-pyelftools libaio-dev libncurses-dev libfuse3-dev patchelf libcmocka-dev make

ENTRYPOINT /bin/bash
12.2.3. Building and Running the Development Container
-
Build the container using the provided
Dockerfile:Bashdocker build -t doca_vfs_custom_fsdev_dev:latest -f Dockerfile . -
Start the container and enter the bash shell:
Bashdocker run -ti --privileged --net=host \ --volume /dev/hugepages:/dev/hugepages \ --volume /dev/shm:/dev/shm \ --volume /dev/infiniband:/dev/infiniband \ --volume /etc/virtiofs:/etc/virtiofs \ --volume ${PWD}/spdk/test/external_code:/external_code \ doca_vfs_custom_fsdev_dev:latest -
Once inside the container, one can manually build and test custom module:
Bashcd /external_code/ export SPDK_HEADER_DIR=/opt/nvidia/spdk-subsystem/virtiofs/include export SPDK_LIB_DIR=/opt/nvidia/spdk-subsystem/virtiofs/lib export DPDK_LIB_DIR=/opt/nvidia/spdk-subsystem/virtiofs/include make fsdev_passthru_shared -
Start the virtio-fs service with the custom module for testing:
Bashcp /external_code/fsdev_passthru/fsdev_passthru.py /usr/bin/ /opt/nvidia/spdk-subsystem/doca_snap/bin/set_environment_variables.sh LD_PRELOAD=/external_code/fsdev_passthru/libfsdev_passthru_external.so \ /opt/nvidia/spdk-subsystem/virtiofs/bin/virtio_fs_tgt -m 0xff & -
To configure the service with custom fsdev module:
Bash# DPU mkdir /etc/virtiofs/AIO0 spdk_rpc.py fsdev_aio_create AIO0 /etc/virtiofs/AIO0 spdk_rpc.py --plugin fsdev_passthru fsdev_passthru_ext_create --name CUSTOM_FSDEV_PT0 --base-fsdev-name AIO0 spdk_rpc.py virtio_fs_transport_create -t DOCA spdk_rpc.py virtio_fs_doca_manager_create -m mlx5_0 spdk_rpc.py virtio_fs_transport_start -t DOCA spdk_rpc.py virtio_fs_device_create --transport-name DOCA --dev-name vfsdev0 --tag CUSTOM_FSDEV_PT0 --fsdev CUSTOM_FSDEV_PT0 --num-request-queues 62 --queue-size 64 --driver-platform x86_64 spdk_rpc.py virtio_fs_doca_device_modify --dev-name vfsdev0 --manager mlx5_0 --vuid MT2334XZ0LEDVFSS0D0F2 spdk_rpc.py virtio_fs_device_start --dev-name vfsdev0 # x86 modprobe -v virtio_pci modprobe -v virtiofs test -d /tmp/CUSTOM_FSDEV_PT0 || mkdir -p /tmp/CUSTOM_FSDEV_PT0 mount -t virtiofs CUSTOM_FSDEV_PT0 /tmp/CUSTOM_FSDEV_PT0
13. Appendix – Custom Bdev Modules
With DOCA SNAP-4 block emulation subsystems enabled (as described in DOCA SNAP Virtio-fs with SNAP Support), DOCA SNAP virtio-fs service allows to load custom bdev modules.
Refer to DOCA SNAP-4 Service Guide documentation for more information.
14. Appendix – Linux NFS Target
When using the SPDK NFS fsdev module to access shares from Linux NFS target, it's important to ensure that the target is up-to-date. Some versions of the kernel have a bug in the SunRPC code that can cause the NFS target to stop acknowledging incoming TCP packets causing the receive window to get to zero making the connection unusable. It's prone to happen on specific workloads and causes the NFS fsdev to report PDU timeouts and initiate reconnects to recover from this situation. This results in IO stalls and severely degraded performance. The faulty change was introduced in Linux v6.6 and has later been reverted in v6.14. The fix has been also cherry-picked in Ubuntu's 6.8.0-64-generic kernel. It is strongly advised to use kernels that include the fix.
When using the SPDK NFS fsdev module to access shares from a Linux NFS target, you must ensure the target kernel is up to date to avoid severe performance degradation.
-
Issue – A known bug in the Linux kernel's SunRPC code causes the NFS target to abruptly stop acknowledging incoming TCP packets. This shrinks the TCP receive window to zero, rendering the connection unusable.
-
Impact – Under specific workloads, this bug causes the NFS
fsdevto report PDU timeouts and initiate forced reconnections in an attempt to recover. This results in significant I/O stalls and severely degraded storage performance. -
Resolution – The faulty commit (originally introduced in Linux v6.6) was reverted in Linux v6.14. This fix has also been cherry-picked into Ubuntu's
6.8.0-64-generickernel. It is strongly advised to upgrade your NFS target to a kernel containing this fix before deploying.
15. References
|
Title |
Description |
|---|---|
|
NVIDIA DOCA™ SDK enables developers to rapidly create applications and services on top of NVIDIA® BlueField® networking platform, leveraging industry-standard APIs |
|
|
BlueField Board Support Package includes the bootloaders and other essentials for loading and setting software components |
|
|
This document provides details as to the interfaces of the BlueField DPU, specifications, required software and firmware for operating the device, and a step-by-step plan for bringing the DPU up |
|
|
This document provides product release notes as well as information on the BlueField software distribution and how to develop and/or customize applications, system software, and file system images for the BlueField platform |
|
|
DOCA Device Emulation library documentation. The DOCA Device Emulation subsystem provides a low-level software API for users to develop PCIe devices and their controllers. |
|
|
DOCA Device Emulation Virtio-fs library documentation. The DOCA DevEmu Virtio-fs library is part of the DOCA DevEmu Virtio subsystem. It provides low-level software APIs that provide building blocks for developing and manipulating virtio filesystem devices using the device emulation capability of BlueField platforms. |
|
|
DOCA Device Emulation PCI library documentation. DOCA DevEmu PCI is part of the DOCA Device Emulation subsystem. It provides low-level software APIs that allow management of an emulated PCIe device using the emulation capability of NVIDIA® BlueField® networking platforms. |
Last updated: