This guide provides an overview and configuration of virtual functions for NVIDIA® BlueField® and demonstrates a use case for running the DOCA applications over x86 host.
Introduction
Single root IO virtualization (SR-IOV) is a technology that allows a physical PCIe device to present itself multiple times through the PCIe bus. This technology enables multiple virtual instances of the device with separate resources. NVIDIA adapters are able to expose virtual instances or functions (VFs) for each port individually. These virtual functions can then be provisioned separately.
Each VF can be seen as an additional device connected to the physical interface or function (PF). It shares the same resources with the PF, and its number of ports equals those of the PF.
SR-IOV is commonly used in conjunction with an SR-IOV-enabled hypervisor to provide virtual machines direct hardware access to network resources, thereby increasing its performance.
There are several benefits to running applications on the host. For example, one may want to utilize a strong and high-resource host machine, or to start DOCA integration on the host before offloading it to the BlueField DPU.
The configuration in this document allows the entire application to run on the host's memory, while utilizing the HW accelerators on BlueField.
When VFs are enabled on the host, VF representors are visible on the Arm side which can be bridged to corresponding PF representors (e.g., the uplink representor and the host representor). This allows the application to only scan traffic forwarded to the VFs as configured by the user and to behave as a simple "bump-on-the-wire". DOCA installed on the host allows access to the hardware capabilities of the BlueField DPU without comprising features which use HW offload/steering elements embedded inside the eSwitch.
Prerequisites
To run all the reference applications over the host, you must install the host DOCA package. Refer to the DOCA Installation Guide for Linux for more information on host installation.
VFs must be configured as trusted for the hardware jump action to work as intended. The following steps configure "trusted" mode for VFs:
-
Delete all existing VFs
-
To delete all VFs on a PF run the following on the host:
host $ echo 0 > /sys/class/net/<physical_function>/device/sriov_numvfsFor example:
host $ echo 0 > /sys/class/net/ens1f0/device/sriov_numvfs
-
-
Delete all existing SFs.
Refer to BlueField Scalable Functions for instructions on deleting SFs.
-
Stop the main driver on the host:
host $ /etc/init.d/openibd stop -
Before creating the VFs, set them to "trusted" mode on the device by running the following commands on the DPU side.
-
Setting VFs on port 0:
host $ mlxreg -d /dev/mst/mt41686_pciconf0 --reg_id 0xc007 --reg_len 0x40 --indexes "0x0.0:32=0x80000000" --yes --set "0x4.0:32=0x1" -
Setting VFs on port 1:
host $ mlxreg -d /dev/mst/mt41686_pciconf0.1 --reg_id 0xc007 --reg_len 0x40 --indexes "0x0.0:32=0x80000000" --yes --set "0x4.0:32=0x1"
These commands set trusted mode for all created VFs/SFs after their execution on the DPU.
Setting trusted mode should be performed once per reboot.
-
-
Restart the main driver on the host by running the following command:
host $ /etc/init.d/openibd restart
VF Creation
-
Make sure mst driver is running:
host $ sudo mst statusIf it is not loaded, run:
host $ sudo mst start -
Enable SR-IOV. Run:
host $ sudo mlxconfig -y -d /dev/mst/mt41686_pciconf0 s SRIOV_EN=1 -
Set number of VFs. Run:
host $ sudo mlxconfig -y -d /dev/mst/mt41686_pciconf0 s NUM_OF_VFS=XPerform a BlueField system reboot for the
mlxconfigsettings to take effect.host $ echo X > /sys/class/net/<physical_function>/device/sriov_numvfsFor example:
host $ sudo mlxconfig -y -d /dev/mst/mt41686_pciconf0 s NUM_OF_VFS=2
host $ reboot
host $ echo 2 > /sys/class/net/ens1f0/device/sriov_numvfs
After enabling VF, the representor appears on the DPU. The function itself is seen at the x86 side.
-
To verify that the VFs have been created. Run:
host $ lspci | grep Virtual
b1:00.3 Ethernet controller: Mellanox Technologies ConnectX Family mlx5Gen Virtual Function (rev 01)
b1:00.4 Ethernet controller: Mellanox Technologies ConnectX Family mlx5Gen Virtual Function (rev 01)
b1:01.3 Ethernet controller: Mellanox Technologies ConnectX Family mlx5Gen Virtual Function (rev 01)
2 new virtual Ethernet devices are created in this example.
-
It is advisable to limit VF firmware (ICM) pages (e.g., via VF
page_limitsysfs) to avoid uncontrolled memory growth and host resource exhaustion. For example, this command prevents a VF from allocating more than the configured page limit:echo X > /sys/class/infiniband/mlx_$/device/sriov/$vf_id/paging_control/page_limit
Running DOCA Application on Host
Allocate the required number of VFs as explained previously.
Allocate any other resources as specified by the application (e.g., huge pages).
The following is the CLI example for running a reference application over the host using VF:
doca_<app_name> -a "pci address VF0" -a "pci address VF1" -c 0xff -- [application flags]
The following is an example with specific PCIe addresses for the VFs:
doca_<app_name> -a b1:00.3 -a b1:00.4 -c 0xff -- -l 60
By default, a DPDK application initializes all the cores of the device. This is usually unnecessary and may even cause unforeseeable issues. It is recommended to limit the number of cores, especially when using an AMD-based system, to 16 cores using the -c flag when running DPDK.
Topology Example
The following is a topology example for running the application over the host.
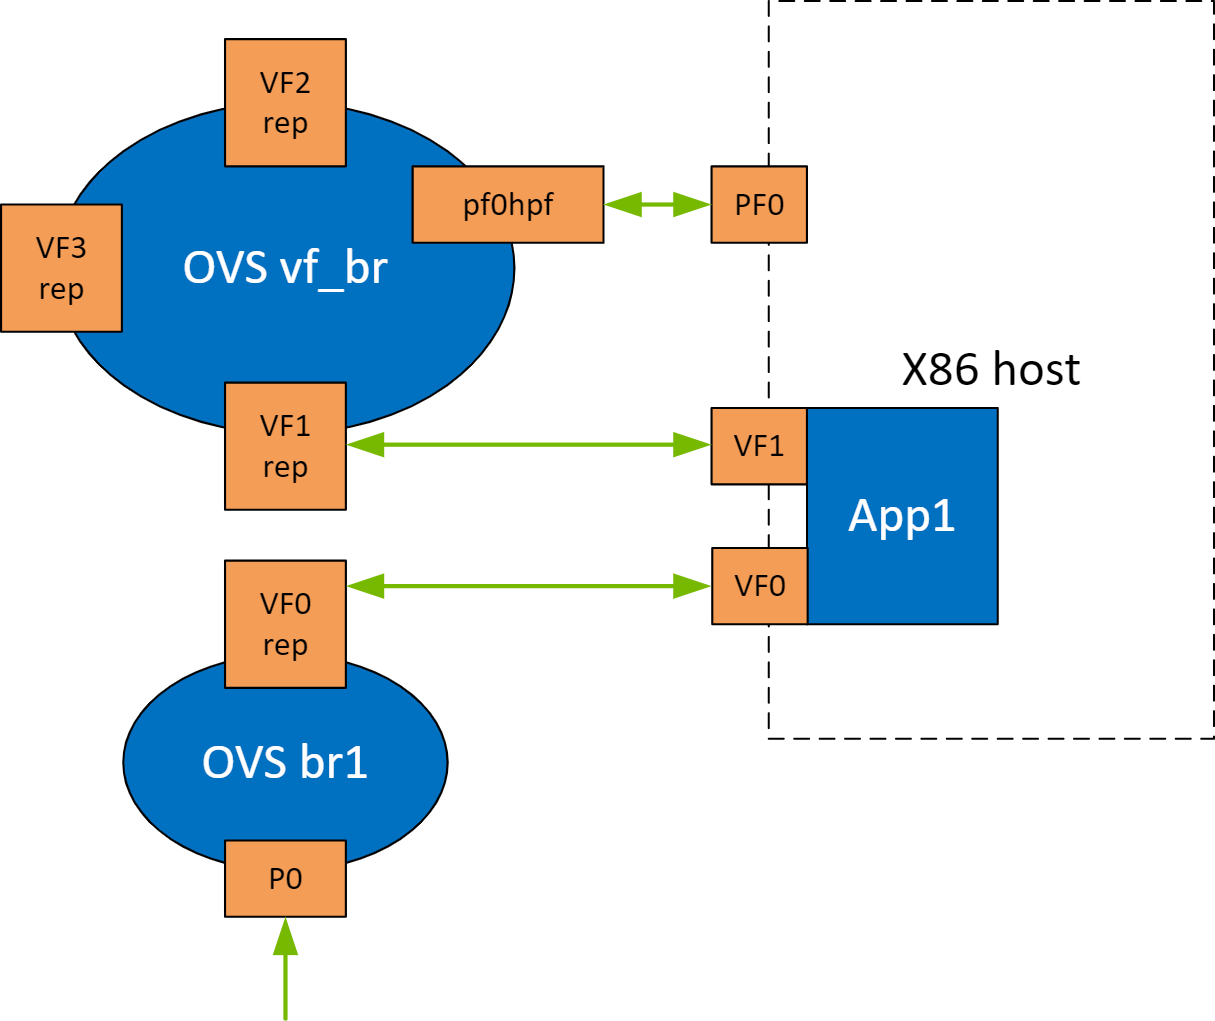
Configure the OVS on BlueField as follows:
Bridge vf_br:
    Port vf_br
       Interface vf_br
           type: internal
    Port pf0hpf
       Interface pf0hpf
   Port pf0vf1
       Interface pf0vf1
Bridge ovsbr1
   Port ovsbr1
       Interface ovsbr1
           type: internal
   Port p0
       Interface p0
   Port pf0vf0
       Interface pf0vf0
When enabling a new VF over the host, VF representors are created on the Arm side. The first OVS bridge connects the uplink connection (p0) to the new VF representor (pf0vf0), and the second bridge connects the second VF representor (pf0vf1) to the host representors (pf0phf). On the host, the 2 PCIe addresses of the newly created function must be initialized when running the applications.
When traffic is received (e.g., from the uplink), the following occurs:
-
Traffic is received over
p0. -
Traffic is forwarded to
pf0vf0. -
Application "listens" to
pf0vf0andpf0vf1and can, therefore, acquire the traffic frompf0vf0, inspect it, and forward topf0vf1. -
Traffic is forwarded from
pf0vf1topf0hpf.
VF Creation on Adapter Card
Supported only for NVIDIA® ConnectX®-6 Dx based adapter cards and higher.
The following steps are required only when running DOCA applications on an adapter card.
-
Set trust level for all VFs. Run:
host $ mlxreg -d /dev/mst/mt4125_pciconf0 --reg_name VHCA_TRUST_LEVEL --yes --set "all_vhca=0x1,trust_level=0x1" --indexes "vhca_id=0x0,all_vhca=0x0" -
Create X VFs (X being the required number of VFs) and run the following to turn on trusted mode for the created VFs:
echo ON | tee /sys/class/net/enp1s0f0np0/device/sriov/X/trustFor example, if you are creating 2 VFs, the following commands should be used:
echo ON | tee /sys/class/net/enp1s0f0np0/device/sriov/0/trust echo ON | tee /sys/class/net/enp1s0f0np0/device/sriov/1/trust -
Create a VF representor using the following command, replace the PCIe address with the PCIe address of the created VF:
echo 0000:17:00.2 > /sys/bus/pci/drivers/mlx5_core/unbind
echo 0000:17:00.2 > /sys/bus/pci/drivers/mlx5_core/bind
Last updated: