Single Root I/O Virtualization (SR-IOV) enables a single physical PCIe device to expose multiple virtual instances on the PCIe bus. Each instance, known as a virtual function (VF), acts as an independent PCIe device while sharing the physical function (PF)'s resources.
NVIDIA® ConnectX® adapters support up to 127 VFs per port, each of which can be provisioned and managed independently. SR-IOV is typically used with an SR-IOV-enabled hypervisor to provide virtual machines with direct hardware access to network interfaces, improving throughput and reducing CPU overhead.
This section describes how to configure SR-IOV in a Red Hat Enterprise Linux (RHEL) environment using ConnectX VPI adapters.
System Requirements
To configure and use SR-IOV, ensure the following prerequisites are met:
-
Installed MLNX_OFED driver
-
A server or blade with an SR-IOV-capable BIOS
-
A hypervisor that supports SR-IOV (for example, Red Hat Enterprise Linux Server 6 or later)
-
An ConnectX VPI adapter supporting SR-IOV
BIOS and Kernel Setup
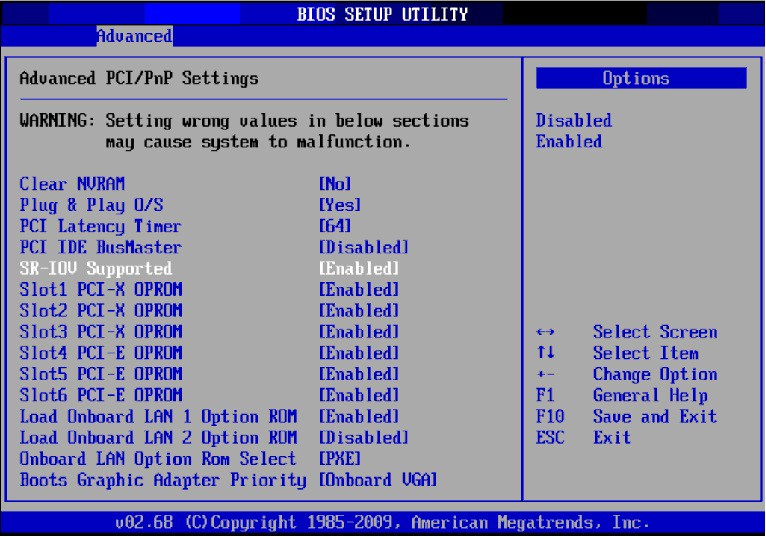
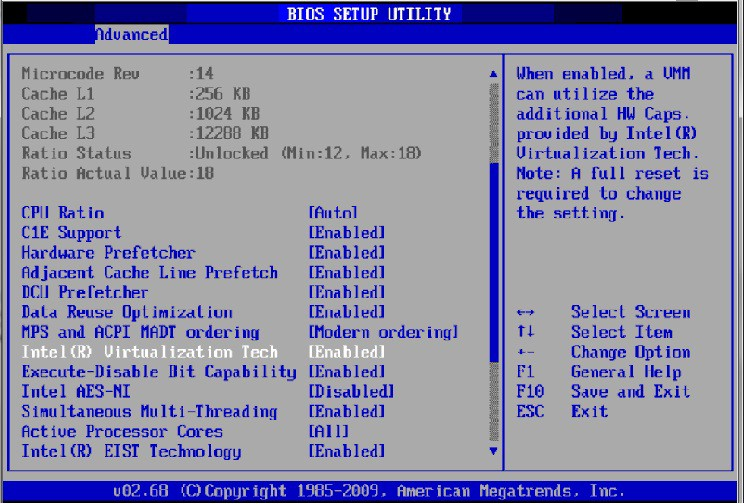
The figures used in this section are for illustration purposes only. For further information, refer to your BIOS User Manual.
-
Enable "SR-IOV" in the system BIOS.
-
Enable "Intel Virtualization Technology" (VT-d).
-
Install a hypervisor that supports SR-IOV.
-
Update the GRUB configuration to enable IOMMU:
Example for Intel systems (/boot/grub/grub.conf):default=0 timeout=5 splashimage=(hd0,0)/grub/splash.xpm.gz hiddenmenu title Red Hat Enterprise Linux Server (4.x.x) root (hd0,0) kernel /vmlinuz-4.x.x ro root=/dev/VolGroup00/LogVol00 rhgb quiet intel_iommu=on initrd /initrd-4.x.x.imgEnsure the parameter
intel_iommu=onis present. On newer systems using/boot/grub2/grub.cfg, add the parameter to the line starting withlinux16.
Configuring SR-IOV (Ethernet)
For configuration details, refer to the community guide HowTo Configure SR-IOV for ConnectX-4/ConnectX- 5/ConnectX-6 with KVM (Ethernet).
Configuring SR-IOV (InfiniBand)
-
Install MLNX_OFED for Linux with SR-IOV support.
-
Verify SR-IOV enablement in the firmware:
mlxconfig -d /dev/mst/mt4115_pciconf0 qExample output:
SRIOV_EN              1
NUM_OF_VFS            8
To modify these settings, if needed:
mlxconfig -d /dev/mst/mt4115_pciconf0 set SRIOV_EN=1 NUM_OF_VFS=16 -
Reboot the server.
-
Create VFs. Depending on your kernel version, use one of the following sysfs files:Standard (for newer kernels): echo <num_vfs> > /sys/class/infiniband/mlx5_0/device/sriov_numvfs Legacy (for older kernels): echo <num_vfs> > /sys/class/infiniband/mlx5_0/device/mlx5_num_vfs The sriov_numvfs file is only present if intel_iommu=on was set in GRUB.Rules:You can change the number of VFs only when none are assigned.If VFs are assigned to VMs, the count cannot be changed.Unloading the PF driver removes SR-IOV only if no VFs are assigned.When the PF driver is reloaded, assigned VFs become operational again (the VF driver may need to be restarted).
-
Verify VF creation.
lspci | grep MellanoxExample output:
08:00.0 Infiniband controller: Mellanox Technologies MT27700 Family [ConnectX-4] 08:00.1 Infiniband controller: Mellanox Technologies MT27700 Family [ConnectX-4] 08:00.2 Infiniband controller: Mellanox Technologies MT27700 Family [ConnectX-4 Virtual Function] 08:00.3 Infiniband controller: Mellanox Technologies MT27700 Family [ConnectX-4 Virtual Function] 08:00.4 Infiniband controller: Mellanox Technologies MT27700 Family [ConnectX-4 Virtual Function] 08:00.5 Infiniband controller: Mellanox Technologies MT27700 Family [ConnectX-4 Virtual Function] -
Configure each VF. Sysfs entries are available under
/sys/class/infiniband/mlx5_<PF_INDEX>/device/sriov/. Example output:sriov/ ├── 0/ │ ├── node │ ├── port │ └── policy ├── 1/ │ ├── node │ ├── port │ └── policy └── 2/ ├── node ├── port └── policy-
Node GUID:
echo 00:11:22:33:44:55:1:0 > /sys/class/infiniband/mlx5_0/device/sriov/0/node
-
Port GUID:
echo 00:11:22:33:44:55:2:0 > /sys/class/infiniband/mlx5_0/device/sriov/0/port
-
Policy (
/sys/class/infiniband/<PF>/device/sriov/<index>/policy) – Defines VF port behavior. Options: ValueDescriptionDownPort state remains downUpSets port to Initialize, allowing the SM to bring it upFollowMirrors the physical port's stateBy default, all VF policies initialize as
Down, exceptVPort0, which defaults toFollow.
-
-
Enable virtualization in OpenSM by adding the following to
/etc/opensm/opensm.conf:virt_enabled 2
OpenSM and related InfiniBand tools (e.g.,
iblinkinfo,ibqueryerr) must run on the PF, not the VF. In multi-PF configurations, OpenSM should run onhost0.
VF Initialization and Binding
Because the same mlx5_core driver handles both PFs and VFs, the PF driver attempts to initialize all VFs by default.
To assign a VF to a virtual machine, unbind it from the PF driver first:
-
Identify the VF PCIe address:
lspci -DExample:
0000:09:00.2 -
Unbind from PF driver:
echo 0000:09:00.2 > /sys/bus/pci/drivers/mlx5_core/unbind -
Bind again (if needed):
echo 0000:09:00.2 > /sys/bus/pci/drivers/mlx5_core/bind
PCIe BDF Mapping of PFs and VFs
PCIe addresses are sequential across PFs and VFs.
For example, if the card's PCIe slot is 05:00 and it has two ports:
|
Function |
PCIe BDF Range |
Description |
|---|---|---|
|
PF0 |
05:00.0 |
PF for port 0 |
|
PF1 |
05:00.1 |
PF for port 1 |
|
VFs for PF0 |
05:00.2–05:00.4 |
VFs 0–2 for PF0 ( |
|
VFs for PF1 |
05:00.5–05:00.7 |
VFs 0–2 for PF1 ( |
Additional SR-IOV Configurations
Assigning VF to Virtual Machine
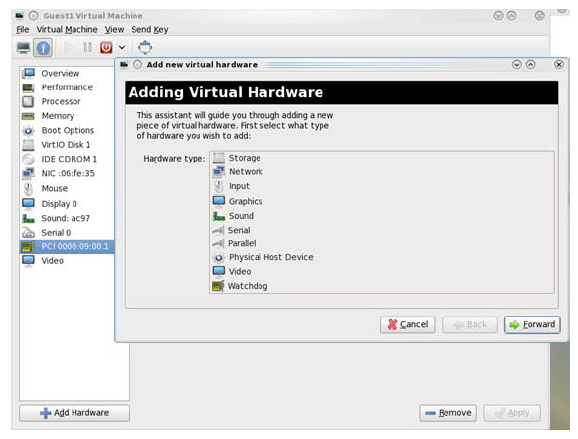
This section describes how to attach an SR-IOV VF to a VM on a Red Hat KVM host using virt-manager (RHEL/KVM).
-
Run the virt-manager.
-
Double-click the VM and open its Properties.
-
Go to Details → Add Hardware → PCI Host Device.
-
Select the NVIDIA VF by its PCIe address (e.g.,
00:03.1). -
Reboot the VM if it's running; otherwise, start it.
-
Inside the guest, verify the device is present:
lspci | grep MellanoxExample:
01:00.0 Infiniband controller: Mellanox Technologies MT28800 Family [ConnectX-5 Ex] -
(Optional) Configure the guest interface (e.g., via
/etc/sysconfig/network-scripts/ifcfg-ethX).VF MACs are randomly assigned by default; you don’t need to set one unless you require a stable MAC.
Ethernet VF Configuration (Host)
You can configure VFs via iproute2 (preferred) or sysfs.
-
Using ip (preferred)
ip link set { dev <PF_DEVICE> | group <DEVGROUP> } [ up | down ] \ vf <NUM> [ mac <LLADDR> ] [ vlan <VLANID> [ qos <VLAN-QOS> ] ] \ [ spoofchk { on | off } ] \ [ state { enable | disable | auto } ] -
Using sysfs (example layout, ConnectX-4)
/sys/class/net/<PF>/device/sriov/<VF>/
├── config
├── link_state
├── mac
├── mac_list
├── max_tx_rate
├── min_tx_rate
├── spoofcheck
├── stats
├── trunk
└── trust
VLAN Modes: VGT vs VST
-
VGT (VLAN Guest Tagging) – Guest tags/untags its own traffic. (Default)
-
VST (VLAN Switch Tagging) – Hypervisor enforces a VLAN/QoS for the VF; outgoing untagged/priority-tagged traffic is tagged by the hypervisor; incoming VLAN tags are stripped.
Configure VST:
ip link set dev <PF_DEVICE> vf <NUM> vlan <VLAN_ID> [qos <QOS>]
# Example:
ip link set dev eth2 vf 2 vlan 10 qos 3   # enable VST with VLAN 10, QoS 3
ip link set dev eth2 vf 2 vlan 0          # revert to VGT
Additional Ethernet VF Options
-
Guest MAC (set a stable MAC before the guest driver loads):
ip link set dev <PF_DEVICE> vf <NUM> mac <LLADDR>
For legacy/ConnectX-4 guests (no random MAC), always configure via
ip link. -
Spoof checking (kernel ≥ 3.1):
ip link set dev <PF_DEVICE> vf <NUM> spoofchk [on | off] -
Guest link state:
ip link set dev <PF_DEVICE> vf <UM> state [enable| disable| auto]
VF Statistics (sysfs)
Virtual function statistics can be queried via sysfs:
cat /sys/class/infiniband/mlx5_2/device/sriov/2/stats
tx_packets : 5011
tx_bytes   : 4450870
tx_dropped : 0
rx_packets : 5003
rx_bytes   : 4450222
rx_broadcast : 0
rx_multicast : 0
tx_broadcast : 0
tx_multicast : 8
rx_dropped : 0
Mapping VFs to Ports
Use ip link (v2.6.34~3+):
ip link
Example (excerpt):
61: p1p1: ...
    vf 0 MAC 00:00:00:00:00:00, vlan 4095, spoof checking off, link-state auto
    vf 38 MAC ff:ff:ff:ff:ff:ff, vlan 65535, spoof checking off, link-state disable
A MAC of ff:ff:ff:ff:ff:ff indicates the VF is not assigned to this net device's port.
You can still configure such VFs from this PF; changes apply to the VF’s actual port owner.
RoCE Support
RoCE is supported on VFs and can be used with VLANs. The hypervisor GID table has 16 entries; the remaining 112 entries are shared across VFs. With >56 VFs, some may have only a single GID entry, which is insufficient if a VF’s Ethernet interface is assigned an IP. Plan VF counts accordingly.
VGT+ (Virtual Guest Tagging Plus)
VGT+ lets a VF tag its own packets while enforcing an administrative VLAN trunk policy that defines which VLANs are allowed.
-
No default VLAN is defined by VGT+.
-
Outgoing packets are forwarded only if they match allowed VLANs.
-
Incoming packets are delivered to the VF only if allowed by policy.
In SR-IOV, the default operating mode is VGT.
Enable VGT+ (set allowed VLAN ranges):
# Enable VLAN range(s) on VF 0 of PF eth5:
echo "add <start_vid> <end_vid>" > /sys/class/net/eth5/device/sriov/0/trunk

# Examples:
echo "add 4 15"  > /sys/class/net/eth5/device/sriov/0/trunk
echo "add 17 17" > /sys/class/net/eth5/device/sriov/0/trunk

# VLAN 0 means untagged and priority-tagged traffic is allowed.
# Disable VGT+ (remove all VLANs):
echo "rem 0 4095" > /sys/class/net/eth5/device/sriov/0/trunk
# Remove a specific range/ID:
echo "rem 4 15"   > /sys/class/net/eth5/device/sriov/0/trunk
echo "rem 17 17"  > /sys/class/net/eth5/device/sriov/0/trunk
SR-IOV Advanced Security
MAC Anti-Spoofing
Prevents a VF from sending frames with a MAC different from the one assigned by the admin. Disabled by default.
-
Using
ip(kernel ≥ 3.10):ip link set ens785f1 vf 0 spoofchk on # enable ip link set ens785f1 vf 0 spoofchk off # disable
-
Using sysfs:
echo "ON"  > /sys/class/net/ens785f1/device/sriov/0/spoofcheck
echo "OFF" > /sys/class/net/ens785f1/device/sriov/0/spoofcheck
This setting is non-persistent across driver restarts.
Rate Limit per VF
See HowTo Configure Rate Limit per VF for ConnectX-4/ConnectX-5/ConnectX-6 Community post. Per-VF files (e.g., /sys/class/net/<ifname>/device/sriov/<vf_num>/max_tx_rate) still apply.
Rate Limit per Group of VFs
Group VFs and apply a group rate limit; effective VF limit is the min of the VF's own limit and the group’s available bandwidth share.
# Enable VLAN range(s) on VF 0 of PF eth5:
echo "add <start_vid> <end_vid>" > /sys/class/net/eth5/device/sriov/0/trunk

# Examples:
echo "add 4 15"  > /sys/class/net/eth5/device/sriov/0/trunk
echo "add 17 17" > /sys/class/net/eth5/device/sriov/0/trunk

# VLAN 0 means untagged and priority-tagged traffic is allowed.
# Disable VGT+ (remove all VLANs):
echo "rem 0 4095" > /sys/class/net/eth5/device/sriov/0/trunk
# Remove a specific range/ID:
echo "rem 4 15"   > /sys/class/net/eth5/device/sriov/0/trunk
echo "rem 17 17"  > /sys/class/net/eth5/device/sriov/0/trunk
Configuration outline:
-
When supported, the driver exposes
/sys/class/net/<ifname>/device/sriov/groups/. -
All VFs start in group 0.
-
Move a VF to a group:
echo 7 > /sys/class/net/<ifname>/device/sriov/5/group -
Set group max rate:
echo 5000 > /sys/class/net/<ifname>/device/sriov/groups/7/max_tx_rate
-
Inspect VF/group:VF stats include group ID: cat /sys/class/net/<ifname>/device/sriov/<vf_num>/stats Group config shows current rate limit and member count: cat /sys/class/net/<ifname>/device/sriov/groups/<group_id>/config
Bandwidth Guarantee per Group of VFs
Guarantee a minimum transmit rate per group; ensure the sum of group minimums ≤ line rate.
Example (40 Gb/s link):
echo 20000 > /sys/class/net/<ifname>/device/sriov/group/1/min_tx_rate
echo 5000 > /sys/class/net/<ifname>/device/sriov/group/2/min_tx_rate
echo 15000 > /sys/class/net/<ifname>/device/sriov/group/3/min_tx_rate
-
Group 1: 20 Gb/s
-
Group 2: 5 Gb/s
-
Group 3: 15 Gb/s
-
Groups with 0 have no guarantee.
You can still set per-VF min rates to split a group’s guarantee among member VFs (sum should not exceed the group minimum).
Privileged VFs
Trusted VFs can receive a limited set of PF-like privileges (e.g., entering promiscuous mode).
-
Using
ip(kernel ≥ 4.5):ip link set ens785f1 vf 0 trust on ip link set ens785f1 vf 0 trust off
-
Using sysfs:
echo "ON"  > /sys/class/net/ens785f1/device/sriov/0/trust
echo "OFF" > /sys/class/net/ens785f1/device/sriov/0/trust
Probed VFs
Probing VFs consumes resources. Disable probing if you don’t need to monitor VMs:
-
Kernel ≥ 4.12 (preferred) – use
sriov_drivers_autoprobe(PCIe sysfs). -
Older kernels – use
mlx5_coremodule paramprobe_vf:echo 0 > /sys/module/mlx5_core/parameters/probe_vf
For more information on how to probe VFs, see HowTo Configure and Probe VFs on mlx5 Drivers Community post.
VF Promiscuous and All-Multicast Modes
Only trusted VFs can enable these modes.
-
Promiscuous Mode (receive unmatched and all multicast traffic):
ifconfig eth2 promisc     # enable
ifconfig eth2 -promisc    # disable
-
All-Multicast Mode (receive all multicast on the port):
ifconfig eth2 allmulti    # enable
ifconfig eth2 -allmulti   # disable
Uninstalling the SR-IOV Driver
-
Detach all VFs from VMs or stop the VMs that use VFs.
Stopping the driver while VMs are using VFs may hang the host.
-
Run the uninstall script:
Follow the prompts. Example output (truncated):/usr/sbin/ofed_uninstall.sh
This program will uninstall all OFED packages on your machine.
Do you want to continue? [y/N]: y
...
-
Reboot the server.
Last updated: