IPMB requests can be initiated in 2 directions:
-
BlueField BMC-to-BlueField
-
BlueField-to-BlueField BMC
The NVIDIA® BlueField® networking platform's (DPU or SuperNIC) ipmb_dev_int driver is registered at the 7-bit I2C address 0x30 by default. The I2C address of the BlueField can be changed in the file /usr/bin/set_emu_param.sh.
-
BlueField Controller cards provide connection from the host server BMC to BlueField Arm I2C bus
-
BlueField devices provide connection from the host server BMC to the BlueField NC-SI port
-
BlueField Reference Platforms provide connection from its on-board BMC to BlueField Arm I2C bus
BlueField BMC IPMI Commands
The BlueField BMC is able to retrieve data from BlueField software over its Intelligent Platform Management Bus (IPMB).
For more details, please refer to the following sections of the NVIDIA BlueField BMC Software user manual under BMC SW tab.
-
Appendix - Generic IPMI Commands
-
Appendix - NVIDIA OEM IPMI Commands
BlueField IPMI Commands
The BlueField is able to retrieve data from the BlueField BMC over IPMB.
Issue a command with the following format from the BlueField to retrieve information from the BMC:
$ ipmitool <ipmitool command>
The BlueField may request information about itself using the following command format:
$ ipmitool -U ADMIN -P ADMIN -p 9001 -H localhost <ipmitool command>
The ipmb_host driver allows the BlueField to send requests to the BMC. Once set_emu_param.service is started, it will try to load the ipmb_host drivers. If the BMC is down or not responsive when BlueField tries to load the ipmb_host driver, the latter will not load successfully. In that case, make sure the BMC is up and operational, and run the following from BlueField's console:
echo 0x1011 > /sys/bus/i2c/devices/i2c-2/delete_device
rmmod ipmb_host
The set_emu_param.service script will try to load the driver again.
I2C Addresses for BMC-initiated Requests
|
Device |
I2C Address |
|---|---|
|
BlueField |
0x30 |
|
BMC |
0x20 |
I2C Addresses for BlueField-initiated Requests
|
Device |
I2C Address |
|---|---|
|
BlueField |
0x11 |
|
BMC |
0x10 |
Changing I2C Addresses
To use a different BlueField or BMC I2C address, you must make changes to the following files' variables.
|
Filename Path |
Parameter Change |
|---|---|
|
|
The
These addresses must be different from one another. Otherwise, one of the drives will fail to register. To change the BMC I2C address:
|
Disabling IPMI from BlueField Arm to BMC
The BlueField SoC features two I2C channels connecting BlueField Arm and the BMC:
-
I2C-1 sends IPMI commands from BlueField Arm to the BMC
-
I2C-5 sends IPMI commands from the BMC to BlueField Arm
In cases where the BlueField Arm is not trusted, it may be desirable to block IPMI commands from the BlueField Arm to the BMC as it could grant a malicious actor root-level access to the BMC. This can be done via Redfish or the UEFI menu.
Disabling IPMI Using Redfish
-
Disable I2C-1:
curl -k -u root:'bmc_password' -H 'content-type: application/json' -d '{ "Attributes": { "DisableI2c1": true } }' -X PATCH https://<bmc_ip>/redfish/v1/Systems/Bluefield/Bios/Settings
-
Make sure the configuration is saved in the BMC's data base:
# curl -k -u root:'bmc_password' -H 'content-type: application/json' X GET https://<bmc_ip>/redfish/v1/Systems/Bluefield/Bios/Settings{
  "@odata.id": "/redfish/v1/Systems/Bluefield/Bios/Settings",
  "@odata.type": "#Bios.v1_2_0.Bios",
  "Attributes": {
    "DisableI2c1": true
  },
  "Description": "BIOS Settings",
  "Id": "BIOS_Settings",
  "Name": "BIOS Configuration"
}
-
Perform warm reset (e.g.,
SW_RESET) and wait for Redfish to run. -
Perform warm reset (e.g.,
SW_RESET) and wait for Linux to boot. -
Verify that
i2c-1has successfully been disabled:root@localhost:~# ls /sys/bus/i2c/devices/Expected output:
i2c-5i2c-1device should not appear.
Disabling IPMI Using UEFI Menu
-
Select Device Manager:
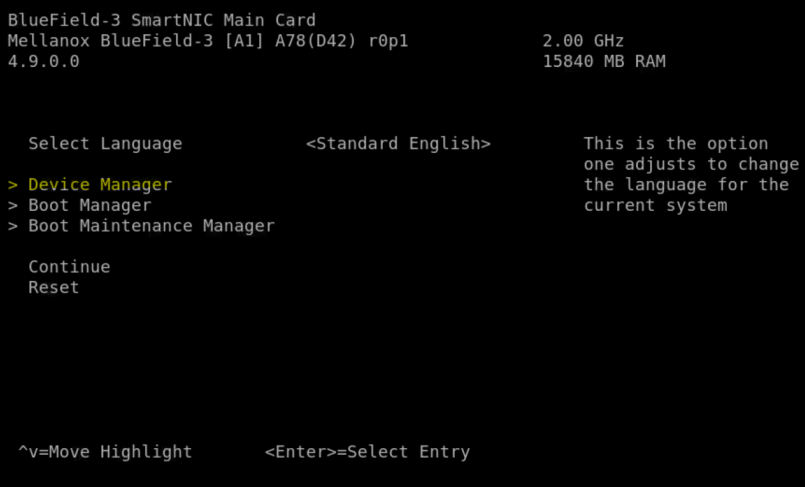
-
Select System Configuration:
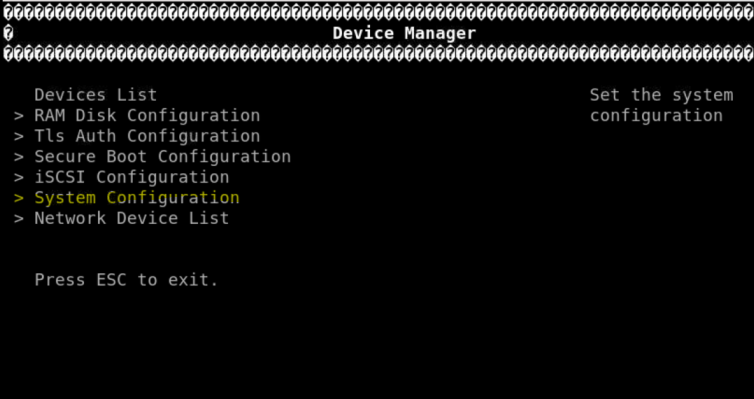
-
Select Disable I2C1 (make sure it is marked with an X):
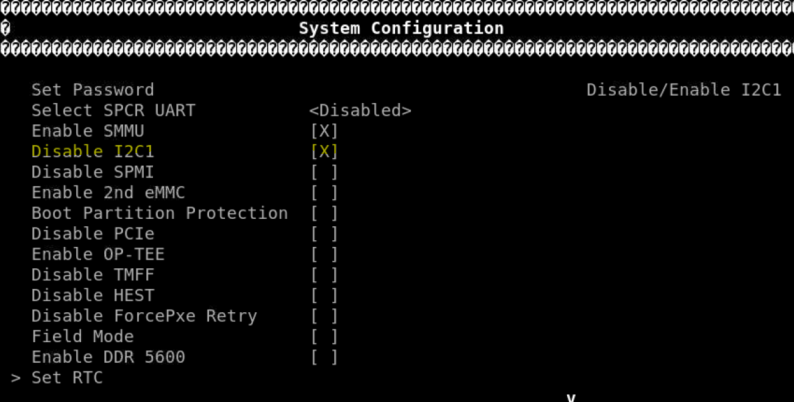
-
Press ESC key and type Y to save your changes.
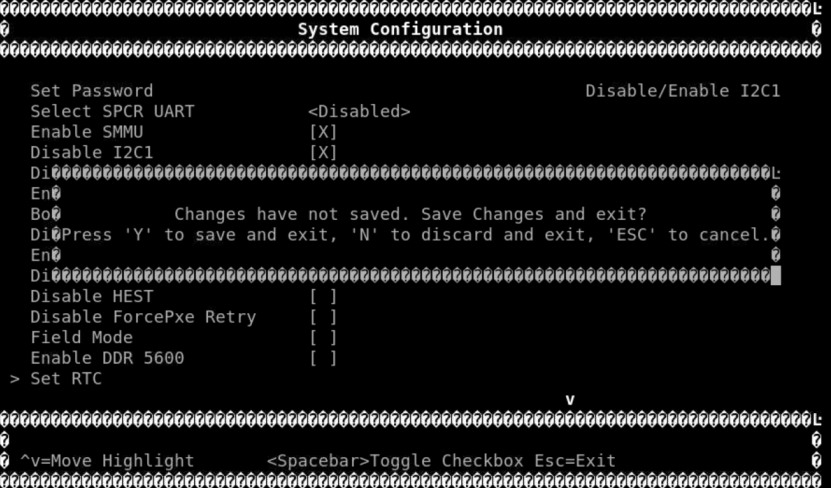
-
Perform a warm reset (e.g.,
SW_RESETor via the reset option in the main menu of the UEFI menu) and wait for Linux to boot. -
Verify that
i2c-1has successfully been disabled:root@localhost:~# ls /sys/bus/i2c/devices/Expected output:
i2c-5i2c-1device should not appear.
External Host IPMI Commands
It is possible for the external host to retrieve data from the BlueField via the IPMI LAN interface (either OOB or ConnectX).
To do that:
-
Set the network interface address properly in
progconf. For example, if the OOB IP address is 192.168.101.2, edit theOOB_IPvariable in the/etc/ipmi/progconffile as follows:root@localhost:~# cat /etc/ipmi/progconf SUPPORT_IPMB="NONE" LOOP_PERIOD=3 BF_FAMILY=$(/usr/bin/bffamily | tr -d '[:space:]') OOB_IP="192.168.101.2"
-
Then reboot or restart the IPMI service as follows:
systemctl restart mlx_ipmid
-
To get information from the BlueField, issue commands from the external host in the following format:
ipmitool -I lanplus -H 192.168.101.2 -U ADMIN -P ADMIN <ipmitool command>
Loading and Using IPMI on BlueField Running CentOS
-
Load the BlueField CentOS image:
The following steps are performed from the BlueField CentOS prompt. The BlueField is running CentOS 7.6 with kernel 5.4. The CentOS installation was done using the CentOS everything ISO image.
The following drivers need to be loaded on the BlueField running CentOS:
-
jc42.ko -
ee1004.ko -
at24.ko -
eeprom.ko -
i2c-dev.ko
Example of loading
ee1004.ko,at24.ko, andeeprom.ko:modprobe ee1004 modprobe at24 modprobe eeprom
The
i2c-devmodule is built into the kernel 5.4.60 on CentOS 7.6.
-
-
(Optional) Update the
i2c-mlxdriver if the installed version is older thani2c-mlx-1.0-0.gab579c6.src.rpm.-
Re-compile
i2c-mlx. Run:$ yum remove -y kmod-i2c-mlx $ modprobe -rv i2c-mlx
-
Transfer the
i2c-mlxRPM from the BlueField software tarball under distro/SRPM onto the Arm. Run:$ rpmbuild --rebuild /root/i2c-mlx-1.0-0.g422740c.src.rpm $ yum install -y /root/rpmbuild/RPMS/aarch64/i2c-mlx-1.0-0.g422740c_5.4.17_mlnx.9.ga0bea68.aarch64.rpm $ ls -l /lib/modules/$(uname -r)/extra/i2c-mlx/i2c-mlx.ko
-
Load
i2c-mlx. Run:$ modprobe i2c-mlx
-
-
Install the following packages:
$ yum install ipmitool lm_sensorsIf the above operation fails for ipmitool, run the following to install it:
wget http://sourceforge.net/projects/ipmitool/files/ipmitool/1.8.18/ipmitool-1.8.18.tar.gz
tar -xvzf ipmitool-1.8.18.tar.gz
cd ipmitool-1.8.18
./bootstrap
./configure
make
make install DESTDIR=/tmp/package-ipmitool
-
The
i2c-toolspackage is also required, but the version contained in the CentOS Yum repository is old and does not work with BlueField. Therefore, please download i2c-tools version 4.1, and then build and install it.# Build i2c-tools from a newer source wget http://mirrors.edge.kernel.org/pub/software/utils/i2c-tools/i2c-tools-4.1.tar.gz tar -xvzf i2c-tools-4.1.tar.gz cd i2c-tools-4.1 make make install PREFIX=/usr # create a link to the libraries ln -sfn /usr/lib/libi2c.so.0.1.1 /lib64/libi2c.so ln -sfn /usr/lib/libi2c.so.0.1.1 /lib64/libi2c.so.0
-
Generate an RPM binary from the BlueField's mlx-OpenIPMI-2.0.25 source RPM.
The following packages might be needed to build the binary RPM depending on which version of CentOS you are using.
$ yum install libtool rpm-devel rpmdevtools rpmlint wget ncurses-devel automake
$ rpmbuild --rebuild mlx-OpenIPMI-2.0.25-0.g581ebbb.src.rpm
You may obtain this rpm file by means of scp from the server host's Bluefield Distribution folder. For example:
$ scp <BF_INST_DIR>/distro/SRPMS/mlx-OpenIPMI-2.0.25-0.g4fdc53d.src.rpm <ip-address>:/<target_directory>/
If there are issues with building the OpenIPMI RPM, verify that the swig package is not installed.
$ yum remove -y swig
-
Generate a binary RPM from the ipmb-dev-int source RPM and install it. Run:
$ rpmbuild --rebuild ipmb-dev-int-1.0-0.g304ea0c.src.rpm
-
Generate a binary RPM from the
ipmb-hostsource RPM and install it. Run:$ rpmbuild --rebuild ipmb-host-1.0-0.g304ea0c.src.rpm
-
Load OpenIPMI,
ipmb-host, andipmb-dev-intRPM packages. Run:$ yum install -y /root/rpmbuild/RPMS/aarch64/mlx-OpenIPMI-2.0.25-0.g581ebbb_5.4.0_49.el7a.aarch64.aarch64.rpm $ yum install -y /root/rpmbuild/RPMS/aarch64/ipmb-dev-int-1.0-0.g304ea0c_5.4.0_49.el7a.aarch64.aarch64.rpm $ yum install -y /root/rpmbuild/RPMS/aarch64/ipmb-host-1.0-0.g304ea0c_5.4.0_49.el7a.aarch64.aarch64.rpm
-
Load the IPMB driver. Run:
$ modprobe ipmb-dev-int
-
Install and start
rasdaemonpackage. Run:yum install rasdaemon systemctl enable rasdaemon systemctl start rasdaemon
-
Start the IPMI daemon. Run:
$ systemctl enable mlx_ipmid
$ systemctl start mlx_ipmid
$ systemctl enable set_emu_param
$ systemctl start set_emu_param
Last updated: