This page explains how CVT tracks the lifecycle of each device in your topology, how statuses affect CVT operations, and how to manage device statuses through the UI.
What Is Device Status?
Every device in a CVT topology is assigned a lifecycle status that reflects where the device stands in the journey from initial discovery through validation and into production. CVT uses this status to decide which operations are appropriate for each device -- for example, whether to ping it, deploy an agent, or include it in validation.
Statuses change in two ways:
-
Automatically -- CVT promotes or demotes devices based on connectivity checks, pre-check results, agent deployment outcomes, and validation events.
-
Manually -- Administrators set statuses through the UI when a device needs to be placed into maintenance, marked for production, excluded from management, and so on.
Only valid transitions are allowed. If a transition does not make sense for a device's current status, CVT rejects it and explains why.
Device Statuses at a Glance
|
Status |
Description |
|---|---|
|
Undefined |
Initial state after topology load. CVT has not yet checked the device. |
|
Not Installed |
Device does not respond to ping. Assumed to be absent or unreachable. |
|
Installed No Power |
Device is physically present but not powered on. Behaves the same as Not Installed. |
|
Not Provisioned |
Device is reachable but failed one or more pre-checks (e.g., SSH credentials, disk space, OS version). |
|
Provisioned |
Device passes all pre-checks and is ready for an agent deployment decision. |
|
Unsupported |
Device model is not supported by CVT. |
|
Agent Ready |
Device is eligible for agent deployment. Only devices in this status appear in the deployment wizard. |
|
Validation Ready |
Agent is deployed and the device is ready to start validation. |
|
Validating |
Validation is actively running on this device. |
|
Validation Only |
Agent is externally managed (not by CVT). CVT can validate but cannot remove the agent. |
|
Production Ready |
Validation is complete and the device is ready to be promoted to production. |
|
Production |
Device is in production. The agent is idle and the device is hidden from the circuit view. |
|
Drain / Troubleshooting |
A production device that requires investigation. CVT re-deploys the agent and starts validation. |
|
Maintenance |
Device is under maintenance. All alarms are suppressed, validation is stopped, and pinging is disabled. |
|
Unmanaged |
Device is excluded from all CVT operations. Appears grayed out in the rack view. |
Lifecycle Overview
The diagram below shows the primary path a device takes from discovery through production. This is the path that devices follow automatically when everything is working correctly.
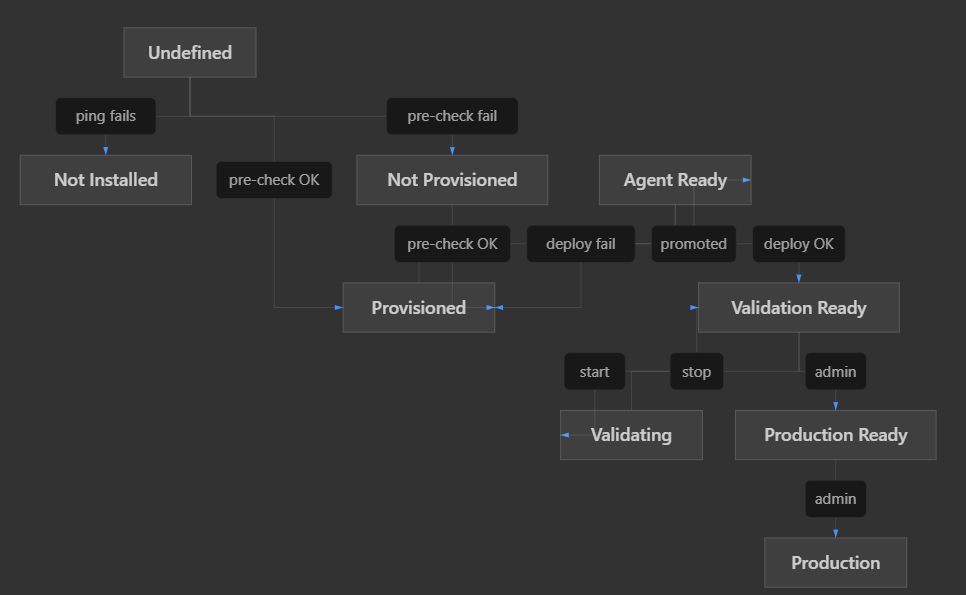
At any point, an administrator can move a device into one of the operational statuses: Maintenance, Drain / Troubleshooting, Unmanaged, or Validation Only. The full set of allowed transitions is listed in the reference table below.
Allowed Transitions Reference
|
From |
Allowed Targets |
|---|---|
|
Undefined |
Not Installed, Provisioned, Not Provisioned, Unmanaged |
|
Not Installed |
Installed No Power, Not Provisioned, Unmanaged |
|
Installed No Power |
Not Installed, Not Provisioned, Unmanaged |
|
Not Provisioned |
Provisioned, Unmanaged |
|
Provisioned |
Not Provisioned, Agent Ready, Unmanaged, Unsupported |
|
Unsupported |
Not Provisioned |
|
Agent Ready |
Validation Ready, Provisioned |
|
Validation Ready |
Validating, Production Ready, Drain / Troubleshooting, Maintenance, Provisioned, Agent Ready |
|
Validating |
Validation Ready, Production Ready, Drain / Troubleshooting, Maintenance, Provisioned, Agent Ready |
|
Validation Only |
Production Ready, Maintenance, Provisioned, Agent Ready |
|
Production Ready |
Production, Drain / Troubleshooting, Provisioned, Agent Ready |
|
Production |
Drain / Troubleshooting, Maintenance, Provisioned, Agent Ready |
|
Drain / Troubleshooting |
Validation Ready, Maintenance, Provisioned, Agent Ready |
|
Maintenance |
Provisioned, Agent Ready, Validation Ready |
|
Unmanaged |
Not Installed, Not Provisioned, Provisioned |
Typical Device Journey
A device that is functioning correctly and has proper credentials will automatically progress through these statuses without any administrator intervention:
-
Undefined -- topology is loaded.
-
Provisioned -- CVT pings the device and runs pre-checks (SSH access, disk space, OS version). All checks pass.
-
Agent Ready -- CVT confirms the device is eligible for agent deployment.
-
Validation Ready -- the agent is deployed successfully.
-
Validating -- validation starts.
From there, the administrator reviews validation results and decides whether to promote the device to Production Ready and eventually to Production.
If something goes wrong at any step (ping failure, pre-check failure, deploy failure), CVT automatically moves the device to the appropriate status so you can see at a glance what needs attention.
How Status Affects CVT Operations
Each status determines which CVT operations apply to the device:
|
Status |
Ping |
Agent Deploy |
Start Validation |
Stop Validation |
Deployment Wizard |
Rack View |
Circuit View |
|---|---|---|---|---|---|---|---|
|
Undefined |
Yes |
-- |
-- |
-- |
-- |
Normal |
Normal |
|
Not Installed |
-- |
-- |
-- |
-- |
-- |
Normal |
Normal |
|
Installed No Power |
-- |
-- |
-- |
-- |
-- |
Normal |
Normal |
|
Not Provisioned |
Yes |
-- |
-- |
-- |
-- |
Normal |
Normal |
|
Provisioned |
Yes |
-- |
-- |
-- |
-- |
Normal |
Normal |
|
Unsupported |
Yes |
-- |
-- |
-- |
-- |
Normal |
Normal |
|
Agent Ready |
Yes |
Yes |
-- |
-- |
Yes |
Normal |
Normal |
|
Validation Ready |
Yes |
Yes |
Yes |
-- |
-- |
Normal |
Normal |
|
Validating |
Yes |
-- |
Yes |
Yes |
-- |
Normal |
Normal |
|
Validation Only |
Yes |
-- |
Yes |
Yes |
-- |
Normal |
Normal |
|
Production Ready |
Yes |
Yes |
Yes |
-- |
-- |
Normal |
Normal |
|
Production |
Yes |
-- |
-- |
-- |
-- |
Normal |
Hidden |
|
Drain / Troubleshooting |
Yes |
Yes |
Yes |
-- |
-- |
Normal |
Normal |
|
Maintenance |
-- |
-- |
-- |
-- |
-- |
Normal |
Normal |
|
Unmanaged |
-- |
-- |
-- |
-- |
-- |
Grayed |
Normal |
Key takeaways:
-
Devices that are Not Installed, Installed No Power, Maintenance, or Unmanaged are not pinged at all.
-
Only Agent Ready devices appear in the deployment wizard.
-
Production devices are hidden from the circuit view to reduce noise.
-
Unmanaged devices appear grayed out in the rack view.
Managing Device Status in the UI
Viewing Device Status
-
Open the CVT web UI and navigate to the Devices view.
-
The Lifecycle column displays a color-coded badge for each device:
Badge Color
Statuses
Green
Validation Ready, Validating, Validation Only, Production Ready, Production
Light Green
Provisioned, Agent Ready
Orange
Not Provisioned
Gray
Unmanaged, Not Installed, Installed No Power, Unsupported
Blue
Drain / Troubleshooting, Maintenance
Light Gray
Undefined
-
Click any device row to open the detail panel on the right side.
Changing the Status of a Single Device
-
Select a device in the Devices view by clicking its row.
-
Click the Set Status button in the toolbar (admin-only), or right-click the device and choose Set Device Status.
-
The modal shows the device name and its current status badge.
-
Choose a new status from the dropdown. Only transitions that are valid from the device's current status are listed.
-
Optionally enter a reason describing why you are making this change.
-
Click Apply.
The devices table refreshes automatically to show the updated status.
Changing the Status of Multiple Devices (Bulk Update)
-
Select multiple devices using Ctrl+click or Shift+click. The detail panel on the right is hidden during multi-select.
-
Click Set Status.
-
The bulk modal shows the list of selected devices and a dropdown listing all statuses. (CVT validates each device individually on the backend.)
-
Optionally enter a reason.
-
Click Apply.
-
A results summary appears showing:
-
Number of successful updates.
-
Number of failures.
-
Per-device error details for any transitions that were rejected.
-
Viewing Status History
-
Select a device in the Devices view.
-
In the detail panel, click the Status History tab.
-
The history table shows every transition for that device:
-
Timestamp -- when the change occurred.
-
From / To -- previous and new status (displayed as badges).
-
Reason -- why the transition happened (e.g., "pre-check passed" or a user-provided reason).
-
Changed By --
autofor system-driven transitions, or the administrator's username for manual changes.
-
History is sorted newest-first.
Agent Deployment and Device Status
Standard Deployment
When you open the Deploy Agents dialog, only devices in Agent Ready status appear in the device list. After a successful deployment:
-
The device transitions from Agent Ready to Validation Ready.
If deployment fails:
-
The device transitions from Agent Ready back to Provisioned so that pre-checks can re-evaluate it on the next connectivity cycle.
Force Deployment
The Deploy Agents dialog includes a Force deploy checkbox (admin-only). When enabled, agent deployment proceeds for devices regardless of their current status. This is useful when you need to deploy agents on devices that have not yet been promoted to Agent Ready.
Force deploy still respects one safety rule: it will not redeploy on a device that already has the correct agent version installed.
Topology Upload and the Managed Column
Unified PTP Files
In Unified PTP files, the Managed column controls whether CVT manages each device. Switches with Managed=False are automatically initialized to Unmanaged status on topology load. The "Allow CVT to manage agents on servers" checkbox is not shown for Unified PTP uploads because management is controlled per-node in the file itself.
DOT Files and Legacy ETH PTP
For DOT file uploads and Legacy ETH PTP files (which lack a per-node Managed column), the "Allow CVT to manage agents on servers" checkbox remains available.
Automatic Transitions
CVT handles most status transitions automatically. The following sections describe the key automated workflows.
Connectivity Checks
After a topology is loaded, CVT periodically pings devices and runs pre-checks:
|
Event |
Transition |
|---|---|
|
Ping fails on a new device |
Undefined → Not Installed |
|
Ping succeeds, pre-checks pass |
Undefined → Provisioned → Agent Ready |
|
Ping succeeds, pre-checks fail |
Undefined → Not Provisioned |
|
Previously unreachable device becomes reachable and passes pre-checks |
Not Installed → Not Provisioned → Provisioned → Agent Ready |
|
Pre-checks fail on a Provisioned device |
Provisioned → Not Provisioned |
If the agent is already installed when pre-checks pass, CVT continues the chain through to Validation Ready.
Agent Deployment
|
Event |
Transition |
|---|---|
|
Agent deployed successfully |
Agent Ready → Validation Ready |
|
Agent deployment fails |
Agent Ready → Provisioned |
|
Agent uninstalled |
Validation Ready → Provisioned |
Validation Lifecycle
|
Event |
Transition |
|---|---|
|
Validation starts |
Validation Ready → Validating |
|
Validation stops |
Validating → Validation Ready |
Crash Recovery
If the CVT collector stops unexpectedly while devices are in the Validating state, those devices are automatically reset to Validation Ready on the next startup so that validation can be restarted cleanly.
Migration from Excluded Devices
If you are upgrading from a CVT version that used the excluded_devices.txt file to exclude devices, the migration happens automatically on first startup:
-
Devices listed in the file are set to Unmanaged status.
-
The file is renamed to
excluded_devices.txt.migrated. -
On subsequent restarts, the migration is skipped.
No manual action is required.
Common Workflows
Bringing a New Device into Production
-
Load the topology (or add the device to an existing topology).
-
Wait for CVT to ping the device and run pre-checks. The device progresses automatically: Undefined → Provisioned → Agent Ready.
-
Deploy the agent (the device appears in the deployment wizard). On success: Agent Ready → Validation Ready.
-
Start validation. The device moves to Validating.
-
Review validation results. When satisfied, use Set Status to promote the device to Production Ready.
-
When ready to put the device into service, promote it to Production.
Excluding a Device from CVT
-
Select the device in the Devices view.
-
Click Set Status and choose Unmanaged.
-
The device is immediately excluded from pinging, deployment, and validation. It appears grayed out in the rack view.
To bring the device back, set it to Not Installed, Not Provisioned, or Provisioned (depending on its actual state). CVT will re-evaluate it during the next connectivity cycle.
Putting a Device into Maintenance
-
Select the device and set its status to Maintenance.
-
CVT stops pinging, stops validation, and suppresses alarms for this device.
-
When maintenance is complete, set the device to Provisioned, Agent Ready, or Validation Ready depending on whether you want CVT to re-validate it.
Troubleshooting a Production Device
-
Set the production device to Drain / Troubleshooting.
-
CVT re-deploys the agent and starts validation so you can investigate the issue with full telemetry.
-
Once resolved, move the device back to Validation Ready or directly to Production Ready if no further validation is needed.
Tips and Best Practices
-
Let CVT drive the early stages. Devices progress automatically from Undefined through Agent Ready. Manual intervention is only needed if something fails or if you want to skip steps using force deploy.
-
Use the Maintenance status before performing hardware work on a device. This prevents false alarms and unnecessary agent activity.
-
Review status history when investigating issues. The history tab provides a complete audit trail of every status change, including timestamps and reasons.
-
Use bulk updates when managing large deployments. Select multiple devices and transition them in a single operation rather than one at a time.
-
Validation Only is intended for devices where the agent is managed by an external system. CVT can run validation on these devices but will not attempt to install or remove the agent.
Last updated: