This guide details the necessary steps to set up NVIDIA DOCA in your Linux environment.
Introduction
Installation of the NVIDIA® BlueField® networking platform (DPU or SuperNIC) software requires following the following step-by-step procedure.
For questions, comments, and feedback, please contact us at doca-feedback@nvidia.com.
Supported Platforms
The following NVIDIA® BlueField® platforms are supported and have been tested with this version of DOCA:
Supported and Tested BlueField Platforms
NVIDIA BlueField-3 Platforms
|
SKU |
PSID |
Description |
|---|---|---|
|
900-9D3B6-00CN-AB0 |
MT_0000000883 |
NVIDIA BlueField-3 B3240 P-Series Dual-slot FHHL DPU; 400GbE / NDR IB (default mode); Dual-port QSFP112; PCIe Gen5.0 x16 with x16 PCIe extension option; 16 Arm cores; 32GB on-board DDR; integrated BMC; Crypto Enabled |
|
900-9D3B6-00CV-AAH |
MT_0000000884 |
NVIDIA BlueField-3 B3220 P-Series FHHL DPU; 200GbE (default mode) / NDR200 IB; Dual-port QSFP112; PCIe Gen5.0 x16 with x16 PCIe extension option; 16 Arm cores; 32GB on-board DDR; integrated BMC; Crypto Enabled |
|
900-9D3B6-00SN-AB0 |
MT_0000000964 |
NVIDIA BlueField-3 B3240 P-Series Dual-slot FHHL DPU; 400GbE / NDR IB (default mode); Dual-port QSFP112; PCIe Gen5.0 x16 with x16 PCIe extension option; 16 Arm cores; 32GB on-board DDR; integrated BMC; Crypto Disabled |
|
900-9D3B6-00SV-AA0 |
MT_0000000965 |
NVIDIA BlueField-3 B3220 P-Series FHHL DPU; 200GbE (default mode) / NDR200 IB; Dual-port QSFP112; PCIe Gen5.0 x16 with x16 PCIe extension option; 16 Arm cores; 32GB on-board DDR; integrated BMC; Crypto Disabled |
|
900-9D3B4-00CC-EA0 |
MT_0000000966 |
NVIDIA BlueField-3 B3210L E-series FHHL SuperNIC; 100GbE (default mode) / HDR100 IB; Dual port QSFP112; PCIe Gen5.0 x16; 8 Arm cores; 16GB on-board DDR; integrated BMC; Crypto Enabled |
|
900-9D3B4-00SC-EA0 |
MT_0000000967 |
NVIDIA BlueField-3 B3210L E-series FHHL SuperNIC; 100GbE (default mode) / HDR100 IB; Dual port QSFP112; PCIe Gen5.0 x16; 8 Arm cores; 16GB on-board DDR; integrated BMC; Crypto Disabled |
|
900-9D3B4-00EN-EA0 |
MT_0000001010 |
NVIDIA BlueField-3 B3140L E-Series FHHL SuperNIC; 400GbE / NDR IB (default mode); Single-port QSFP112; PCIe Gen5.0 x16; 8 Arm cores; 16GB on-board DDR; integrated BMC; Crypto Enabled |
|
900-9D3B4-00PN-EA0 |
MT_0000001011 |
NVIDIA BlueField-3 B3140L E-Series FHHL SuperNIC; 400GbE / NDR IB (default mode); Single-port QSFP112; PCIe Gen5.0 x16; 8 Arm cores; 16GB on-board DDR; integrated BMC; Crypto Disabled |
|
900-9D3B6-00CC-AA0 |
MT_0000001024 |
NVIDIA BlueField-3 B3210 P-Series FHHL DPU; 100GbE (default mode) / HDR100 IB; Dual-port QSFP112; PCIe Gen5.0 x16 with x16 PCIe extension option; 16 Arm cores; 32GB on-board DDR; integrated BMC;Crypto Enabled |
|
900-9D3B6-00SC-AA0 |
MT_0000001025 |
NVIDIA BlueField-3 B3210 P-Series FHHL DPU; 100GbE (default mode) / HDR100 IB; Dual-port QSFP112; PCIe Gen5.0 x16 with x16 PCIe extension option; 16 Arm cores; 32GB on-board DDR; integrated BMC; Crypto Disabled |
|
900-9D3D4-00EN-HA0 |
MT_0000001069 |
Nvidia BlueField-3 B3140H E-series HHHL SuperNIC; 400GbE (default mode) / NDR IB; Single-port QSFP112; PCIe Gen5.0 x16; 8 Arm cores; 16GB on board DDR; integrated BMC; Crypto Enabled |
|
900-9D3D4-00NN-HA0 |
MT_0000001070 |
Nvidia BlueField-3 B3140H E-series HHHL SuperNIC; 400GbE (default mode) /NDR IB; Single-port QSFP112; PCIe Gen5.0 x16; 8 Arm cores; 16GB on board DDR; integrated BMC; Crypto Disabled |
|
900-9D3C6-00CV-DA0 |
MT_0000001075 |
NVIDIA BlueField-3 B3220SH E-Series FHHL Storage Controller; 200GbE (default mode) / NDR200 IB; Dual-port QSFP112; PCIe Gen5.0 x16 with x16 PCIe extension option; 16 Arm cores; 48GB on-board DDR; integrated BMC; Crypto Enabled; Secure Boot |
|
900-9D3C6-00CV-GA0 |
MT_0000001083 |
NVIDIA BlueField-3 B3220SH E-Series No heatsink FHHL Storage Controller; 200GbE (default mode) / NDR200 IB; Dual-port QSFP112; PCIe Gen5.0 x16 with x16 PCIe extension option; 16 Arm cores; 48GB on-board DDR; integrated BMC; Crypto Enabled |
|
900-9D3B4-00CV-EA0 |
MT_0000001093 |
NVIDIA BlueField-3 B3220L E-Series FHHL SuperNIC; 200GbE (default mode) / NDR200 IB; Dual-port QSFP112; PCIe Gen5.0 x16; 8 Arm cores; 16GB on-board DDR; integrated BMC; Crypto Enabled |
|
900-9D3B4-00SV-EA0 |
MT_0000001094 |
NVIDIA BlueField-3 B3220L E-Series FHHL SuperNIC; 200GbE (default mode) / NDR200 IB; Dual-port QSFP112; PCIe Gen5.0 x16; 8 Arm cores; 16GB on-board DDR; integrated BMC; Crypto Disabled |
|
900-9D3C6-00SV-GA0 |
MT_0000001101 |
NVIDIA BlueField-3 B3220SH E-Series No Heatsink FHHL Storage Controller; 200GbE (default mode) / NDR200 IB; Dual-port QSFP112; PCIe Gen5.0 x16 with x16 PCIe extension option; 16 Arm cores; 48GB on-board DDR; integrated BMC; Crypto Disabled |
|
900-9D3C6-00SV-DA0 |
MT_0000001102 |
NVIDIA BlueField-3 B3220SH E-Series FHHL Storage Controller; 200GbE (default mode) / NDR200 IB; Dual-port QSFP112; PCIe Gen5.0 x16 with x16 PCIe extension option; 16 Arm cores; 48GB on-board DDR; integrated BMC; Crypto Disabled; |
|
900-9D3B6-00CC-EA0 |
MT_0000001115 |
NVIDIA BlueField-3 B3210E E-Series FHHL DPU; 100GbE (default mode) / HDR100 IB; Dual-port QSFP112; PCIe Gen5.0 x16 with x16 PCIe extension option; 16 Arm cores; 32GB on-board DDR; integrated BMC; Crypto Enabled |
|
900-9D3B6-00SC-EA0 |
MT_0000001117 |
NVIDIA BlueField-3 B3210E E-Series FHHL DPU; 100GbE (default mode) / HDR100 IB; Dual-port QSFP112; PCIe Gen5.0 x16 with x16 PCIe extension option; 16 Arm cores; 32GB on-board DDR; integrated BMC; Crypto Disabled |
|
900-9D3B6-00CN-PA0 |
MT_0000001188 |
NVIDIA BlueField-3 B3240 P-Series FHHL DPU for Cold Aisle; 400GbE / NDR IB (default mode); Dual-port QSFP112; PCIe Gen5.0 x16 with x16 PCIe extension option; 16 Arm cores; 32GB on-board DDR; integrated BMC; Crypto Enabled |
|
900-9D3B6-00CV-PA0 |
MT_0000001196 |
NVIDIA BlueField-3 B3220 P-Series FHHL DPU for Cold Aisle; 200GbE (default mode) / NDR200 IB; Dual-port QSFP112; PCIe Gen5.0 x16 with x16 PCIe extension option; 16 Arm cores; 32GB on-board DDR; integrated BMC; Crypto Enabled; Tall Bracket |
|
900-9D3D4-00NN-LA0 |
MT_0000001229 |
Nvidia BlueField-3 B3140H E-series HHHL SuperNIC for Cold Aisle; 400GbE (default mode)/NDR IB; Single-port QSFP112; PCIe Gen5.0 x16; 8 Arm cores; 16GB on board DDR; integrated BMC; Crypto Disabled |
NVIDIA BlueField-2 Platforms
|
NVIDIA SKU |
Legacy OPNs |
PSID |
Description |
|---|---|---|---|
|
900-9D219-0086-ST1 |
MBF2M516A-CECOT |
MT_0000000375 |
BlueField-2 E-Series DPU 100GbE Dual-Port QSFP56; PCIe Gen4 x16; Crypto and Secure Boot Enabled; 16GB on-board DDR; 1GbE OOB management; FHHL |
|
900-9D219-0086-ST0 |
MBF2M516A-EECOT |
MT_0000000376 |
BlueField-2 E-Series DPU 100GbE/EDR/HDR100 VPI Dual-Port QSFP56; PCIe Gen4 x16; Crypto and Secure Boot Enabled; 16GB on-board DDR; 1GbE OOB management; FHHL |
|
900-9D219-0056-ST1 |
MBF2M516A-EENOT |
MT_0000000377 |
BlueField-2 E-Series DPU 100GbE/EDR/HDR100 VPI Dual-Port QSFP56; PCIe Gen4 x16; Crypto Disabled; 16GB on-board DDR; 1GbE OOB management; FHHL |
|
900-9D206-0063-ST4 |
MBF2M322A-AEEOT |
MT_0000000490 |
BlueField-2 E-Series DPU 25GbE Dual-Port SFP56; PCIe Gen4 x8; Crypto Enabled; 8GB on-board DDR; 1GbE OOB management; HHHL |
|
900-9D206-0053-SQ0 |
MBF2H332A-AENOT |
MT_0000000539 |
BlueField-2 P-Series DPU 25GbE Dual-Port SFP56; PCIe Gen4 x8; Crypto Disabled; 16GB on-board DDR; 1GbE OOB management; HHHL |
|
900-9D206-0063-ST2 |
MBF2H332A-AEEOT |
MT_0000000540 |
BlueField-2 P-Series DPU 25GbE Dual-Port SFP56; PCIe Gen4 x8; Crypto Enabled; 16GB on-board DDR; 1GbE OOB management; HHHL |
|
900-9D206-0083-ST3 |
MBF2H332A-AECOT |
MT_0000000541 |
BlueField-2 P-Series DPU 25GbE Dual-Port SFP56; PCIe Gen4 x8; Crypto and Secure Boot Enabled; 16GB on-board DDR; 1GbE OOB management; HHHL |
|
900-9D206-0083-ST1 |
MBF2H322A-AECOT |
MT_0000000542 |
BlueField-2 P-Series DPU 25GbE Dual-Port SFP56; PCIe Gen4 x8; Crypto and Secure Boot Enabled; 8GB on-board DDR; 1GbE OOB management; HHHL |
|
900-9D206-0063-ST1 |
MBF2H322A-AEEOT |
MT_0000000543 |
BlueField-2 P-Series DPU 25GbE Dual-Port SFP56; PCIe Gen4 x8; Crypto Enabled; 8GB on-board DDR; 1GbE OOB management; HHHL |
|
900-9D206-0053-ST2 |
MBF2H322A-AENOT |
MT_0000000544 |
BlueField-2 P-Series DPU 25GbE Dual-Port SFP56; PCIe Gen4 x8; Crypto Disabled; 8GB on-board DDR; 1GbE OOB management; HHHL |
|
900-9D219-0066-ST0 |
MBF2M516A-EEEOT |
MT_0000000559 |
BlueField-2 E-Series DPU 100GbE/EDR/HDR100 VPI Dual-Port QSFP56; PCIe Gen4 x16; Crypto Enabled; 16GB on-board DDR; 1GbE OOB management; FHHL |
|
900-9D219-0056-SN1 |
MBF2M516A-CENOT |
MT_0000000560 |
BlueField-2 E-Series DPU 100GbE Dual-Port QSFP56; PCIe Gen4 x16; Crypto Disabled; 16GB on-board DDR; 1GbE OOB management; FHHL |
|
900-9D219-0066-ST2 |
MBF2M516A-CEEOT |
MT_0000000561 |
BlueField-2 E-Series DPU 100GbE Dual-Port QSFP56; PCIe Gen4 x16; Crypto Enabled; 16GB on-board DDR; 1GbE OOB management; FHHL |
|
900-9D219-0006-ST0 |
MBF2H516A-CEEOT |
MT_0000000702 |
BlueField-2 DPU 100GbE Dual-Port QSFP56; PCIe Gen4 x16; Crypto; 16GB on-board DDR; 1GbE OOB management; FHHL |
|
900-9D219-0056-ST2 |
MBF2H516A-CENOT |
MT_0000000703 |
BlueField-2 DPU 100GbE Dual-Port QSFP56; PCIe Gen4 x16; Crypto Disabled; 16GB on-board DDR; 1GbE OOB management; FHHL |
|
900-9D219-0066-ST3 |
MBF2H516A-EEEOT |
MT_0000000704 |
BlueField-2 DPU 100GbE/EDR/HDR100 VPI Dual-Port QSFP56; PCIe Gen4 x16; Crypto Enabled; 16GB on-board DDR; 1GbE OOB management; FHHL |
|
900-9D219-0056-SQ0 |
MBF2H516A-EENOT |
MT_0000000705 |
BlueField-2 DPU 100GbE/EDR/HDR100 VPI Dual-Port QSFP56; PCIe Gen4 x16; Crypto Disabled; 16GB on-board DDR; 1GbE OOB management; FHHL |
|
900-9D250-0038-ST1 |
MBF2M345A-HESOT |
MT_0000000715 |
BlueField-2 E-Series DPU; 200GbE/HDR single-port QSFP56; PCIe Gen4 x16; Secure Boot Enabled; Crypto Disabled; 16GB on-board DDR; 1GbE OOB management; HHHL |
|
900-9D250-0048-ST1 |
MBF2M345A-HECOT |
MT_0000000716 |
BlueField-2 E-Series DPU; 200GbE/HDR single-port QSFP56; PCIe Gen4 x16; Secure Boot Enabled; Crypto Enabled; 16GB on-board DDR; 1GbE OOB management; HHHL |
|
900-9D218-0073-ST1 |
MBF2H512C-AESOT |
MT_0000000723 |
BlueField-2 P-Series DPU 25GbE Dual-Port SFP56; integrated BMC; PCIe Gen4 x8; Secure Boot Enabled; Crypto Disabled; 16GB on-board DDR; 1GbE OOB management; FHHL |
|
900-9D218-0083-ST2 |
MBF2H512C-AECOT |
MT_0000000724 |
BlueField-2 P-Series DPU 25GbE Dual-Port SFP56; integrated BMC; PCIe Gen4 x8; Secure Boot Enabled; Crypto Enabled; 16GB on-board DDR; 1GbE OOB management; FHHL |
|
900-9D208-0086-ST4 |
MBF2M516C-EECOT |
MT_0000000728 |
BlueField-2 E-Series DPU 100GbE/EDR/HDR100 VPI Dual-Port QSFP56; integrated BMC; PCIe Gen4 x16; Secure Boot Enabled; Crypto Enabled; 16GB on-board DDR; 1GbE OOB management; Tall Bracket; FHHL |
|
900-9D208-0086-SQ0 |
MBF2H516C-CECOT |
MT_0000000729 |
BlueField-2 P-Series DPU 100GbE Dual-Port QSFP56; integrated BMC; PCIe Gen4 x16; Secure Boot Enabled; Crypto Enabled; 16GB on-board DDR; 1GbE OOB management; Tall Bracket; FHHL |
|
900-9D208-0076-ST5 |
MBF2M516C-CESOT |
MT_0000000731 |
BlueField-2 E-Series DPU 100GbE Dual-Port QSFP56; integrated BMC; PCIe Gen4 x16; Secure Boot Enabled; Crypto Disabled; 16GB on-board DDR; 1GbE OOB management; Tall Bracket; FHHL |
|
900-9D208-0076-ST6 |
MBF2M516C-EESOT |
MT_0000000732 |
BlueField-2 E-Series DPU 100GbE/EDR/HDR100 VPI Dual-Port QSFP56; integrated BMC; PCIe Gen4 x16; Secure Boot Enabled; Crypto Disabled; 16GB on-board DDR; 1GbE OOB management; Tall Bracket; FHHL |
|
900-9D208-0086-ST3 |
MBF2M516C-CECOT |
MT_0000000733 |
BlueField-2 E-Series DPU 100GbE Dual-Port QSFP56; integrated BMC; PCIe Gen4 x16; Secure Boot Enabled; Crypto Enabled; 16GB on-board DDR; 1GbE OOB management; Tall Bracket; FHHL |
|
900-9D208-0076-ST2 |
MBF2H516C-EESOT |
MT_0000000737 |
BlueField-2 P-Series DPU 100GbE/EDR/HDR100 VPI Dual-Port QSFP56; integrated BMC; PCIe Gen4 x16; Secure Boot Enabled; Crypto Disabled; 16GB on-board DDR; 1GbE OOB management; Tall Bracket; FHHL |
|
900-9D208-0076-ST1 |
MBF2H516C-CESOT |
MT_0000000738 |
BlueField-2 P-Series DPU 100GbE Dual-Port QSFP56; integrated BMC; PCIe Gen4 x16; Secure Boot Enabled; Crypto Disabled; 16GB on-board DDR; 1GbE OOB management; Tall Bracket; FHHL |
|
900-9D218-0083-ST4 |
MBF2H532C-AECOT |
MT_0000000765 |
BlueField-2 P-Series DPU 25GbE Dual-Port SFP56; integrated BMC; PCIe Gen4 x8; Secure Boot Enabled; Crypto Enabled; 32GB on-board DDR; 1GbE OOB management; FHHL |
|
900-9D218-0073-ST0 |
MBF2H532C-AESOT |
MT_0000000766 |
BlueField-2 P-Series DPU 25GbE Dual-Port SFP56; integrated BMC; PCIe Gen4 x8; Secure Boot Enabled; Crypto Disabled; 32GB on-board DDR; 1GbE OOB management; FHHL |
|
900-9D208-0076-ST3 |
MBF2H536C-CESOT |
MT_0000000767 |
BlueField-2 P-Series DPU 100GbE Dual-Port QSFP56; integrated BMC; PCIe Gen4 x16; Secure Boot Enabled; Crypto Disabled; 32GB on-board DDR; 1GbE OOB management; FHHL |
|
900-9D208-0086-ST2 |
MBF2H536C-CECOT |
MT_0000000768 |
BlueField-2 P-Series DPU 100GbE Dual-Port QSFP56; integrated BMC; PCIe Gen4 x16; Secure Boot Enabled; Crypto Enabled; 32GB on-board DDR; 1GbE OOB management; FHHL |
|
900-9D218-0073-ST4 |
MBF2H512C-AEUOT |
MT_0000000972 |
BlueField-2 P-Series DPU 25GbE Dual-Port SFP56; integrated BMC; PCIe Gen4 x8; Secure Boot Enabled with UEFI disabled; Crypto Disabled; 16GB on-board DDR; 1GbE OOB management |
|
900-9D208-0076-STA |
MBF2H516C-CEUOT |
MT_0000000973 |
BlueField-2 P-Series DPU 100GbE Dual-Port QSFP56; integrated BMC; PCIe Gen4 x16; Secure Boot Enabled with UEFI disabled; Crypto Disabled; 16GB on-board DDR; 1GbE OOB management |
|
900-9D208-0076-STB |
MBF2H536C-CEUOT |
MT_0000001008 |
BlueField-2 P-Series DPU 100GbE Dual-Port QSFP56; integrated BMC; PCIe Gen4 x16; Secure Boot Enabled with UEFI Disabled; Crypto Disabled; 32GB on-board DDR; 1GbE OOB management; FHHL |
|
699140280000 |
N/A |
NVD0000000020 |
ZAM/NAS |
Supported ConnectX NICs
The NVIDIA® ConnectX® NICs supported with DOCA-host can be found in NVIDIA DOCA Profiles.
Hardware Prerequisites
For BlueField Platform users, this guide assumes that a BlueField device has been installed in a server according to the instructions detailed in your DPU's hardware user guide.
DOCA Packages
See information in the NVIDIA DOCA Release Notes page.
Supported Host OS per DOCA-Host Installation Profile
Refer to the "Supported Host OS and Features per DOCA-Host Installation Profile" section in the release notes to know which profiles are supported with a specific OS.
DOCA Meta-packages
DOCA meta-packages are collections of several individual packages bundled together for convenience. Instead of executing multiple installation commands for each package, users can install a single meta-package that automatically installs all the included components. This simplifies the process and ensures that all necessary packages are installed in one step. You have already seen some of DOCA's meta-packages in the NVIDIA DOCA Profiles page. Other meta-packages include:
-
doca-all-userspace– installs only user space packages ofdoca-all -
doca-ofed-userpace– installs only user space packages ofdoca-ofed -
doca-networking-userspace– installs only user space packages ofdoca-networking -
doca-roce-userspace– installs only user space packages ofdoca-roce -
doca-kernel– installs only the kernel part of DOCA
The process for installing any or all of the DOCA meta-packages is simple and explained in section "DOCA Installation Guide for Linux | id (2.9.2 LTS)DOCAInstallationGuideforLinux InstallingSoftwareonHost". But in general:
-
Download the DOCA host repo from the NVIDIA DOCA Downloads page.
-
Unpack the repo file (
deborrpm) on your system:-
For deb-based repo:
host# sudo dpkg -i <repo_file> -
For rpm-based repo:
host# sudo rpm -Uvh <repo_file>
-
-
Install the desired meta-packages – use
yumoraptto install the meta-packages of your choicehost# <yum/apt> install {meta-packages}
BlueField Networking Platform Image Installation
This guide provides the minimal instructions for setting up DOCA on a standard system.
Make sure to follow the instructions in this section sequentially. Make sure to update DOCA on the host side first before installing the BFB Bundle on the BlueField.
Installation Files
Find the DOCA installation files for host and BlueField from the NVIDIA DOCA Downloads page.
Uninstalling Software from Host
If an older DOCA (or MLNX_OFED) software version is installed on your host, make sure to uninstall it before proceeding with the installation of the new version:
|
Deb-based |
|
|---|---|
|
RPM-based |
|
Installing Prerequisites on Host for Target BlueField
Install RShim to manage and flash the BlueField platform.
|
OS |
Procedure |
|---|---|
|
Deb-based |
|
|
RPM-based |
|
Skip section "DOCA Installation Guide for Linux | id (2.9.2 LTS)DOCAInstallationGuideforLinux InstallingSoftwareonHost" if you intend to update only the BlueField software (*.bfb). The RShim driver is sufficient for that purpose.
GPG and Kernel Module Signing
This section highlights the signing methods used to ensure the authenticity and integrity of the packages and the kernel modules.
GNU Privacy Guard (GPG)
RPM packages are signed using a GPG key, allowing users to verify that the packages originate from a trusted NVIDIA source and have not been tampered with.
For the package manager to verify the signature:
-
Obtain the public GPG Key by downloading NVIDIA's RPM-GPG-KEY-Mellanox-SHA256 key:
# wget http://www.mellanox.com/downloads/ofed/RPM-GPG-KEY-Mellanox-SHA256 --2018-01-25 13:52:30-- http://www.mellanox.com/downloads/ofed/RPM-GPG-KEY-Mellanox-SHA256 Resolving www.mellanox.com... 72.3.194.0 Connecting to www.mellanox.com|72.3.194.0|:80... connected. HTTP request sent, awaiting response... 200 OK Length: 1354 (1.3K) [text/plain] Saving to: ?RPM-GPG-KEY-Mellanox-SHA256? 100%[=================================================>] 1,354 --.-K/s in 0s 2018-01-25 13:52:30 (247 MB/s) - ?RPM-GPG-KEY-Mellanox-SHA256? saved [1354/1354] -
Import the public key to the package manager's key ring:
# sudo rpm --import RPM-GPG-KEY-Mellanox-SHA256 warning: rpmts_HdrFromFdno: Header V3 DSA/SHA1 Signature, key ID 6224c050: NOKEY Retrieving key from file:///repos/MLNX_OFED//RPM-GPG-KEY-Mellanox Importing GPG key 0x6224C050: Userid: "Mellanox Technologies (Mellanox Technologies - Signing Key v2) " From : /repos/MLNX_OFED//RPM-GPG-KEY-Mellanox-SHA256 Is this ok [y/N]: -
Verify that the key is successfully imported:
# rpm -q gpg-pubkey --qf '%{NAME}-%{VERSION}-%{RELEASE}\t%{SUMMARY}\n' | grep Mellanox gpg-pubkey-a9e4b643-520791ba gpg(Mellanox Technologies ) -
Update the package manager:
sudo yum update
Kernel Module Signing
Kernel drivers are signed using NVIDIA's x.509 public key, allowing users to verify that the drivers originate from a trusted NVIDIA source and have not been tampered with.
To support loading DOCA-HOST drivers on a secure-boot-enabled OS, the NVIDIA x.509 public key should be added to the key database by following these steps:
-
Obtain NVIDIA's public x.509 key:
# wget http://www.mellanox.com/downloads/ofed/mlnx_signing_key_pub.derBuilds for SLES15 SP4 and SP5 are signed with a newer signing key. The corresponding public key can be downloaded from this link.
-
Import the public key to the MOK list using the
mokutilutility:# mokutil --import mlnx_signing_key_pub.derUsers will be asked to enter and confirm a password for this MOK enrollment request.
-
Reboot the system.
Installing Software on Host
Skip this section if you intend to update only the BlueField software (*.bfb). The RShim driver is sufficient for that purpose.
Make sure to have followed the instructions under "DOCA Installation Guide for Linux | id (2.9.2 LTS)DOCAInstallationGuideforLinux InstallingPrerequisitesonHostforTargetBlueField".
-
Install DOCA local repo package for host:
The following table provides instructions for installing the DOCA host repo on your device depending on your OS and desired profile.
OS
Profile
Instructions
Deb-based
doca-all
-
Download the DOCA host repo from the NVIDIA DOCA Downloads page.
-
Unpack the deb repo. Run:
host# dpkg -i <repo_file> -
Perform apt update. Run:
host# apt-get update -
If the kernel version on your host is not supported (not shown under section "Supported Host OS and Features per DOCA-Host Installation Profile"), refer to section "DOCA Installation Guide for Linux | id (2.9.2 LTS)DOCAInstallationGuideforLinux DOCAExtraPackageanddoca kernel support".
-
Ensure that the kernel headers installed match the version of the currently running kernel.
If the build directory exists in under
/lib/modules/$(uname -r)/build, then the kernel headers are installed. -
Run apt install for DOCA SDK and DOCA runtime:
host# sudo apt install -y doca-all mlnx-fw-updater
doca-networking
-
Download the DOCA host repo from the NVIDIA DOCA Downloads page.
-
Unpack the deb repo. Run:
host# dpkg -i <repo_file> -
Perform apt update. Run:
host# apt-get update -
If the kernel version on your host is not supported (not shown under section "Supported Host OS and Features per DOCA-Host Installation Profile"), refer to section "DOCA Installation Guide for Linux | id (2.9.2 LTS)DOCAInstallationGuideforLinux DOCAExtraPackageanddoca kernel support".
-
Ensure that the kernel headers installed match the version of the currently running kernel.
If the build directory exists in under
/lib/modules/$(uname -r)/build, then the kernel headers are installed. -
Run
apt installfor DOCA SDK and DOCA runtime:host# sudo apt install -y doca-networking mlnx-fw-updater
doca-ofed/
doca-roce-
Download the DOCA host repo from the NVIDIA DOCA Downloads page.
-
Unpack the deb repo. Run:
host# sudo dpkg -i <repo_file> -
Perform apt update. Run:
host# sudo apt-get update -
If the kernel version on your host is not supported (not shown under section "Supported Host OS and Features per DOCA-Host Installation Profile"), refer to section "DOCA Installation Guide for Linux | id (2.9.2 LTS)DOCAInstallationGuideforLinux DOCAExtraPackageanddoca kernel support".
-
Ensure that the kernel headers installed match the version of the currently running kernel.
If the build directory exists in under
/lib/modules/$(uname -r)/build, then the kernel headers are installed. -
Install either
doca-ofedordoca-roceprofile. Run:-
For
doca-ofed:host# sudo apt install -y doca-ofed mlnx-fw-updater -
For
doca-roce:host# sudo apt install -y doca-roce mlnx-fw-updater
-
RPM-based
doca-all
-
Download the DOCA host repo from the NVIDIA DOCA Downloads page.
-
Unpack the rpm repo. Run:
host# rpm -Uvh <repo_file>.rpm -
Perform yum update. Run:
host# sudo yum makecache -
If the kernel version on your host is not supported (not shown under section "Supported Host OS and Features per DOCA-Host Installation Profile"), refer to section "DOCA Installation Guide for Linux | id (2.9.2 LTS)DOCAInstallationGuideforLinux DOCAExtraPackageanddoca kernel support".
-
Run yum install for DOCA SDK and DOCA runtime:
host# sudo yum install -y doca-all mlnx-fw-updater
doca-networking
-
Download the DOCA host repo from the NVIDIA DOCA Downloads page.
-
Unpack the rpm repo. Run:
host# rpm -Uvh <repo_file>.rpm -
Perform yum update. Run:
host# sudo yum makecache -
If the kernel version on your host is not supported (not shown under section "Supported Host OS and Features per DOCA-Host Installation Profile"), refer to section "DOCA Installation Guide for Linux | id (2.9.2 LTS)DOCAInstallationGuideforLinux DOCAExtraPackageanddoca kernel support".
-
Run yum install for DOCA SDK and DOCA runtime:
host# sudo yum install -y doca-networking mlnx-fw-updater
doca-ofed/
doca-roce-
Download the DOCA host repo from the NVIDIA DOCA Downloads page.
-
Unpack the RPM repo. Run:
host# sudo rpm -Uvh <repo_file>.rpm -
Perform yum update. Run:
host# sudo yum makecache -
If the kernel version on your host is not supported (not shown under section "Supported Host OS and Features per DOCA-Host Installation Profile"), refer to section "DOCA Installation Guide for Linux | id (2.9.2 LTS)DOCAInstallationGuideforLinux DOCAExtraPackageanddoca kernel support".
-
Install either
doca-ofedordoca-roceprofiles:-
For
doca-ofed:host# sudo yum install -y doca-ofed mlnx-fw-updater -
For
doca-roce:host# sudo yum install -y doca-roce mlnx-fw-updater
-
-
-
Load the drivers:
host# sudo /etc/init.d/openibd restart -
Initialize MST. Run:
host# sudo mst restart
DOCA Extra Package and doca-kernel-support
If the kernel version on your host is not supported (not shown under section "Supported Host OS and Features per DOCA-Host Installation Profile"), users may opt to either:
-
Switch to a compatible kernel; or
-
Install
doca-extrapackage and rundoca-kernel-support
doca-kernel-support is a script intended to rebuild kernel modules included with DOCA-host for cases where they are not provided. It builds a single package (i.e., rpm or deb) that contains a repository of packages (i.e., dnf or apt).
DOCA-host provides binary builds of kernel modules for some specific kernels. This script rebuilds kernel modules included with DOCA-host for a custom kernel version and creates an RPM or DEB package that holds all of those rebuilt modules for easy install.
doca-kernel-support does not support customized or unofficial kernels.
To run doca-kernel-support:
-
Run:
host# apt/yum install -y doca-extra -
Execute the
doca-kernel-supportscript which rebuilds and installs the DOCA-host kernel modules with the running kernel:host# /opt/mellanox/doca/tools/doca-kernel-supportThe output may end with
rpmordebwith the following general format:doca-kernel-support: Built single package: <doca-kernel-repo> doca-kernel-support: DoneOutput example:
doca-kernel-support: Built single package: /tmp/DOCA.EuUfkWfV7Z/doca-kernel-repo-2.9.0-1.kver.5.14.0.356.el9.x86.64.x86_64.rpm doca-kernel-support: Donedoca-kernel-supportdoes not support customized or unofficial kernels. -
Install the generated meta-package on the desired DOCA profile:
The examples provided install DOCA kernel repos (RPM/DEB) with
doca-ofedprofile, but other profiles may be installed if they are supported.-
Format for RPM-based distributions:
host# rpm -i <doca-kernel-repo>
host# dnf makecache
host# dnf install <doca-userspace-metapackage>
host# dnf install --disablerepo=doca doca-kernel-KERNEL_VERSION     # For all the meta-package, not just this single package
Example:
host# rpm -i /tmp/DOCA.EuUfkWfV7Z/doca-kernel-repo-2.9.0-1.kver.5.14.0.356.el9.x86.64.x86_64.rpm host# dnf makecache host# dnf install doca-ofed-userspace host# dnf install --disablerepo=doca doca-kernel-5.14.0.356.el9.x86.64.x86_64.noarch -
Format for DEB-based distributions:
host# dpkg -i <doca-kernel-repo>
host# apt update
host# apt install <doca-profile>
Example:
host# dpkg -i /tmp/DOCA.J8JYxEmffD/doca-kernel-repo-2.9.0-6.4.0.mlnx_2.9.0_amd64.deb
host# apt update
host# apt install doca-ofed
-
-
(Optional) Retrieve installed packages and their versions as part of DOCA Host installation:
host# /opt/mellanox/doca/tools/doca-info

Versions:
- DOCA Base MLNX_OFED_LINUX-24.07-0.5.5.0
- MFT 4.29.0-127

UEFI\ATF versions:
- mst_device: mt41692_pciconf0
     UEFI Version: 4.7.0-42-g13081ae
     ATF Version: 4.7.0-25-g5569834

Firmware (Current):
- BlueField-3 32.41.1000

DOCA:
- doca-all 2.8.0-0.0.4
- doca-apsh-config 2.8.0079-1
- doca-bench 2.8.0079-1
…

DOCA Dependencies:
…
- flexio 24.07.2300
- mlnx-dpdk 22.11.0-2407.0.10


OFED:
…
- rdma-core 2407mlnx52-1.2407055
…
- ucx 1.17.0-1.2407055
…
If BlueField has a BF-Bundle version older than 2.7.0 installed on it, the UEFI/ATF versions would appear as N/A. If your version is 2.7.0 or higher and still see N/A, then perform driver restart on the host:
/etc/init.d/openibd restart
Upgrading Software on Host
To update existing DOCA host packages, follow these steps:
-
Install the newer version of the DOCA host repository as detailed in the section titled "DOCA Installation Guide for Linux | id (2.9.2 LTS)DOCAInstallationGuideforLinux InstallingSoftwareonHost".
-
Upgrade the DOCA packages
-
To upgrade from DOCA version 2.5.x, all DOCA and OFED related packages should be removed. For detailed instructions on how to uninstall these packages, please refer to the uninstall section "DOCA Installation Guide for Linux | id (2.9.2 LTS)DOCAInstallationGuideforLinux UninstallingSoftwarefromHost".
-
To upgrade from DOCA 2.6.0 and later, use the following command:
-
For DEB-based distributions:
host# apt install doca-all
-
For RPM-based distributions:
host# yum upgrade doca-all
-
-
Before upgrading
mlnx-fw-updater, make sure to restart MST first:host# mst restart
-
Installation on Community Operating Systems
NVIDIA provides DOCA packages to be installed on common OSs. These packages are provided as binaries, and NVIDIA provides full support for them.
NVIDIA also provides a support model for DOCA used on open-source community OSs. The goal of this new support model is to enable customers to use community-maintained variants of the Linux OS, without being limited to the distributions that NVIDIA provides primary support for.
In the community model, there is shared responsibility between NVIDIA and customers choosing to use community OSs in their environment:
-
NVIDIA owns basic validation for the OSs, so that customers know they can expect DOCA to work.
-
Customers are responsible for building their own packages and binaries (based on source code and build instructions detailed below), and can also choose to deploy parts of DOCA instead of the whole package
NVIDIA provides support to customers and partners with Support contracts. In certain cases, NVIDIA will require the customer to work with the community to fix issues deemed to be caused by the community breaking DOCA.
To install doca-host-community on a host, follow these steps:
-
Install the
doca-host-communityrepository that includes sources and tools to generate the DOCA community repo:-
For RPM-based packages:
host# rpm -Uvh doca-host-repo-community-{doca_version}.noarch.rpmExample:
host# rpm -Uvh doca-host-repo-community-2.9.0-0.2.9.24.10.0.5.2.0.noarch.rpm -
For DEB-based packages:
host# dpkg -i doca-host_{doca_version}-community_all.debExample:
host# dpkg -i doca-host_2.9.0-100000-24.10-community_all.deb
-
-
Run the build script to generate the
doca-host-communityrepository:host# /opt/mellanox/doca/tools/doca-community-buildThe script output should include a line similar to the following:
-
For RPM-based packages:
host# doca-community-build: Built single package: /tmp/DOCA.Lz1pntWcGM/doca-community-repo-24.10.0.5.2.0-1.kver.4.18.0.477.10.1.el8.8.x86.64.x86_64.rpm -
For DEB-based packages:
host# doca-community-build: Built single package: /tmp/DOCA.gcVyNokLfV/doca-community-repo-24.10-0.5.2.0-6.8.0.31.generic_24.10.0.5.2.0_amd64.debThe binary created by the script can be copied to any similar machine with the same kernel It contains all of the
doca-ofedprofile built packages, with extra meta-package that depends on those packages, installing the meta-package will install all of the built packages
-
-
The resulting DOCA community repo should be ready for installation on this host or distributed to any other similar machine with the same distribution and kernel:
-
For RPM-based (non-SLES) packages:
host# yum install /tmp/DOCA.m6rIcEJNKl/doca-community-repo-24.10.0.4.6.0-1.kver.5.14.0.427.13.1.el9.4.x86.64.x86_64.rpm host# yum makecache -
For SLES RPM-based packages:
host# zypper install /tmp/DOCA.m6rIcEJNKl/doca-community-repo-24.10.0.4.6.0-1.kver.5.14.0.427.13.1.el9.4.x86.64.x86_64.rpm host# zypper refresh -
For DEB-based packages:
host# apt install /tmp/DOCA.gcVyNokLfV/doca-community-repo-24.10-0.5.2.0-6.8.0.31.generic_24.10.0.5.2.0_amd64.deb
host# apt update
-
-
Install
doca-ofed-communitymeta-package:host# yum/apt install doca-ofed-community
Installing Proprietary Packages
The installation procedure does not install proprietary packages. Those packages are installed upon request.
List of close-source proprietary packages:
-
Clusterkit
-
DPCP
-
hcoll
-
sharp
-
ibutils2
-
opensm
Currently, the only way to install these packages is by using an already-built RPM or DEB file from a similar primary OS.
The following table maps community OSs which are most similar to primary OSs:
|
Community OS |
Most Similar Primary OS |
|---|---|
|
Alma 8.5 |
RHEL 8.5 |
|
Anolis OS 8.4 |
RHEL 8.5 |
|
CentOS Stream 8 |
RHEL 8 |
|
CentOS Stream 9 |
RHEL 9 |
|
EulerOS-V2.0.SP10 |
EulerOS-V2.0.SP11 |
|
Fedora 35 |
RHEL 8.5 |
|
OpenEuler-20.03.SP1 |
OpenEuler20 SP3 |
|
OpenSUSE 15.3 |
SLES15 SP3 |
|
Photon OS 3.0 |
RHEL 7.9 |
|
UOS-V20-1040d |
Debian 10.8 |
Download and Install MFT and Firmware
Storage Installation
-
Before installation, search for the required package using your system's package manager:
# apt/zypper/dnf/yum search mlnx-nvme
# apt/zypper/dnf/yum search mlnx-nfsrdma
-
Once the correct package name is identified, install it using:
# apt/zypper/dnf/yum install <full-package-name>
Installation examples:
-
For SLES:
# zypper search mlnx-nvme
# zypper install mlnx-nvme-kmp-default
-
For Debian-based systems:
# apt search mlnx-nvme
# apt search mlnx-nfsrdma
# apt install mlnx-nvme-dkms
# apt install mlnx-nfsrdma-dkms
Installing Software on BlueField
ATF will not boot 150W BlueField-3 platforms if the ATX +12V is not connected. This is meant to ensure proper operation of the BlueField. For information on connecting the external power supply connector, please refer to the NVIDIA BlueField-3 Networking Platform User Guide.
Users have two options for installing DOCA on BlueField DPU or SuperNIC:
-
Upgrading the full DOCA image on BlueField (recommended) – this option overwrites the entire boot partition with an Ubuntu 22.04 installation and updates BlueField and NIC firmware.
-
-
Upgrading DOCA online repo package on BlueField – this option upgrades DOCA components without overwriting the boot partition. Use this option to preserve configurations or files on BlueField itself.
Installing Full DOCA Image on DPU via Host
This step overwrites the entire boot partition.
This installation sets up the OVS bridge.
Option 1 – No Pre-defined Password
To change the default Ubuntu password during the BFB bundle installation, proceed to Option 2.
BFB installation is executed as follows:
host# sudo bfb-install --rshim rshim<N> --bfb <image_path.bfb>
Where rshim<N> is rshim0 if you only have one Bluefield. You may run the following command to verify:
host# ls -la /dev/ | grep rshim
Option 2 – Set Pre-defined Password
Ubuntu users can provide a unique password that will be applied at the end of the BlueField BFB bundle installation. This password needs to be defined in a bf.cfg configuration file.
To set the password for the "ubuntu" user:
-
Create password hash. Run:
host# openssl passwd -1 Password: Verifying - Password: $1$3B0RIrfX$TlHry93NFUJzg3Nya00rE1 -
Add the password hash in quotes to the
bf.cfgfile:host# echo ubuntu_PASSWORD='$1$3B0RIrfX$TlHry93NFUJzg3Nya00rE1' > bf.cfgWhen running the installation command, use the
--configflag to provide the file containing the password:host# sudo bfb-install --rshim rshim<N> --bfb <image_path.bfb> --config bf.cfgOptionally, to upgrade the BlueField integrated BMC firmware using BFB bundle, please provide the current BMC root credentials in a
bf.cfgfile, as shown in the following:BMC_PASSWORD="<root password>" BMC_USER="root" BMC_REBOOT="yes"Unless previously changed, the default BMC root password is
0penBmc.If
--configis not used, then upon first login to the BlueField device, users will be prompted to update the default 'ubuntu' password.The following is an example of Ubuntu-22.04 BFB bundle installation (Release version may vary in the future).
host# sudo bfb-install --rshim rshim0 --bfb bf-bundle-2.7.0_24.04_ubuntu-22.04_prod.bfb --config bf.cfg
Pushing bfb 1.41GiB 0:02:02 [11.7MiB/s] [           <=>                                                                                                                                ]
Collecting BlueField booting status. Press Ctrl+C to stop
 INFO[PSC]: PSC BL1 START
 INFO[BL2]: start
 INFO[BL2]: boot mode (rshim)
 INFO[BL2]: VDDQ: 1120 mV
 INFO[BL2]: DDR POST passed
 INFO[BL2]: UEFI loaded
 INFO[BL31]: start
 INFO[BL31]: lifecycle GA Secured
 INFO[BL31]: VDD: 850 mV
 INFO[BL31]: runtime
 INFO[BL31]: MB ping success
 INFO[UEFI]: eMMC init
 INFO[UEFI]: eMMC probed
 INFO[UEFI]: UPVS valid
 INFO[UEFI]: PMI: updates started
 INFO[UEFI]: PMI: total updates: 1
 INFO[UEFI]: PMI: updates completed, status 0
 INFO[UEFI]: PCIe enum start
 INFO[UEFI]: PCIe enum end
 INFO[UEFI]: UEFI Secure Boot
 INFO[UEFI]: PK configured
 INFO[UEFI]: Redfish enabled
 INFO[UEFI]: exit Boot Service
 INFO[MISC]: Found bf.cfg
 INFO[MISC]: Ubuntu installation started
 INFO[MISC]: Installing OS image
 INFO[MISC]: Changing the default password for user ubuntu
 INFO[MISC]: Ubuntu installation completed
 INFO[MISC]: Updating NIC firmware...
 INFO[MISC]: NIC firmware update done
 INFO[MISC]: Installation finished
To verify the BlueField has completed booting up, allow additional 90 seconds then perform the following:
host# sudo cat /dev/rshim<N>/misc ... INFO[MISC]: Linux up INFO[MISC]: DPU is ready -
Retrieve installed packages and their versions as part of BF-Bundle installation:
-
Log into BlueField.
-
Run the following:
bf# sudo bf-infoExample output:
Versions:
- ATF: v2.2(release):4.9.0-16-g221717c68
- UEFI: 4.9.0-37-gcbeaab0650
- BSP: 4.9.0.13322
- NIC Firmware: 32.43.0356
- DOCA Base (OFED): 24.10-0.5.1.0
...
Storage:
- mlnx-libsnap 1.6.0-1
- spdk 23.01.5-24
- virtio-net-controller 24.10.15-1
DOCA:
- doca-apsh-config 2.9.0064-1
- libdoca-sdk-urom-dev 2.9.0064-1
...
FlexIO:
- flexio-samples 24.10.2447
- flexio-sdk 24.10.2447
...
SoC Platform:
- mlxbf-gige-modules 1.0-0.kver.6.1.0-11-arm64
- sdhci-of-dwcmshc-modules 1.0-0.kver.6.1.0-11-arm64
...
OFED:
rdma-core 2410mlnx54-1.2410051
ucx 1.18.0-1.2410051
...
-
-
Configure the
tmfifo_net0interface over IPv4 for SSHing into the BlueField Arm OS:host# ifconfig tmfifo_net0 192.168.100.1/24SSH into the BlueField Arm OS with 192.168.100.2 (preconfigured default).
Upgrading Firmware
This operation is only required if the user skipped NIC firmware update during BFB bundle installation using the parameter WITH_NIC_FW_UPDATE=no in the bf.cfg file.
This section explains how to update the NIC firmware on a DOCA installed BlueField OS.
If multiple BlueFields are installed, the following steps must be performed on all of them after BFB installation.
An up-to-date NIC firmware image is provided in BlueField BFB bundle and copied to the BlueField filesystem during BFB installation.
To upgrade firmware in the BlueField Arm OS:
-
SSH to your BlueField Arm OS by any means available.
The following instructions enable to login to the BlueField Arm OS from the host OS over the RShim virtual interface,
tmfifo_net<N>and do not require LAN connectivity with the BlueField OOB network port.This operation can be performed over the host's
tmfifo_net0IPv4, 192.168.100.1 (preconfigured) with BlueField Arm OS at 192.168.100.2 (default).The default credentials for Ubuntu are as follows:
Username
Password
ubuntu
ubuntuFor example, to log into BlueField Arm OS over IPv6:
host]# systemctl restart rshim // Wait 10 seconds host]# ssh -6 fe80::21a:caff:feff:ff01%tmfifo_net<N> Password: <configured-password> -
Upgrade firmware in BlueField. Run:
dpu# sudo /opt/mellanox/mlnx-fw-updater/mlnx_fw_updater.pl --force-fw-updateExample output:
Device #1: ---------- Device Type: BlueField-2 [...] Versions: Current Available FW <Old_FW> <New_FW> -
For the firmware upgrade to take effect perform a BlueField system reboot.
Post-installation Procedure
-
Restart the driver. Run:
host# sudo /etc/init.d/openibd restart Unloading HCA driver: [ OK ] Loading HCA driver and Access Layer: [ OK ] -
Configure the physical function (PF) interfaces.
host# sudo ifconfig <interface-1> <network-1/mask> up
host# sudo ifconfig <interface-2> <network-2/mask> up
For example:
host# sudo ifconfig p2p1 192.168.200.32/24 up
host# sudo ifconfig p2p2 192.168.201.32/24 up
Pings between the source and destination should now be operational.
Upgrading BlueField Using Standard Linux Tools
This upgrade procedure enables upgrading DOCA components using standard Linux tools (e.g., apt update and yum update). This process utilizes native package manager repositories to upgrade BlueField networking platforms (DPUs or SuperNICs) without the need for a full installation.
Using Linux tools for updating specific DOCA components is possible, yet the potential combinations created by this scenario are not validated by NVIDIA. NVIDIA only validates DOCA software installation of the full BF-Bundle package.
This process has the following benefits:
-
Only updates components that include modifications
-
Includes upgrade of:
-
DOCA drivers and libraries
-
DOCA reference applications
-
BSP (UEFI/ATF) upgrade while maintaining the configuration
-
NIC firmware upgrade while maintaining the configuration
-
BMC components upgrade
-
-
Does not:
-
Impact user binaries
-
Upgrade non-Ubuntu OS kernels
-
Upgrade BlueField BMC firmware
-
-
After completion of BlueField upgrade:
-
If NIC firmware was not updated, perform BlueField Arm reset (software reset/reboot BlueField)
-
If NIC firmware was updated, perform firmware reset (
mlxfwreset) or perform a graceful shutdown and power cycle
-
|
OS |
Action |
Instructions |
|---|---|---|
|
Ubuntu/
|
Remove |
|
|
Install the the GPG key |
|
|
|
Export the desired distribution |
Export |
|
|
Add GPG key to APT trusted keyring |
|
|
|
Add DOCA online repository |
|
|
|
Update index |
|
|
|
Upgrade UEFI/ATF firmware |
Install the ATF/UEFI package and Initiate the UEFI/ATF firmware upgrade: |
|
|
Upgrade BlueField NIC firmware |
Install the NIC firmware package: Initiate NIC firmware upgrade: |
|
|
Upgrade BMC components |
Insert the BMC password to config file The format of To apply the new firmware immediately after the BMC versions are upgraded, add the following parameters to the
To apply the new BMC firmware at a later time, users must reset the BMC and CEC components manually. Refer to "Resetting CEC and BMC Subsystems Using CEC Self-reset Command" for information. Install the packages of BMC components: Initiate the upgrade of BMC components: The upgrade process should take up to 20 minutes. |
|
|
Remove old metapackages |
|
|
|
Install new metapackages |
|
|
|
Upgrade system |
|
|
|
Apply the new changes, NIC firmware, and UEFI/ATF |
For the upgrade to take effect, perform BlueField system reboot. This step triggers immediate reboot of the BlueField Arm cores. |
|
|
CentOS/RHEL/
|
Remove |
|
|
Export the desired distribution |
Export
|
|
|
Add DOCA online repository |
A file is created under |
|
|
Update index |
|
|
|
Upgrade UEFI/ATF firmware |
Install the ATF/UEFI package and Initiate UEFI/ATF firmware upgrade: |
|
|
Upgrade BlueField NIC firmware |
The following command updates the firmware package and flashes the firmware to the NIC: Initiate NIC firmware upgrade: |
|
|
Upgrade BMC components |
Insert the BMC password to config file The format of To apply the new firmware immediately after the BMC versions are upgraded, add the following parameters to the
To apply the new BMC firmware at a later time, users must reset the BMC and CEC components manually. Refer to "Resetting CEC and BMC Subsystems Using CEC Self-reset Command" for information. Install the packages of BMC components: Initiate the upgrade of BMC components: The upgrade process should take up to 20 minutes. |
|
|
Remove old metapackages |
If you are upgrading from DOCA 2.7.0 or below, make sure to also remove strongSwan and Libreswan packages: |
|
|
Install new metapackages |
|
|
|
Lock the kernel |
If using Anolis OS, pin kernel package versions: |
|
|
Upgrade system |
|
|
|
Apply the new changes, NIC firmware, and UEFI/ATF |
For the upgrade to take effect, perform BlueField system reboot. This step triggers immediate reboot of the BlueField Arm cores. |
Post-Installation Procedure
-
Restart the driver. Run:
host# sudo /etc/init.d/openibd restart Unloading HCA driver: [ OK ] Loading HCA driver and Access Layer: [ OK ] -
Configure the physical function (PF) interfaces.
host# sudo ifconfig <interface-1> <network-1/mask> up
host# sudo ifconfig <interface-2> <network-2/mask> up
For example:
host# sudo ifconfig p2p1 192.168.200.32/24 up
host# sudo ifconfig p2p2 192.168.201.32/24 up
Pings between the source and destination should now be operational.
Building Your Own BFB Installation Image
Users wishing to build their own customized BlueField OS image can use the BFB build environment. Please refer to the bfb-build project in this GitHub webpage for more information.
For a customized BlueField OS image to boot on the UEFI secure-boot-enabled BlueField (default BlueField secure boot setting), the OS must be either signed with an existing key in the UEFI DB (e.g., the Microsoft key), or UEFI secure boot must be disabled. Please refer to the "Secure Boot" page under NVIDIA BlueField DPU Platform Operating System Documentation for more details.
Setting Up Build Environment for Developers
For full instructions about setting up a development environment, refer to the DOCA Developer Guide.
Additional SDKs for DOCA
Installing CUDA on NVIDIA Converged Accelerator
NVIDIA® CUDA® is a parallel computing platform and programming model developed by NVIDIA for general computing GPUs.
This section details the necessary steps to set up CUDA on your environment. This section assumes that a BFB image has already been installed on your environment.
To install CUDA on your converged accelerator:
-
Download and install the latest NVIDIA Data Center GPU driver.
-
Download and install CUDA
The CUDA version tested to work with DOCA SDK is 11.8.0.
Downloading CUDA includes the latest NVIDIA Data Center GPU driver and CUDA toolkit. For more information about CUDA and driver compatibility, refer to the NVIDIA CUDA Toolkit Release Notes.
Configuring Operation Mode
There are two modes that the NVIDIA Converged Accelerator may operate in:
-
Standard mode (default) – the BlueField and the GPU operate separately
-
BlueField-X mode – the GPU is exposed to BlueField and is no longer visible on the host
To verify which mode the system is operating in, run:
host# sudo mst start
host# sudo mlxconfig -d <device-id> q PCI_DOWNSTREAM_PORT_OWNER[4]
To learn your BlueField Platform's device ID, refer to section "DOCA Installation Guide for Linux | id (2.9.2 LTS)DOCAInstallationGuideforLinux DeterminingBlueFieldDeviceID".
-
Standard mode output:
Device #1:
[…]
Configurations:                              Next Boot
         PCI_DOWNSTREAM_PORT_OWNER[4]        DEVICE_DEFAULT(0)
-
BlueField-X mode output:
Device #1:
[…]
Configurations:                              Next Boot
         PCI_DOWNSTREAM_PORT_OWNER[4]        EMBEDDED_CPU(15)
To configure BlueField-X mode, run:
host# mlxconfig -d <device-id> s PCI_DOWNSTREAM_PORT_OWNER[4]=0xF
To configure standard mode, run:
host# mlxconfig -d <device-id> s PCI_DOWNSTREAM_PORT_OWNER[4]=0x0
To learn your BlueField Platform's device ID, refer to section "DOCA Installation Guide for Linux | id (2.9.2 LTS)DOCAInstallationGuideforLinux DeterminingBlueFieldDeviceID".
Power cycle is required for configuration to take effect. For power cycle the host run:
host# ipmitool power cycle
Downloading and Installing CUDA Toolkit and Driver
This section details the necessary steps to set up CUDA on your environment. It assumes that a BFB image has already been installed on your environment.
-
Install CUDA by visiting the CUDA Toolkit Downloads webpage.
Select the Linux distribution and version relevant for your environment.
This section shows the native compilation option either on x86 or aarch64 hosts.
-
Test that the driver installation completed successfully. Run:
dpu# nvidia-smi Tue Apr 5 13:37:59 2022 +-----------------------------------------------------------------------------+ | NVIDIA-SMI 510.47.03 Driver Version: 510.47.03 CUDA Version: 11.8 | |-------------------------------+----------------------+----------------------+ | GPU Name Persistence-M| Bus-Id Disp.A | Volatile Uncorr. ECC | | Fan Temp Perf Pwr:Usage/Cap| Memory-Usage | GPU-Util Compute M. | | | | MIG M. | |===============================+======================+======================| | 0 NVIDIA BF A10 Off | 00000000:06:00.0 Off | 0 | | 0% 43C P0 N/A / 225W | 0MiB / 23028MiB | 0% Default | | | | N/A | +-------------------------------+----------------------+----------------------+ +-----------------------------------------------------------------------------+ | Processes: | | GPU GI CI PID Type Process name GPU Memory | | ID ID Usage | |=============================================================================| | No running processes found | +-----------------------------------------------------------------------------+ -
Verify that the installation completed successfully.
-
Download CUDA samples repo. Run:
dpu# git clone https://github.com/NVIDIA/cuda-samples.git -
Build and run vectorAdd CUDA sample. Run:
dpu# cd cuda-samples/Samples/0_Introduction/vectorAdd
dpu# make
dpu# ./vectorAdd
If the
vectorAddsample works as expected, it should output "Test Passed".If it seems that the GPU is slow or stuck, stop execution and run:
dpu# sudo setpci -v -d ::0302 800.L=201 # CPL_VC0 = 32 -
GPUDirect RDMA
For information on GPUDirect RMDA and more, refer to DOCA GPUNetIO documentation.
Installing Rivermax on BlueField
NVIDIA Rivermax offers a unique IP-based solution for any media and data streaming use case.
This section provides the steps to install Rivermax assuming that a BFB image has already been installed on your environment.
Downloading Rivermax Driver
-
Navigate to the NVIDIA Rivermax SDK product page.
-
Register to be able to download the driver package using the JOIN button at the top of the page.
-
Download the appropriate driver package according to your BFB under the "Linux" subsection. For example, for Ubuntu 22.04 BFB, download
rivermax_ubuntu2204_<version>.tar.gz.
Installing Rivermax Driver
-
Copy the
.tgzfile to BlueField:host# sudo scp -r rivermax_ubuntu2204_<version>.tar.gz ubuntu@192.168.100.2:/tmp/ -
Extract the Rivermax file:
dpu# sudo tar xzf rivermax_ubuntu2204_<version>.tar.gz -
Install the Rivermax driver package:
dpu# cd <rivermax-version>/Ubuntu.22.04/deb-dist/aarch64/
dpu# sudo dpkg -i rivermax_<version>.deb
Installing Rivermax Libraries from DOCA
Rivermax libraries are compatibles with DOCA components and can be found inside the doca-dpu-repo.
-
Unpack the doca-dpu-repo:
dpu# sudo dpkg -i doca-dpu-repo-ubuntu2204-local_<version>_arm64.deb -
Run apt update:
dpu# sudo apt-get update -
Install the Rivermax libraries:
dpu# sudo apt install doca-sdk-rmax
dpu# sudo apt install libdoca-sdk-rmax-dev
For additional details and guidelines, please visit the NVIDIA Rivermax SDK product page.
Installing Multiple BlueField Devices with DOCA Installer Tool
In order to be able to use DOCA installer, Make sure to update DOCA on the host side 3.0.0 before installing the doca-installer.
|
DEB-based |
|
|
|---|---|---|
|
RPM-based |
|
DOCA installer is a utility designed to install and upgrade BFB and BlueField firmware bundle images across multiple DPUs in parallel.
It supports multiple DPU operation modes, including NIC mode, DPU mode, and both modes on the same host. It offers extensive customization through configuration files in INI and YAML formats.
This overwrites the entire boot partition with an Ubuntu 22.04 installation and updates BlueField and NIC firmware.
This installation sets up the OVS bridge.
DOCA Installer Running Modes
DOCA installer supports 3 installation running modes:
|
Mode |
Command |
|---|---|
|
Global run |
|
|
Per PSID group |
|
|
Per RShim device |
|
Where:
-
<N>– the appropriate RShim device identifier. If your environment has only one BlueField device, use0. -
<image_path.bfb>– Replace this with the path to the BFB image file -
<PSID>– the group shared PSID identifierOther cards who do not share this PSID will not be upgraded.
Run DOCA Installer with Configuration File
DOCA installer supports 2 configuration files in the format of either INI or YAML.
To upgrade BMC/CEC/Golden Image version, the BMC_USER and BMC_PASSWORD variables must be defined in the bf.cfg configuration file.
Running DOCA installer with configuration file requires providing -c <path-to-config> or --config-file <path-to-config>.
|
Mode |
Command |
|---|---|
|
Global run |
|
|
Per PSID group |
|
|
Per RShim device |
|
Where:
-
<N>– the appropriate RShim device identifier. If your environment has only one BlueField device, use0. -
<image_path.bfb>– Replace this with the path to the BFB image file -
<PSID>– the group shared PSID identifierOther cards who do not share this PSID will not be upgraded.
-
<path-to-config>– Path to configuration file (INI or YAML)The YAML configuration file uses a few key sections to organize settings:
-
global_configs– Defines variables that are common to all devices. Under this key, thevariablessub-key is used to specify shared parameters such asBMC_USERandBMC_PASSWORD. These settings apply globally unless overridden by device-specific configurations. -
rshim– Contains configuration for individual devices. Within thershimsection, each key (e.g.,rshim1,rshim2) represents a specific device's configuration.Important!
When
rshim<N>andglobal_configsshare the same configuration, the script prioritizesrshim<X>settings. -
variables– Specifies device-specific configuration parameters (e.g.,UPDATE_DPU_OS,WITH_NIC_FW_UPDATE) that control the installation and upgrade process for that device -
methods– Contains commands or steps (often multi-line shell commands) that are executed to customize the device. YAML anchors (e.g.,&default_post_install) can be used here to reuse common command blocks across multiple devices.
-
INI Configuration File Customization
|
Customization Type |
Example |
|---|---|
|
Customizing a single device |
To enable per-device configuration, it is necessary to specify the RSHIM device for each variable or method targets. |
|
Customizing all devices |
To customize all your devices and they share the same parameters (for those that can be shared), customization can be done as follows: |
YAML Configuration File Customization
|
Customization type |
Example |
|---|---|
|
Customizing a single device with no global configs |
To enable per-device configuration, it is necessary to specify the RSHIM device for each variable or method targets. YAML
|
|
Customizing all devices using global configs only |
To customize all of your devices and they all shared same parameters (on those who can be shared) customization can be done as follow YAML
|
|
Customizing all devices using global configs, and specific configs per device |
To share global configurations for multiple devices along with specific device configurations, this can be achieved by providing YAML
|
|
Advanced example with reusing methods using anchors |
The YAML configuration file will also allow users to utilize YAML tools, such as anchors, in order to reuse methods. For example, here we can see the reuse of the YAML
|
Logs and Debuggability
The DOCA installer tool will provide extended logs and enhanced debuggability compared to the existing options available with the bfb-install tool.
For each execution of the doca-installer tool, a new directory will be generated at the specified path:
/var/log/doca_installer_logs/doca_installer_<time stamp>
Under the logs directory, you'll find the following:
-
Full run of the doca installer tool
-
rshim misc per device
-
lspci - per device and of the entier system
-
bfb-install output
-
mlxconfig
-
mlxprivhost
-
mstdump (optional)
-
flint image retrive (optional)
The following is an example output of Ubuntu-22.04 BFB bundle installation on top of a host with 4 devices (version may vary in the future):
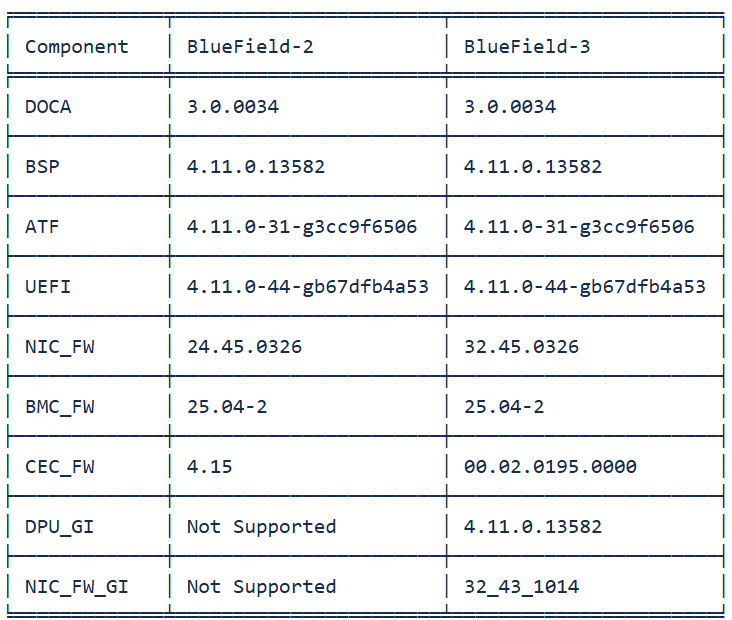
host# doca-installer -b /root/bf-bundle-3.0.0-91_25.04_ubuntu-22.04_prod.bfb -c /root/bf.cfg

Extracting firmware versions from /root/bf-bundle-3.0.0-91_25.04_ubuntu-22.04_prod.bfb Target Firmware Versions of the provided image:
Bundle install of /root/bf-bundle-3.0.0-91_25.04_ubuntu-22.04_prod.bfb image Logs will be saved to /var/log/doca_installer_logs/doca_installer_20250401_104535 directory INFO: Searching for interfering processes: minicom, screen Available DPUs on host: 4 BF DPUs:
The following DPUs are about to be upgrade: 4 BF DPUs:

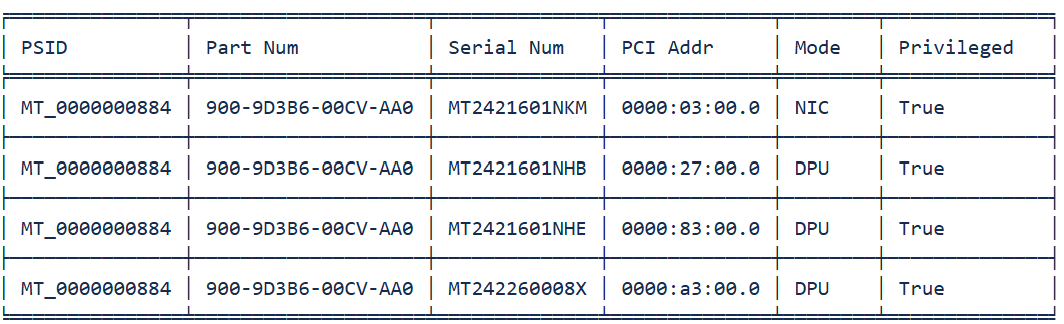
Generated configuration for 0000:03:00.0 at /tmp/rshim0-bf.cfg Generated configuration for 0000:27:00.0 at /tmp/rshim1-bf.cfg Generated configuration for 0000:83:00.0 at /tmp/rshim3-bf.cfg Generated configuration for 0000:a3:00.0 at /tmp/rshim2-bf.cfg.

Validating new FW on DPUs... Post-installation verification results: Verification for device: 0000:27:00.0 (PSID: MT_0000000884)
--------------------------------------------------------------------------------
Verification for device: 0000:83:00.0 (PSID: MT_0000000884)
--------------------------------------------------------------------------------
Verification for device: 0000:a3:00.0 (PSID: MT_0000000884)
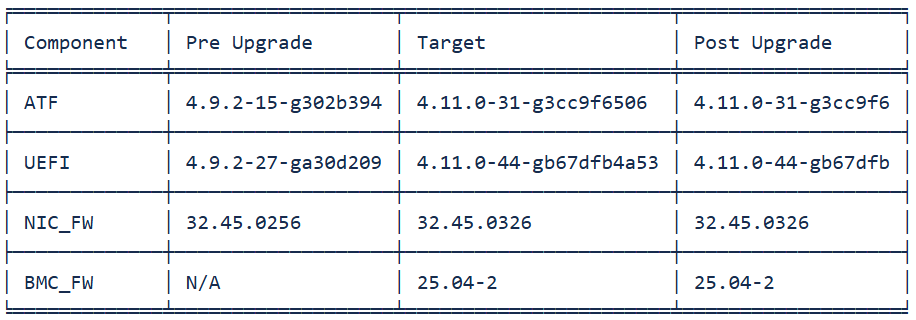
--------------------------------------------------------------------------------
Verification for device: 0000:03:00.0 (PSID: MT_0000000884)
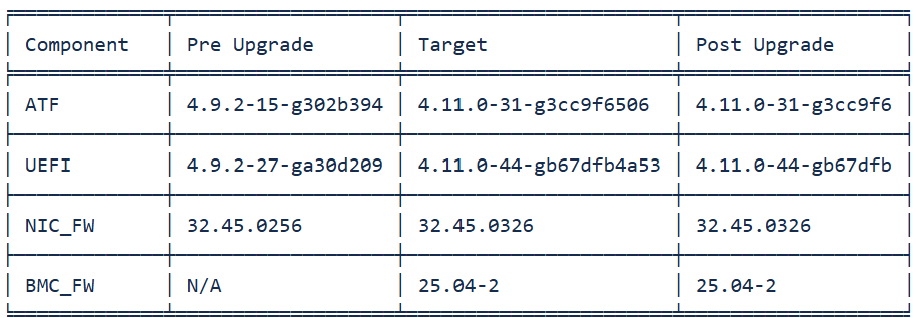
================================================================================
UPGRADE SUMMARY REPORT
================================================================================

The following devices passed upgrade successfully:
      1. 0000:27:00.0 (PSID: MT_0000000884)
      2. 0000:83:00.0 (PSID: MT_0000000884)
      3. 0000:a3:00.0 (PSID: MT_0000000884)
	  4. 0000:03:00.0 (PSID: MT_0000000884)

The following devices did not pass upgrades successfully:
      None
Important! The script will try to load the new NIC firmware automatically,but in case it will fail to do so, it will notify the user with the following message:INFO: At least one device requires a host power cycle for new NIC Firmware to be loaded.
Important! In case the script will find that one or more of the devices didnot have BMC_REBOOT set to 'yes' as part of the configuration file, it willnotify the user with the following message:WARNING: BMC_REBOOT is not configured for all devices or is not set to 'yes'. BMC firmware updates will only take effect after a BMC reboot.
Supported DOCA-Host OS for doca-installer
The following OSs on the host machine are supported for doca-installer:
|
Operating System |
Architecture |
|---|---|
|
debian10.13 |
x86_64 |
|
aarch64 |
|
|
debian12.1 |
x86_64 |
|
aarch64 |
|
|
debian12.5 |
x86_64 |
|
aarch64 |
|
|
openeuler24.03 |
x86_64 |
|
aarch64 |
|
|
ol8.4 |
x86_64 |
|
ol8.6 |
x86_64 |
|
ol8.7 |
x86_64 |
|
ol8.8 |
x86_64 |
|
ol8.10 |
x86_64 |
|
ol9.1 |
x86_64 |
|
ol9.2 |
x86_64 |
|
ol9.4 |
aarch64 |
|
rhel8.2 |
x86_64 |
|
aarch64 |
|
|
rhel8.4 |
x86_64 |
|
aarch64 |
|
|
rhel8.6 |
x86_64 |
|
ppc64le |
|
|
aarch64 |
|
|
rhel8.8 |
x86_64 |
|
ppc64le |
|
|
aarch64 |
|
|
rhel8.9 |
x86_64 |
|
ppc64le |
|
|
aarch64 |
|
|
rhel8.10 |
x86_64 |
|
ppc64le |
|
|
aarch64 |
|
|
rhel9.0 |
x86_64 |
|
ppc64le |
|
|
aarch64 |
|
|
rhel9.2 |
x86_64 |
|
ppc64le |
|
|
aarch64 |
|
|
rhel9.4 |
x86_64 |
|
ppc64le |
|
|
aarch64 |
|
|
rhel9.5 |
x86_64 |
|
aarch64 |
|
|
ppc64le |
|
|
rhel9.6 |
x86_64 |
|
aarch64 |
|
|
ppc64le |
|
|
ubuntu22.04 |
x86_64 |
|
ppc64le |
|
|
aarch64 |
|
|
ubuntu24.04 |
x86_64 |
|
aarch64 |
|
|
ppc64le |
|
|
ubuntu24.10 |
x86_64 |
|
ubuntu25.04 |
x86_64 |
|
aarch64 |
|
|
azurelinux3.0 |
x86_64 |
|
aarch64 |
Last updated: