This guide explains how to use the DOCA Management Service (DMS) with the NVIDIA® BlueField® networking platform or NVIDIA® ConnectX® SmartNICs.
DOCA Management Service is currently in alpha stage. DMS includes security features such as process separation, TLS encryption, and multiple authentication methods. However, when exposing DMS over external networks, follow the security best practices outlined in this guide to ensure proper access control and protection.
Introduction
DOCA Management Service (DMS) is a centralized solution for configuring and operating NVIDIA® BlueField® and ConnectX® devices.
DMS unifies NVIDIA's internal scripts and tools into a management layer with an industry-standard configuration API based on OpenConfig. Users can configure BlueField or ConnectX devices either locally (by SSH'ing to the host or DPU's Arm domain and running the DMS CLI) or remotely (via gRPC).
DMS exposes configurable parameters for BlueField and ConnectX over the external interface, enabling automated configuration from a management station. The interface offers a consistent and unified approach to device configuration while abstracting away the underlying tools used to manage individual features.
DMS follows a client-server architecture. The server component, DMS Daemon (dmsd), is responsible for resource discovery and for processing incoming commands from clients. These clients can be either the provided DMS Client (dmsc) or a custom-built client using the same API.
Open Config and YANG Models
-
OpenConfig is a standard that defines and implements a common, vendor-independent software layer for managing and monitoring network devices.
It utilizes YANG data models to represent device configurations and operational states in a consistent and standardized format.
-
YANG (Yet Another Next Generation) is a data modeling language used to describe the structure and content of network configuration and state data.
It represents data hierarchically, similar to an XML tree, and defines schemas for configuration, operational state, and remote procedure calls (RPCs). YANG models serve as the foundation for implementing the OpenConfig standard.
DMS utilizes OpenConfig, which consists of two main protocols:
GNMI (gRPC Network Management Interface)
A protocol for managing network device configurations and retrieving operational state data. It provides operations for getting, setting, and subscribing to configuration and state data using structured data models (YANG).
GNOI (gRPC Network Operations Interface)
A protocol for performing operational tasks on network devices such as file operations, OS management (install, activate, reboot), and system diagnostics. Together with gNMI, they provide a comprehensive management and operations framework.
DMS is inspired by the OpenConfig structure, aiming to provide a methodical framework for configurable items, but does not seek full alignment with it. Most gNMI/gNOI protocols used in DMS are aligned with the OpenConfig community and rely on the gRPC protocol for command transmission.
The DOCA YANG model is currently experimental.
DMS utilizes these models and services primarily for configuration purposes.
Telemetry streaming via the gNMI Subscribe mechanism is not supported.
DMS can run either on the host machine where BlueField or ConnectX devices are installed, or directly on the BlueField Arm cores when operating in DPU mode.
Security Considerations
DMS provides multiple layers of security to protect the infrastructure:
Architecture Security
Process Separation
DMS uses a two-process architecture to minimize security risks (detailed in section 4.2):
• dmsd (Frontend) – Handles client communication with limited privileges
• dmspe (Backend) – Executes privileged operations in an isolated process
This separation ensures that even if the frontend is compromised, privileged operations remain protected. The frontend process runs with minimal permissions and only communicates with the backend through a controlled interface, limiting the attack surface.
User Group Authorization
Only users in the dmsgroup are authorized to execute DMS commands, providing an additional access control layer.
Authentication and Encryption
DMS supports multiple authentication methods with varying security levels. The table below provides a quick overview; for detailed configuration examples and usage, see section 5.2.2.1 (DMS Quick Start Guide).
|
Method |
Security Level |
Best For |
Description |
|---|---|---|---|
|
Local Testing |
Low |
Development only |
No authentication. Server binds to localhost only. |
|
PAM |
Medium |
Unix user authentication |
Uses system user accounts. Requires |
|
Credentials |
Medium |
Simple deployments |
Static username/password authentication. |
|
Certificate (TLS) |
High |
Production deployments |
Mutual TLS with certificates. Provides encryption and strong authentication. |
Note: TLS Encryption is strongly recommended for all production deployments to protect data in transit.
Network Exposure Risks and Mitigations
Risks:
-
Exposing DMS on external networks without proper authentication may allow unauthorized access
-
Weak or default passwords can be exploited by attackers
-
Unencrypted traffic can be intercepted (man-in-the-middle attacks)
Mitigations:
The following security mitigations are recommended. For practical command examples, see "Security Best Practices" in section 5.2.2.1.
-
Use Certificate (TLS) for production
-
Enable TLS encryption for all external interfaces (see section 5.2.2.1 Mode 4 for TLS configuration)
-
For PAM authentication: use the allowed_users list to restrict which Unix users can connect (see section 5.2.2.1 Mode 2)
-
Use strong, unique passwords or passfile instead of command-line passwords
-
Bind to
localhost(127.0.0.1) for local-only access -
Deploy DMS on the DPU for better isolation from the host network
Customer Responsibilities
To ensure secure DMS operation:
-
Use TLS in production – Always enable certificate-based authentication
-
Restrict network access – Use firewalls to limit which clients can connect
-
Limit user access – Add only necessary users to
dmsgroup -
Secure credentials – Use
--passfileand restrict file permissions (chmod 600) -
Monitor logs – Regularly review dmsd logs for suspicious activity
-
Keep software updated – Apply DOCA updates to address security fixes
Refer to the Security Best Practices section for detailed guidance on secure deployment.
Requirements
To operate the DMS, DOCA must be installed on the system where DMS will run.
-
DMS on Host – The DOCA for Host package must be installed on the host system. It should be installed using either the
doca-networkingordoca-allprofile. -
DMS on DPU (BlueField Arm) – A compatible DOCA image must be installed on the BlueField Arm processor.
Consult the DOCA Installation Guide for Linux to correctly set up the required DOCA components prior to deploying DMS.
Supported operating systems are Linux-based environments.
Service Deployment
DMS consists of three major components:
-
Dmsd – Server (Frontend) – DMS server frontend that handles client communication. Can run on the BlueField ARM or on the host with an NVIDIA PCIe device.
-
Dmspe – Privileged Backend – Executes privileged operations in an isolated process for security (see section 2.1.1).
-
Dmsc – Client – DOCA-provided OpenConfig client. Customers can choose to use this client, any other open-source client, or develop their own (gRPC-based) client.
-
Yang files – Yang model files contain the data model used to configure the device, using NVIDIA-specific extension to common OpenConfig YANG Models.
Service Connectivity
The following is an architectural diagram of DMS:

The DMS architecture supports flexible deployment.
The DMS client can operate from various locations relative to the server. The supported modes of operation are:
1. Host-Local: Both the DMS client and server are deployed on the Host.
2. DPU-Local: Both the DMS client and server are deployed on the DPU (BlueField Arm).
3. Remote Client (Host Server): The DMS server is deployed on the Host, while the DMS client is deployed remotely, connecting over the management network.
4. Remote Client (DPU Server): The DMS server is deployed on the DPU (BlueField Arm), while the DMS client is deployed remotely, connecting over the management network.
5. Host with ConnectX NIC (Non-DPU): DMS server runs on the Host, managing a ConnectX NIC without a DPU.
6. Host with Multiple NICs/DPUs: A single DMS server on the Host can manage multiple network devices (NICs or DPUs) simultaneously.
7. Containerized Deployment: DMS runs in a container on the Host (see section 3 for container deployment instructions).

Process Separation
To enhance security and performance, the DOCA Management Service (DMS) has been redesigned to separate its operations into two distinct processes:
1. dmsd (Frontend Process)
-
Function: Acts as the frontend service responsible for managing communication with clients. It handles incoming requests and prepares them for secure execution.
-
Role: User-facing; responds to client requests and communicates with the privileged backend.
2. dmspe (Privileged Backend Process)
-
Function: Responsible for executing privileged commands that require elevated permissions. These commands are executed securely to ensure system integrity.
-
Role: Back-end; silently executes commands on behalf of
dmsdwith the necessary privileges.
Running the DMS Server
Prerequisites
The prerequisites for running the DMS service differ depending on whether you are running it on the host machine or directly on the DPU.
1. Running on the Host (Not DPU)
Before running the DMS service on a host, both of the following prerequisites must be fulfilled:
A. Execute Installation Script
-
Purpose: To install
dmspewith the correct permissions, ensuring it can execute privileged operations. -
Command: Run the
install_dmspe.shscript.
B. Add User to dmsgroup
-
Purpose: Only users who are members of the
dmsgroupare authorized to execute DMS commands viadmspe. -
Commands: Add your current user to the
dmsgroup:# Add your current user to dmsgroup sudo usermod -a -G dmsgroup $USER # Apply the change by logging out and back in, or run: newgrp dmsgroup
2. Running on the DPU (Arm)
When running DMS on the DPU, no installation script is required, as the necessary permissions are set automatically.
However, the User Group Requirement (section 5.1.1.2.B above) is still mandatory. You must ensure the user is a member of the dmsgroup to execute DMS commands.
DMS Daemon Launch Options
Option 1: SystemD Service (Recommended)
On the DPU, the DMS Daemon (dmsd) runs as a systemd service and comes pre-installed with the BlueField BFB-Bundle.
It should be running locally by default as a systemd service, bound to localhost:9339.
Default Configuration: The SystemD service runs with PAM authentication by default. The authentication mode and other server flags are configured in the service file.
To view the current configuration:
systemctl cat dmsd.service
To change authentication mode or other flags:
-
Edit the service file:
sudo systemctl edit --full dmsd.service -
Modify the
ExecStartline with desired flags (all available flags are documented in section 5.3) -
Reload and restart:
sudo systemctl daemon-reload && sudo systemctl restart dmsd.service
The same authentication modes available in Option 2 (Manual Launch) can be used here: PAM, Credentials, Certificate, or Testing mode.
-
To check if
dmsdis running:ps -ef | grep dms
-
To manage the service:
sudo systemctl status dmsd
sudo systemctl start dmsd
sudo systemctl stop dmsd
-
To interact with
dmsdusing the built-in client (requires user-password authentication; the default is the OS root password):dmscli
-
A template
systemdservice file is included in the DOCA package:/opt/mellanox/doca/services/dms/dmsd.service/dmsd.service
Option 2: Manual Launch
Note: The following Quick Start Guide demonstrates how to use the DMS Client (dmsc) to connect to the DMS Server (dmsd). The server flags are described in section 5.3 (DMS Server Flags) below.
DMS Quick Start Guide
The DMS Client (dmsc) is used to interact with the DMS Server (dmsd). The client accepts two types of parameters:
-
Flags – Configuration options starting with
-(e.g.,-afor address,-ufor username,-ifor insecure mode) -
Commands – Operations to perform (e.g.,
get,set,mlxconfig,file)
The basic syntax is: dmsc [flags] <command> [command-options]
Client Flags
|
Flag |
Description |
Example |
|---|---|---|
|
|
Server address (IP:port) |
|
|
|
Username for authentication |
|
|
|
Server port |
|
|
|
Insecure mode (disable TLS) |
|
|
|
Client TLS certificate |
|
|
|
Client TLS key |
|
|
|
Request timeout |
|
|
|
Skip certificate verification |
|
Note: Password is prompted interactively or use --passfile /path/to/file
Password can be provided using the parameter --passfile /path/to/file (server must have read permissions to the file). Otherwise, users are prompted to provide it.
Note: The examples below show both server and client commands. Server flags (e.g., -auth, -bind_address, -tls_enabled) are detailed in section 5.3. Client flags (e.g., -a, -i) are listed in the table above. Client commands (e.g., get, set) specify the operation to perform.
Mode 1: Local Testing
|
Component |
Command |
|---|---|
|
Server |
|
|
Client |
|
Required Flags
|
Flag |
Server |
Client |
Notes |
|---|---|---|---|
|
Address |
|
|
Must match |
|
Auth Mode |
|
- |
Required |
|
TLS |
|
|
Disabled for testing |
-
Use case: Testing on same machine (localhost only)
-
Security: None - Testing only!
Mode 2: PAM Authentication
|
Component |
Command |
|---|---|
|
Server |
|
|
Client |
|
Required Flags
|
Flag |
Server |
Client |
Notes |
|---|---|---|---|
|
Address |
|
|
Replace |
|
Auth mode |
|
- |
Use Unix users |
|
Allowed users |
|
- |
Comma-separated list |
|
Username |
- |
|
Must be in allowed_users |
|
Password |
- |
(prompted) |
Will be prompted interactively, or use |
|
TLS |
|
|
Optional: enable for encryption |
-
Use case: Production with Unix user authentication
-
Security: Low without TLS
Mode 3: Credentials Authentication
|
Component |
Command |
|---|---|
|
Server |
|
|
Client |
|
Required Flags
|
Flag |
Server |
Client |
Notes |
|---|---|---|---|
|
Address |
|
|
Replace |
|
Auth mode |
|
- |
Static username/password |
|
Username |
|
|
Must match on both sides |
|
Password |
|
(prompted) |
Client: password prompted interactively or use |
|
TLS |
|
|
Optional: enable for encryption |
-
Better practice: Use
-passfile /path/to/pass.txtinstead of-passwordon server (more secure) -
Use case: Simple authentication without Unix users
-
Security: Low without TLS
Mode 4: TLS with Certificates (Most Secure)
|
Component |
Command |
|---|---|
|
Server |
|
|
Client |
|
Required Flags
|
Flag |
Server |
Client |
Notes |
|---|---|---|---|
|
Address |
|
|
Replace |
|
Auth mode |
|
- |
Certificate-based auth |
|
CA certificate |
|
|
Same CA file on both sides. Server: old |
|
Server cert |
|
- |
Server: old |
|
Server key |
|
- |
Server: old |
|
Client cert |
- |
|
Client's certificate (or |
|
Client key |
- |
|
Client's private key (or |
-
Use case: Production deployments requiring encryption
-
Security: High - Encrypted and mutually authenticated
Example Commands
|
Command Type |
Example |
Description |
|---|---|---|
|
Get system info |
|
Retrieve system platform information (password prompted) |
|
Set configuration |
|
Update system name (password prompted) |
|
Subscribe to stats |
|
Monitor interface counters in real-time |
|
gNOI: Get file |
|
Download a file from the server |
Replace 10.237.155.125:9339 with your server's IP address and port.
Security Best Practices
|
DO |
DON'T |
|---|---|
|
Use Mode 4 (TLS) in production |
Use |
|
Use |
Put passwords on command line in production |
|
Limit |
Use |
|
Use |
Expose server on |
The following are examples for starting dmsd daemon manually with a variety of authentication methods:
-
Localhost with username/password:
/opt/mellanox/doca/services/dms/dmsd \
  --bind_address localhost:9339 \
  --auth credentials \
  --username my_username \
  --password my_password
-
Remote host with shadow file:
/opt/mellanox/doca/services/dms/dmsd \ --bind_address <ip>:<port> \ --auth shadow \ --username my_username \ --shadow /etc/shadow -
TLS certificate-based authentication:
/opt/mellanox/doca/services/dms/dmsd \
  --bind_address localhost:9339 \
  --auth cert \
  --ca <ca.pem> \
  --tls_key_file <key.pem> \
  --tls_cert_file <cert.pem>
-
Specific PCIe device (for a host with multiple DPUs):
/opt/mellanox/doca/services/dms/dmsd \
  --bind_address localhost:9339 \
  --auth credentials \
  --username my_username \
  --password my_password \
  --target_pci 0000:08:00
-
Provide a list of PCIe devices (for a host with multiple DPUs):
/opt/mellanox/doca/services/dms/dmsd \
  --bind_address localhost:9339 \
  --auth credentials \
  --username my_username \
  --password my_password \
  --target_pci 0000:08:00,0000:09:00
DMS Server Flags
To see the full list of flags, use the help flag (i.e., dmsd --help, dmsd -h).
General Flags
-
--bind_address <string>– Bind to<address>:<port>or just:<port>(default is:9339). Can be localhost for the local use case, or an IP address for the remote use case. -
-v <value>– log level for V logs -
--target_pci <string>– One or multiple target PCIe addresses (i.e.,0000:03:00, 0000:03:00,0000:04:00). Auto-select if only one NVIDIA network device is present; otherwise, one or more PCIe addresses must be specified.
Provisioning Flags
-
--image_folder <string>– Specify the image install folder. Can copy images directly to the folder to avoid transfer over the net. Default create folder:/tmp/dms. -
--chunk_size_ack <uint>– The chunk size of the image to respond with a transfer response in bytes (default: 12000000) -
--exec_timeout <uint>– The maximum execution timeout in seconds for a command if not responding (not printing tostdout); 0 (default) is unlimited
Config Flags
-
--init_config <string>– File containing gNMI requests to run on DMS start. By default, DMS adds any gNMI set request to a file (file format is req.json).
Authentication Method Flags
The --auth <string> flag specifies one of the following three authentication methods, each with its own set of required flags:
Shadow
-
Zero-touch setup – no need to create a dedicated DMS user (reuses existing OS user)
-
The server reads the hashed password from the shadow file in real time for each client request
-
Required flags:
--username <string>and--shadow <string>-
Example:
--auth shadow --username root --shadow /etc/shadow
-
-
To disable authentication:
--noauth
Credentials
-
Requires the admin to define a strong password.
-
Required flags:
--username <string>and optionally--password <string>-
Example:
--auth credentials --username root --password 123456
-
-
To prompt for password input interactively at startup, leave the
--passwordflag empty. -
To disable authentication:
--noauth
Certificate (TLS)
-
The most secure option, using Transport Layer Security (TLS) for both encryption and mutual authentication.
-
Authentication is based on digital certificates, ensuring only trusted clients can connect.
-
Required flags:
--auth cert
--ca <path/to/ca.crt>
--tls_key_file <path/to/target.key>
--tls_cert_file <path/to/target.crt> -
Example:
--auth cert --ca /path/to/certs/ca.crt --tls_key_file /path/to/certs/target.key --tls_cert_file /path/to/certs/target.crt
-
-
To disable TLS:
--tls_enabled=false
Security Flags
TLS Encryption and Authentication
DMS uses TLS (Transport Layer Security) by default to secure communication. TLS is a widely adopted cryptographic protocol that provides the following guarantees:
-
Encryption – Protects transmitted data from eavesdropping.
-
Authentication – Verifies the identity of the server and optionally the client via digital certificates.
-
Integrity – Ensures transmitted data is not tampered with.
TLS relies on a public/private key pair and a digital certificate issued by a Certificate Authority (CA). These elements ensure secure, authenticated communication.
DMS supports TLS for both gNMI and gNOI interfaces, and works with either self-signed or CA-signed certificates.
To enable TLS, both server and client must provide:
-
--ca <string>– Path to the CA certificate used to validate the remote party’s certificate. -
--tls_cert_file <string>– Path to the public certificate presented during the TLS handshake. -
--tls_key_file <string>– Path to the corresponding private key used to sign the handshake and decrypt messages.The private key must be protected. If compromised, it can be used to impersonate the server or client.
TLS Communication Modes
Mutual TLS Authentication (mTLS)
Both the server and client present certificates and verify each other during the TLS handshake.
# Server:
/opt/mellanox/doca/services/dms/dmsd <flags> --auth cert \
  --ca /path/to/certs/client_ca.crt \
  --tls_cert_file /path/to/certs/target.crt \
  --tls_key_file /path/to/certs/target.key

# Client:
/opt/mellanox/doca/services/dms/dmsc <flags> \
  --tls-ca /path/to/certs/target_ca.crt \
  --tls-cert /path/to/certs/client.crt \
  --tls-key /path/to/certs/client.key <command>
Highlights:
-
Provides the highest level of security.
-
Ensures both sides are authenticated and trusted.
-
All traffic is encrypted.
TLS (Server Authentication Only)
Only the server presents its certificate during the handshake. The client verifies the server but does not present a certificate.
# Server:
/opt/mellanox/doca/services/dms/dmsd <flags> --auth cert \
  --tls_cert_file /path/to/certs/target.crt \
  --tls_key_file /path/to/certs/target.key

# Client:
/opt/mellanox/doca/services/dms/dmsc <flags> \
  --tls-ca /path/to/certs/target_ca.crt \
  --skip-verify <command>
Highlights:
-
Client authenticity is not verified.
-
Use
--skip-verifyif a root CA is not provided. -
Traffic remains encrypted.
Insecure Mode (No TLS)
TLS is disabled entirely on both server and client. No encryption or authentication is performed.
# Server:
/opt/mellanox/doca/services/dms/dmsd <flags> --auth cert --tls_enabled=false

# Client:
/opt/mellanox/doca/services/dms/dmsc <flags> --insecure <command>
To achieve insecure communication (no encryption), configure:
-
Server – use
--tls_enabled=falseparam -
Client – use
--insecureflag'
Highlights:
-
Not recommended for production.
-
Use only in fully isolated, trusted environments for testing or development.
Running the DMS Client
To see the full list of flags, use the help flag (i.e., dmsc --help, dmsc -h).
DMS Client Flags
General Flags
-
--address <string>– Bind to<address>:<port>or just:<port>(default is:9339). Can be localhost for the local use case, or an IP address for the remote use case. -
--target <string>– Target PCIe address to interact with. Mandatory if the server is running for multiple PCIe addresses. -
-d, --debug– Debug mode.
Authentication Flags
-
-u, --username <string>– username. -
-p, --password <string>– password.
Security Flags
-
--tls-ca <string>– path to server CA certificate. -
--tls-key <string>– path to the client TLS private key. -
--tls-cert <string>– path to the client TLS certificate, containing the public key. -
--skip-verify– tells the client to skip verifying the server's certificate during the TLS handshake. TLS is enabled, and the connection is encrypted. -
--insecure– Disable TLS. The client connects over plain TCP, with no encryption or authentication.
gNMI Command
gNMI (gRPC Network Management Interface) is a standardized network management protocol to configure and monitor network devices via gRPC and Protocol Buffers. It enables interaction with devices using models such as OpenConfig.
Core gNMI commands:
-
Get – Retrieves device data (e.g., operational state, configuration).
-
Set – Modifies device configuration.
-
Capabilities – Queries the device’s capabilities (e.g., supported models, versions, encodings).
-
Subscribe – Streams data from the device to the client.
DMS currently does not support the Subscribe command.
In DMSC, the gNMI functionality is powered by the GNMIC project. For additional details, refer to the GNMIC documentation.
Prompt mode with autocomplete can be invoked using the prompt command. To access it, run dmscli and authenticate with the dmsd user password (by default, the root OS password).
Get Request
Get requests happen in real-time without a cache. Get command requires providing the YANG Xpath as described in the following:
/opt/mellanox/doca/services/dms/dmsc <flags> get --path /interfaces/interface[name=p0]/config/mtu
[
  {
    "source": "localhost:9339",
    "timestamp": 1712485149723248511,
    "time": "2024-04-07T10:19:09.723248511Z",
    "updates": [
      {
        "Path": "interfaces/interface[name=p0]/config/mtu",
        "values": {
          "interfaces/interface/config/mtu": "1500"
        }
      }
    ]
  }
]
To insert params in the path, as an indication of the interface name (p0).
Get request also work on subtree (subPath) as follows:
/opt/mellanox/doca/services/dms/dmsc <flags> get --path /nvidia/roce
[
  {
    "source": "127.0.0.1:9339",
    "timestamp": 1728471432988295603,
    "time": "2024-10-09T13:57:12.988295603+03:00",
    "updates": [
      {
        "Path": "nvidia/roce",
        "values": {
          "nvidia/roce": {
            "config": {
              "adaptive-routing": "false",
              "multipath-dscp": "MULTIPATH_DSCP_DEFAULT",
              "tx-sched-locality-mode": "TX_SCHED_LOCALITY_ACCUMULATIVE"
            }
          }
        }
      }
    ]
  }
]
Failing to provide a mandatory parameter for decoding a leaf leads to that leaf being skipped. The entire request fails when the first leaf fails.
Set Request
Set requests happen immediately, invoking tools to configure the OS.
Set commands require providing Yang Xpath as described in the following:
/opt/mellanox/doca/services/dms/dmsc <flags> set --update /interfaces/interface[name=p0]/config/mtu:::int:::9216
{
  "source": "localhost:9339",
  "time": "1970-01-01T00:00:00Z",
  "results": [
    {
      "operation": "UPDATE",
      "path": "interfaces/interface[name=p0]/config/mtu"
    }
  ]
}
To insert params in the path, as an indication of the interface name (p0).
The value provided must be separated by value type and char.
Currently, only the --update flag is supported in Set.
The update of some leaves only takes effect after the system reboot. Refer to gNOI system reboot for information.
It is also possible to invoke a command JSON list:
/opt/mellanox/doca/services/dms/dmsc <flags> set --request-file req.json
req.json example:
{
  "updates":
    [
      {
        "path": "/interfaces/interface[name=p0]/config/mtu",
        "value": 9216,
        "encoding": "uint"
      },
      {
        "path": "/interfaces/interface[name=p0]/config/enabled",
        "value": true,
        "encoding": "bool"
      }
    ]
}
List of DMS Supported Get/Set Commands
To get the list of supported paths for get/set commands, run the following command:
dmsc --file /opt/mellanox/doca/service/dms/yang path --types --descr
Valid Values for Fields:
-
identityref and enumeration types have predefined valid values defined in the YANG models located in
/dms/gnxi/yang/ -
Common examples:
-
trust-mode: QOS_TRUST_MODE_PCP, QOS_TRUST_MODE_DSCP -
priority[id]: 0-7 (standard traffic class priorities) -
mode: NIC, DPU, SEPARATED -
admin-status/oper-status: UP, DOWN, UNKNOWN
-
-
For complete valid value definitions, refer to the YANG files in
/opt/mellanox/doca/services/dms/yang/or use the gNMIcapabilitiescommand to inspect the schema
Availability Modes:
The table below indicates deployment context support for each path:
-
All modes: Supported on all deployment types (Host with CX, Host with DPU, DPU standalone)
-
CX, DPU: Supported on both ConnectX NICs and BlueField DPUs
-
DPU only: BlueField DPUs only
-
CX only: ConnectX NICs only
See section 4.1 for detailed deployment architecture.
Supported Operations in the table below:
-
Configuration paths (/config/...) - Support both Get and Set operations
-
State paths (/state/...) - Support Get only (read-only operational data)
-
Command execution paths (/nvidia/command/...) - Support Get only (runs commands)
-
Bulk profile configuration - Some profile paths support Set only for batch updates
|
# |
Path |
Type |
Description |
Availability |
|---|---|---|---|---|
|
1 |
/interfaces/interface[name=*]/config/enabled |
boolean |
This leaf contains the configured, desired state of the interface. Systems that implement the IF-MIB use the value of this leaf in the 'running' datastore to set IF-MIB.ifAdminStatus to 'up' or 'down' after an ifEntry has been initialized, as described in RFC 2863. Changes in this leaf in the 'running' datastore are reflected in ifAdminStatus, but if ifAdminStatus is changed over SNMP, this leaf is not affected. |
All modes |
|
2 |
/interfaces/interface[name=*]/config/mtu |
uint16 |
Set the maximum transmission unit size in octets for the physical interface. If this is not set, the mtu is set to the operational default -- e.g., 1514 bytes on an Ethernet interface. |
All modes |
|
3 |
/interfaces/interface[name=*]/config/name |
string |
The name of the interface. A device MAY restrict the allowed values for this leaf, possibly depending on the type of the interface. For system-controlled interfaces, this leaf is the device-specific name of the interface. The 'config false' list interfaces/interface[name]/state contains the currently existing interfaces on the device. If a client tries to create a configuration for a system-controlled interface that is not present in the corresponding state list, the server MAY reject the request if the implementation does not support pre-provisioning of interfaces or if the name refers to an interface that can never exist in the system. A NETCONF server MUST reply with an rpc-error with the error-tag 'invalid-value' in this case. The IETF model in RFC 7223 provides YANG features for the following (i.e., pre-provisioning and arbitrary names), However they are omitted here: If the device supports pre-provisioning of the interface configuration, the 'pre-provisioning' feature is advertised. If the device allows an arbitrarily named user-controlled interfaces, the 'arbitrary-names' feature is advertised. When a configured user-controlled interface is created by the system, it is instantiated with the same name in the /interfaces/interface[name]/state list. |
All modes |
|
4 |
/interfaces/interface[name=*]/config/type |
identityref |
The type of the interface. When an interface entry is created, a server MAY initialize the type leaf with a valid value, e.g., if it is possible to derive the type from the name of the interface. If a client tries to set the type of an interface to a value that can never be used by the system, e.g., if the type is not supported, or if the type does not match the name of the interface, the server MUST reject the request. A NETCONF server MUST reply with an rpc-error with the error-tag 'invalid-value' in this case. |
All modes |
|
5 |
/interfaces/interface[name=*]/ethernet/nvidia/config/inter-packet-gap |
uint8 |
Inter packet gap configuration, in 4B unit |
DPU only |
|
6 |
/interfaces/interface[name=*]/ethernet/nvidia/config/rate-limit |
uint16 |
The percentage of bandwidth, in permile units, to be used on the port. |
DPU only |
|
7 |
/interfaces/interface[name=*]/name |
leafref |
References the name of the interface |
All modes |
|
8 |
/interfaces/interface[name=*]/nvidia/cc/config/priority[id=*]/id |
leafref |
|
CX, DPU |
|
9 |
/interfaces/interface[name=*]/nvidia/cc/config/priority[id=*]/np_enabled |
boolean |
Enable CC NP for a given priority on the interface |
CX, DPU |
|
10 |
/interfaces/interface[name=*]/nvidia/cc/config/priority[id=*]/rp_enabled |
boolean |
Enable CC RP for a given priority on the interface- this runs using the doca mgmt sdk api. |
CX, DPU |
|
11 |
/interfaces/interface[name=*]/nvidia/cc/slot[id=*]/config/counter_enable |
boolean |
Enable the counter while enabling tha CC algo according to the algo_slot |
CX, DPU |
|
12 |
/interfaces/interface[name=*]/nvidia/cc/slot[id=*]/config/enabled |
boolean |
Enable a CC algo slot execution. |
CX, DPU |
|
13 |
/interfaces/interface[name=*]/nvidia/cc/slot[id=*]/config/id |
algo_slot_id |
CC algo slot id. |
CX, DPU |
|
14 |
/interfaces/interface[name=*]/nvidia/cc/slot[id=*]/id |
leafref |
CC algo slot ID. |
CX, DPU |
|
15 |
/interfaces/interface[name=*]/nvidia/cc/slot[id=*]/param[id=*]/config/id |
algo_param_id |
CC algo param id. |
CX, DPU |
|
16 |
/interfaces/interface[name=*]/nvidia/cc/slot[id=*]/param[id=*]/config/value |
algo_param_value |
Parameter value within the CC algo slot. |
CX, DPU |
|
17 |
/interfaces/interface[name=*]/nvidia/cc/slot[id=*]/param[id=*]/id |
leafref |
Parameter ID within the CC algo slot. |
CX, DPU |
|
18 |
/interfaces/interface[name=*]/nvidia/qos/config/pfc |
boolean |
Enables PFC |
All modes |
|
19 |
/interfaces/interface[name=*]/nvidia/qos/config/priority-to-tc |
string |
priority to traffic class mapping, should have 8 entries for all tcs. |
All modes |
|
20 |
/interfaces/interface[name=*]/nvidia/qos/config/priority[id=*]/id |
prio |
Priority ID. |
All modes |
|
21 |
/interfaces/interface[name=*]/nvidia/qos/config/trust-mode |
identityref |
Trust mode for the interface QoS. |
All modes |
|
22 |
/interfaces/interface[name=*]/nvidia/roce/adp-retx-profiles*
|
json file |
DMS to configure adaptive-retransmission timeouts via ROCE_ACCL command register. |
CX, DPU |
|
23 |
/interfaces/interface[name=*]/nvidia/roce/config/adaptive-retransmission |
boolean |
Enable adaptive retransmission |
CX, DPU |
|
24 |
/interfaces/interface[name=*]/nvidia/roce/config/adaptive-routing-force |
boolean |
Force adaptive routing even if the feature was not negotiated between the requestor and responder. |
CX, DPU |
|
25 |
/interfaces/interface[name=*]/nvidia/roce/config/cc-per-plane |
boolean |
Enable\Disable congestion control per plane (when multi plane is supported) |
CX, DPU |
|
26 |
/interfaces/interface[name=*]/nvidia/roce/config/rtt-resp-dscp |
uint8 |
Defines the DSCP fixed value used if mode is set to FIXED. |
CX, DPU |
|
27 |
/interfaces/interface[name=*]/nvidia/roce/config/rtt-resp-dscp-mode |
identityref |
Defines the method for setting DSCP in RTT response packets. |
CX, DPU |
|
28 |
/interfaces/interface[name=*]/nvidia/roce/config/slow-restart |
boolean |
Enable slow restart when congestion |
CX, DPU |
|
29 |
/interfaces/interface[name=*]/nvidia/roce/config/slow-restart-idle |
boolean |
Enable slow restart when idle |
CX, DPU |
|
30 |
/interfaces/interface[name=*]/nvidia/roce/config/tos |
tos |
ToS value for RoCE traffic. |
CX, DPU |
|
31 |
/interfaces/interface[name=*]/nvidia/roce/config/tx-window |
boolean |
Enable transmission window |
CX, DPU |
|
32 |
/interfaces/interface[name=*]/nvidia/virtual-functions/vf[netdev-name=*]/config/data-direct |
boolean |
enable or disable the data direct options for VFs only, this command is using the doca mgmt sdk api. |
DPU only |
|
33 |
/interfaces/interface[name=*]/state/admin-status |
enumeration |
The desired state of the interface. In RFC 7223, this leaf has the same read semantics as ifAdminStatus. Here, it reflects the administrative state as set by enabling or disabling the interface. |
All modes |
|
34 |
/interfaces/interface[name=*]/state/oper-status |
enumeration |
The current operational state of the interface. This leaf has the same semantics as ifOperStatus. |
All modes |
|
35 |
/nvidia/cc/config/user-programmable |
boolean |
Enables user-programmable CC functionality. |
CX, DPU |
|
36 |
/nvidia/command[run=*]/run |
string |
The command to run. |
All modes |
|
37 |
/nvidia/device/config/module[module-id=*]/module-id |
int |
read only, get the module/port id for setting port splitting |
DPU only |
|
38 |
/nvidia/device/config/module[module-id=*]/port[port-id=*]/port-id |
int |
read only, get the module/port id for setting port splitting |
DPU only |
|
39 |
/nvidia/device/config/module[module-id=*]/port[port-id=*]/lanes |
string |
set\ get the lanes defined for a specific module and port when defining port splitting. |
DPU only |
|
40 |
/nvidia/mode/config/mode |
identityref |
Mode can take one of several predefined values representing operational modes of DPU. |
DPU only |
|
41 |
/nvidia/physical-functions/config/num-of-pf |
int |
set\get the number of pfs when configuring a NIC to sport multiplane and port splitting |
CX, DPU |
|
42 |
/nvidia/roce/config/adaptive-routing |
boolean |
Enable adaptive routing between a requestor and responder. |
CX, DPU |
|
43 |
/nvidia/roce/config/cc-steering-ext |
string |
2 bit field for controling cc steering extension, could be: default, disabled, enabled or reserved |
CX, DPU |
|
44 |
/nvidia/roce/config/multipath-dscp |
identityref |
Multipath on transmit, set the DSCP bit to hold the MP eligible info |
CX, DPU |
|
45 |
/nvidia/roce/config/tx-sched-locality-mode |
identityref |
Transmission scheduler adaptation to locality |
CX, DPU |
gNOI Commands
gNOI (gRPC Network Operations Interface) is a protocol for operational tasks such as installing software, managing certificates, and troubleshooting. It complements gNMI by focusing on administrative and system-level functions.
Within DMSc, gNOI support is provided by the GNOIC project. For full documentation, refer to the GNOIC project documentation.
To invoke a gNOI command, run:
/opt/mellanox/doca/services/dms/dmsc -a localhost --port 9339 --tls-cert client.crt --tls-key client.key <command>
To use interactive mode with autocompletion, enter:
/opt/mellanox/doca/services/dms/dmsc prompt
All commands are blocked by default unless explicitly enabled. gNOI commands are currently supported only on the host system—not on the BlueField.
OS Commands
The following commands support provisioning of DOCA images (BFB) on BlueField DPUs and firmware updates on both BlueField DPUs and ConnectX NICs.
Install
Transfers and authenticates the specified package file. If the file is valid, it is saved to the server’s image folder (default: /tmp/dms). If the file already exists in that folder with the expected version and extension, the server skips the file transfer and proceeds with authentication only.
/opt/mellanox/doca/services/dms/dmsc <flags> os install \
    --version <version_string> \
    --pkg <path_to_bfb_or_cfg_or_fw>
Examples:
-
Install a BFB image:
/opt/mellanox/doca/services/dms/dmsc <flags> os install \ --version 2_9_0 \ --pkg DOCA_2.9.0_Ubuntu.bfb -
Install a config file:
/opt/mellanox/doca/services/dms/dmsc <flags> os install \ --version 0_0_1.cfg \ --pkg bf.cfg -
Install firmware:
/opt/mellanox/doca/services/dms/dmsc <flags> os install \
    --version 24_29_0046.fw \
    --pkg fw-BlueField.bin
The file extension is autodetected based on the provided package. If omitted from the --version string, it is inferred automatically. Users can also copy the file manually to the image folder and run the command to authenticate it without triggering a transfer.
The file is saved to the folder specified in the -image_folder flag (default /tmp/dms) given to the server, if the file authenticates successfully.
Activate
The activate command deploys BFB bundles and/or firmware to the hardware.
/opt/mellanox/doca/services/dms/dmsc <flags> os activate --version <version_string>
Examples:
-
Activate all files under a version prefix:
/opt/mellanox/doca/services/dms/dmsc <flags> os activate --version 2_9_0
-
Activate specific files by name (use semicolon to separate multiple components):
/opt/mellanox/doca/services/dms/dmsc <flags> os activate --version "2_9_0.bfb;0_0_1.cfg;24_29_0046.fw"
-
Auto-detect and install the appropriate firmware:
/opt/mellanox/doca/services/dms/dmsc <flags> os activate --version auto
Behavior:
-
The
--versionflag specifies which files to activate from the directory defined by the--image_folderflag (default:/tmp/dms). -
If no file extensions are included, the command activates all files matching the base version name.
-
When using
--version auto, themlnx-fw-updater.plscript runs automatically. This script:-
Detects the connected device type.
-
Identifies the appropriate firmware version.
-
Installs it accordingly.
-
Deploying BFB bundles is supported only when the command runs from the host system.
After firmware activation, a firmware reset is automatically triggered.
Verify
The verify command retrieves the currently installed firmware and BFB bundle versions from the target device.
/opt/mellanox/doca/services/dms/dmsc <flags> os verify
The response includes the firmware and BFB versions, separated by a semicolon:
+-----------------+---------------------------------------------------------------+-----------------------------+
|   Target Name   |                          Version                              | Activation Fail Msg         |
+-----------------+---------------------------------------------------------------+-----------------------------+
| 127.0.0.1:19999 | FW: 32.42.1000;BFB: bf-bundle-2.8.0-98_24.07-ubuntu-22.04_dev |                             |
+-----------------+---------------------------------------------------------------+-----------------------------+
Notes:
-
The
Versioncolumn lists both the firmware (FW) and BFB versions if available. -
The
Activation Fail Msgcolumn displays error messages if activation fails. -
The BFB bundle version is displayed only if it was installed via DMS.
System
The following subsections describe actions related to rebooting the BFB bundle or firmware on BlueField.
Reboot Status
Use the following command to check whether a reboot is currently in progress:
/opt/mellanox/doca/services/dms/dmsc <flags> system reboot-status [--reboot_status_check <string>]
The returned value indicates the system status:
-
false– The system is active and not rebooting. -
true– The system is in the process of rebooting. -
If the status cannot be retrieved, the result appears as failure, and the
messagefield provides additional details.
The flag --reboot_status_check <string> checks if firmware reboot is needed:
|
Value |
Description |
|---|---|
|
|
Default. Performs a quick but imprecise check. Any configuration may trigger a reboot. |
|
|
Performs a slower but more accurate check. |
|
|
Skips the firmware reboot check entirely. |
Reboot
To reboot the BlueField Arm and firmware, use the following command:
/opt/mellanox/doca/services/dms/dmsc <flags> system reboot --delay <seconds> [--subcomponent <component>] [--method <type>]
This command is non-blocking and returns immediately after it is issued.
|
Flag |
Description |
|---|---|
|
|
Specifies the number of seconds to wait before triggering the reset. |
|
|
Optional. Specifies which component to reset. Currently supports |
|
|
Optional. Specifies the reset method. Supported values: |
By default, if subcomponent and method are not specified, the command executes the lowest-level reset available for the system.
Factory-reset
Performs a factory reset on the target node by resetting all PFs (Physical Functions) to their default configurations.
Start
Resets device configurations to their default values for each PF on the specified target:
/opt/mellanox/doca/services/dms/dmsc <flags> factory-reset start
Or using the alias:
/opt/mellanox/doca/services/dms/dmsc <flags> reset start
Reset to the Golden Image (a pre-configured, ideal-state version) is not supported.
File
Performs operational tasks related to files on the target device.
Stat
Retrieves metadata for a specified file or directory.
# Single file
/opt/mellanox/doca/services/dms/dmsc <flags> file stat --path /path/to/file

# Directory with recursive listing
/opt/mellanox/doca/services/dms/dmsc <flags> file stat --path /path/to/dir --recursive
Example output:
+----------------+---------------------+----------------------+------------+------------+------+
|  Target Name   |        Path         |     LastModified     |    Perm    |   Umask    | Size |
+----------------+---------------------+----------------------+------------+------------+------+
| 127.0.0.1:9339 | /path/to/dir/file_1 | 2025-04-10T09:05:37Z | -rw-r--r-- | -----w--w- | 0    |
|                | /path/to/dir/file_2 | 2025-04-10T09:05:37Z | -rw-r--r-- | -----w--w- | 0    |
+----------------+---------------------+----------------------+------------+------------+------+
Get
Streams the contents of a file from the target device to the client.
To allow this operation, the DMSD server must be started with a list of directories permitted for read access, using the --allow_list_read flag:
/opt/mellanox/doca/services/dms/dmsd <flags> --allow_list_read <dir1>,<dir2>,<dir3>
Client invocation:
/opt/mellanox/doca/services/dms/dmsc <flags> file get --file /tmp/debug/<file_to_get>
Put
Streams a file from the client to the target device.
To allow this operation, the DMSD server must be started with a list of directories permitted for write access, using the --allow_list_write flag.
/opt/mellanox/doca/services/dms/dmsd <flags> --allow_list_write <dir1>,<dir2>,<dir3>
Client invocation:
/opt/mellanox/doca/services/dms/dmsc <flags> file put --file /tmp/debug/file_to_send --dst /tmp/output/path_on_remote_host
mlxconfig
Enables setting and retrieving configuration params of devices.
This option is disabled by default. To use it, dmsd must be started with --enable_mlxconfig.
Set
Set the key=value parameter pairs of configurations on the target device.
/opt/mellanox/doca/services/dms/dmsc <flags> mlxconfig set \
    [PARAM1=VALUE1 PARAM2=VALUE2 ...]
Examples:
-
Setting a single param:
/opt/mellanox/doca/services/dms/dmsc <flags> mlxconfig set \
    LINK_TYPE_P1=1
-
Setting multiple parameters:
/opt/mellanox/doca/services/dms/dmsc <flags> mlxconfig set \
    LINK_TYPE_P1=1 LINK_TYPE_P2=1
Query
Query the configuration parameter values of the target device.
The output displays the nextboot value.
The verbose output displays default, current, and netboot values.
/opt/mellanox/doca/services/dms/dmsc <flags> mlxconfig query [-v] \
    [PARAM1 PARAM2 ...]
Examples:
-
Querying a single param:
/opt/mellanox/doca/services/dms/dmsc <flags> mlxconfig query \
    LINK_TYPE_P1
-
Querying a single param verbosely:
/opt/mellanox/doca/services/dms/dmsc <flags> mlxconfig query \
    LINK_TYPE_P1=1
-
Querying multiple parameters:
/opt/mellanox/doca/services/dms/dmsc <flags> mlxconfig query [-v] \
    LINK_TYPE_P1 LINK_TYPE_P2
Reset
Resets parameter configuration to default values.
/opt/mellanox/doca/services/dms/dmsc <flags> mlxconfig reset
Currently the supported parameters are:
Note: To see the complete list of supported parameters dynamically, run /opt/mellanox/doca/services/dms/dmsc -a <server>:<port> --insecure mlxconfig query (requires server started with --enable_mlxconfig flag).
-
LARGE_MTU_TWEAK_64
-
NVME_EMULATION_ENABLE
-
NVME_EMULATION_NUM_PF
-
PCI_SWITCH_EMULATION_NUM_PORT
-
PCI_SWITCH_EMULATION_ENABLE
-
PF_NUM_OF_VF_VALID
-
PF_NUM_PF_MSIX_VALID
-
PER_PF_NUM_SF
-
NUM_PF_MSIX_VALID
-
NUM_OF_VFS
-
NUM_OF_PF
-
PF_BAR2_ENABLE
-
SRIOV_EN
-
NUM_PF_MSIX
-
NUM_VF_MSIX
-
INTERNAL_CPU_MODEL
-
INTERNAL_CPU_OFFLOAD_ENGINE
-
TX_SCHEDULER_LOCALITY_MODE
-
TX_SCHEDULER_LOCALITY_FACTOR
-
PF_TOTAL_SF
-
PF_DEVICE_ID_ENABLE
-
PF_SF_BAR_SIZE
-
PF_NUM_PF_MSIX
-
PF_DEVICE_ID
-
LAG_RESOURCE_ALLOCATION
-
USER_PROGRAMMABLE_CC
-
CLAMP_TGT_RATE_AFTER_TIME_INC_P2
-
CLAMP_TGT_RATE_P2
-
RPG_TIME_RESET_P2
-
RPG_BYTE_RESET_P2
-
RPG_THRESHOLD_P2
-
RPG_AI_RATE_P2
-
RPG_HAI_RATE_P2
-
RPG_GD_P2
-
RPG_MIN_DEC_FAC_P2
-
RPG_MIN_RATE_P2
-
RATE_TO_SET_ON_FIRST_CNP_P2
-
DCE_TCP_G_P2
-
DCE_TCP_RTT_P2
-
RATE_REDUCE_MONITOR_PERIOD_P2
-
INITIAL_ALPHA_VALUE_P2
-
MIN_TIME_BETWEEN_CNPS_P2
-
CNP_802P_PRIO_P2
-
CNP_DSCP_P2
-
ROCE_RTT_RESP_DSCP_P1
-
ROCE_RTT_RESP_DSCP_MODE_P1
-
ROCE_RTT_RESP_DSCP_P2
-
ROCE_RTT_RESP_DSCP_MODE_P2
-
IP_VER
-
MULTIPATH_DSCP
-
IP_OVER_VXLAN_EN
-
ROCE_ADAPTIVE_ROUTING_EN
-
LINK_TYPE_P1
-
LINK_TYPE_P2
Containerz
Containerz supports remote management and monitoring of containers on either the host or the DPU. This deployment model follows the DOCA container methodology described in the DOCA Container Deployment Guide.
Containerz supports the following two backend modes.
Docker Backend (Default)
This mode interacts with the Docker daemon (dockerd) on the host.
Ensure that the Docker daemon is running:
systemctl start docker
Kubelet Backend
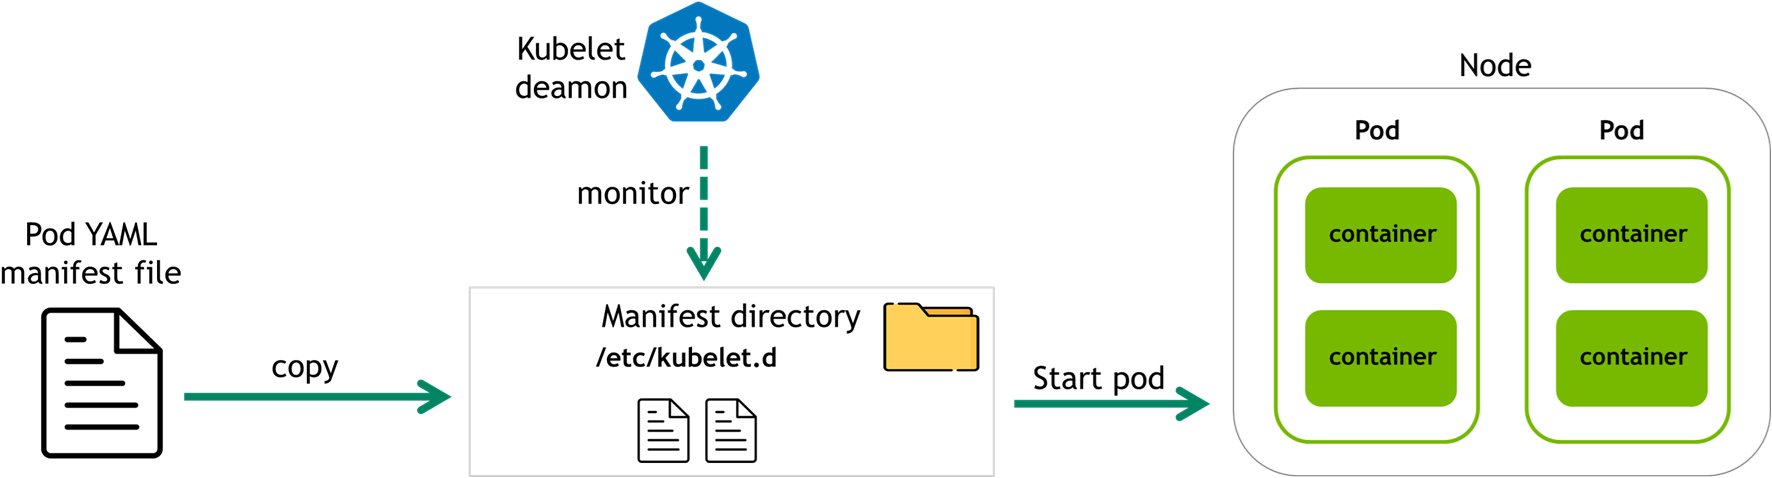
This mode uses the Kubelet daemon to manage containers on the BlueField DPU using static pod definitions. It does not require a full Kubernetes cluster.
Kubelet automatically handles any manifest files placed in /etc/kubelet.d.
-
Add a pod – Place a YAML manifest in
/etc/kubelet.d -
Remove a pod – Delete the corresponding YAML file
This is the default mode for dmsd when launched by systemd on the DPU.
-
The Kubelet daemon is not running by default on the host (DOCA for host).
-
This mode is only supported when
dmsdruns on the DPU. -
For DOCA on the host, use the Docker backend.
To specify the container backend mode, use the --container_interface flag:
/opt/mellanox/doca/services/dms/dmsd <flags> --container_interface <kubelet|docker>
Container Operations
These operations control container lifecycle, image usage, and persistent volumes on the system. Behavior differs based on the selected container backend (Docker or Kubelet).
Container Start
Launches a container using the specified image or configuration file.
-
Docker mode: The image must exist locally.
-
Kubelet mode: Provide a YAML file defining the pod. The file is copied to the Kubelet manifest directory, which triggers container startup.
# Docker mode
/opt/mellanox/doca/services/dms/dmsd <flags> containerz container start --image <image_name>

# Kubelet mode
/opt/mellanox/doca/services/dms/dmsd <flags> containerz container start --image path/to/yaml/file.yaml
Container List
Displays all currently running containers.
/opt/mellanox/doca/services/dms/dmsd <flags> containerz container list
Container Stop
Stops a running container. The container remains available for later restart.
-
Kubelet mode: Stops the container by deleting its manifest YAML from the directory.
/opt/mellanox/doca/services/dms/dmsd <flags> containerz container stop --instance <container name>
Container Remove
Stops and deletes the specified container.
/opt/mellanox/doca/services/dms/dmsd <flags> containerz container remove --instance <container name>
Image Operations
These commands manage container images—pulling from registries, pushing from the client, listing available images, and removing them from the device.
Image Pull
Downloads a container image from a remote registry to the device.
/opt/mellanox/doca/services/dms/dmsd <flags> containerz image pull --image ubuntu
Image Push
Streams a container image (in .tar format) from the client to the device. The image is transferred over gRPC and saved locally.
/opt/mellanox/doca/services/dms/dmsd <flags> containerz image push --file /path/to/tarfile.tar
Image List
Lists all container images currently available on the device.
/opt/mellanox/doca/services/dms/dmsd <flags> containerz image list
Image Remove
Deletes a specific container image from the device.
/opt/mellanox/doca/services/dms/dmsd <flags> containerz image remove --image ubuntu
Volume Operations
These commands manage persistent storage volumes for containers.
In Kubelet mode, all volumes are created under /var/dms/volume.
Volume Create
Creates a new named volume on the device.
/opt/mellanox/doca/services/dms/dmsd <flags> containerz volume create --name my_volume
Volume Remove
Deletes the specified volume by name.
/opt/mellanox/doca/services/dms/dmsd <flags> containerz volume remove --name volume_name
Volume list
Displays all named volumes and their associated mount points.
/opt/mellanox/doca/services/dms/dmsd <flags> containerz volume list
Last updated: