This guide provides an example of switch implementation on top of NVIDIA® BlueField® DPU.
Introduction
DOCA Switch is a network application that leverages the DPU's hardware capability for internal switching between representor ports on the DPU.
DOCA Switch is based on the DOCA Flow library. As such, it exposes a command line interface which receives DOCA Flow like commands to allow adding rules in real time.
System Design
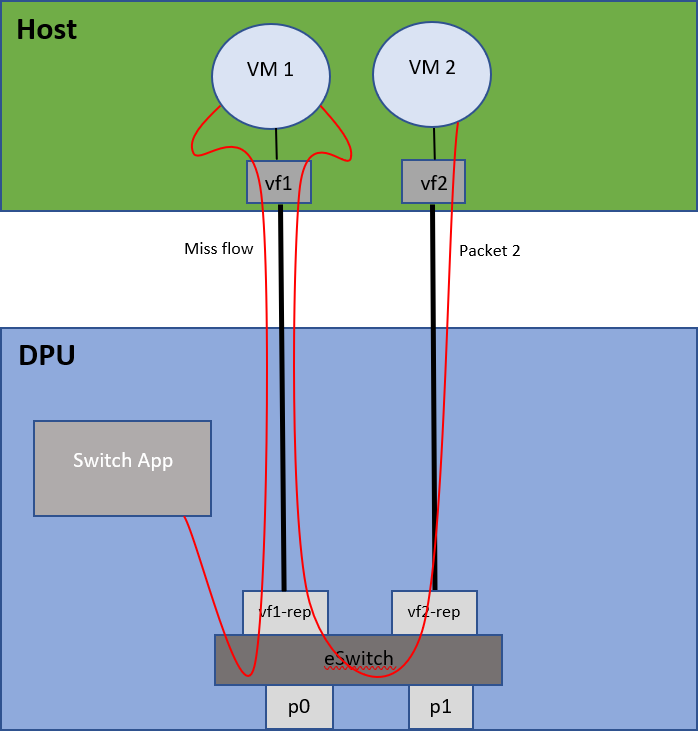
DOCA Switch is designed to run on the DPU as a standalone application (all network traffic goes directly through it).
Traffic flows between two VMs on the host:
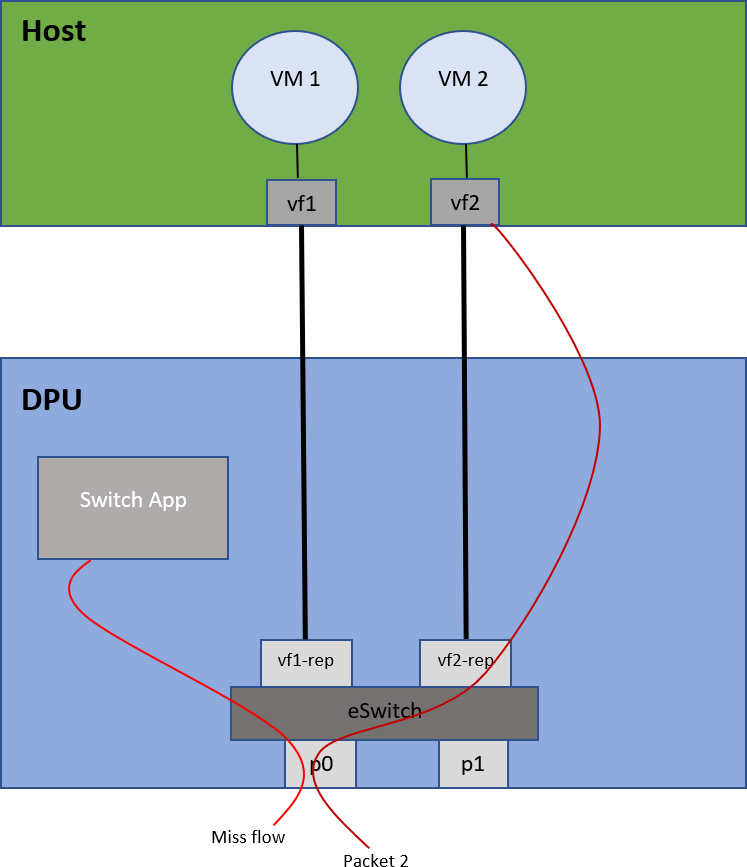
Traffic flow from a physical port to a VM on the host:
Application Architecture
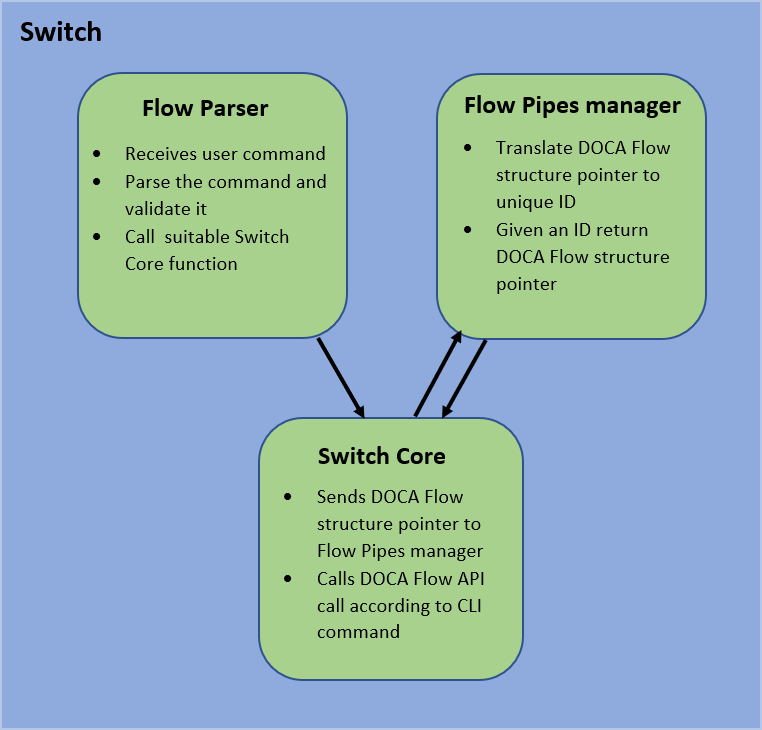
DOCA Switch is based on 3 modules:
-
Command line interface – receives pre-defined DOCA Flow-like commands and parses them
-
Flow pipes manger – generates a unique identification number for each DOCA Flow structure created
-
Switch core – combines all modules together and calls necessary DOCA Flow API
Port initialization cannot be made dynamically. All ports must be defined when running the application with standard DPDK flags.
-
When adding a pipe or an entry, the user must run commands to create the relevant structs beforehand
-
Optional parameters must be specified by the user in the command line; otherwise,
NULLis used -
After a pipe or an entry is created successfully, the relevant ID is printed for future use
DOCA Libraries
This application leverages the following DOCA libraries:
Refer to its respective programming guide for more information.
Compiling the Application
Please refer to the DOCA Installation Guide for Linux for details on how to install BlueField-related software.
DOCA reference applications are installed with full source code and build instructions. This allows you to compile them as-is or modify the source code to create custom versions.
For more information about the applications as well as development and compilation tips, refer to the DOCA Reference Applications page.
The source code for the application is located in the following directory:
/opt/mellanox/doca/applications/switch/
Compiling All Applications
All DOCA applications are defined under a single meson project. So, by default, the compilation includes all of them.
To build all the applications together, run:
cd /opt/mellanox/doca/applications/
meson /tmp/build
ninja -C /tmp/build
doca_switch is created under /tmp/build/switch/.
Recompiling Only the Current Application
To directly build only the switch application:
cd /opt/mellanox/doca/applications/
meson /tmp/build -Denable_all_applications=false -Denable_switch=true
ninja -C /tmp/build
doca_switch is created under /tmp/build/switch/.
Alternatively, one can set the desired flags in the meson_options.txt file instead of providing them in the compilation command line:
-
Edit the following flags in
/opt/mellanox/doca/applications/meson_options.txt:Set enable_all_applications to falseSet enable_switch to true -
Run the following compilation commands:
cd /opt/mellanox/doca/applications/ meson /tmp/build ninja -C /tmp/builddoca_switchis created under/tmp/build/switch/.
Running the Application
Prerequisites
The switch application is based on DOCA Flow. Therefore, the user is required to allocate huge pages.
$ echo '1024' | sudo tee -a /sys/kernel/mm/hugepages/hugepages-2048kB/nr_hugepages
$ sudo mkdir /mnt/huge
$ sudo mount -t hugetlbfs -o pagesize=2M nodev /mnt/huge
Application Execution
The switch application is provided in source form. Therefore, hence a compilation is required before the application can be executed.
-
Application usage instructions:
Usage: doca_switch [DPDK Flags] -- [DOCA Flags] [Program Flags]

DOCA Flags:
  -h, --help                        Print a help synopsis
  -v, --version                     Print program version information
  -l, --log-level                   Set the (numeric) log level for the program <10=DISABLE, 20=CRITICAL, 30=ERROR, 40=WARNING, 50=INFO, 60=DEBUG, 70=TRACE>
  --sdk-log-level                   Set the SDK (numeric) log level for the program <10=DISABLE, 20=CRITICAL, 30=ERROR, 40=WARNING, 50=INFO, 60=DEBUG, 70=TRACE>
  --log-filter                      Filter logs from specific modules, separated by comma
  -j, --json <path>                 Parse command line flags from an input json file

Program Flags:
  -a, --device                      device
  -r, --rep                         device representor
  -exp, --expert-mode               set expert mode
This usage printout can be printed to the command line using the
-h(or--help) options:./doca_switch -- -h
For additional information, refer to section "DOCA Switch Application Guide | Command Line Flags".
-
CLI example for running the application on BlueField:
./doca_switch -- -r pci/03:00.0,pf0vf[0-1] -l 60
The PCIe address (
03:00.0) should match the address of the desired PCIe device.For additional information regarding the command line syntax of the device and device representor identifiers, please referr to the matching section in the DOCA Arg Parser Guide.
Command Line Flags
General Flags
|
Short Flag |
Long Flag |
Description |
|---|---|---|
|
|
|
Prints a help synopsis and exits |
|
|
|
Prints program version information and exits |
|
|
|
Sets the numeric log level for the application:
|
|
N/A |
|
Sets the SDK numeric log level using the same 10-70 scale as above |
|
N/A |
|
Filters logs from specific modules (comma-separated list) |
|
|
|
Parses command-line flags from a specified input JSON file |
Refer to DOCA Arg Parser for more information regarding the supported flags and execution modes.
Program Flags
|
Short Flag |
Long Flag |
Description |
|---|---|---|
|
|
|
Device identifier |
|
|
|
Device representor identifiers for the ports indices |
|
exp |
expert-mode |
Run switch in expert mode |
Supported Commands
-
create pipe port_id=[port_id][,<optional_parameters>]
Available optional parameters:name=<pipe-name>root_enable=[1|0]monitor=[1|0]match_mask=[1|0]fwd=[1|0]fwd_miss=[1|0]type=[basic|control] -
add entry pipe_id=<pipe_id>,pipe_queue=<pipe_queue>[,<optional_parameters>]
Available optional parameters:monitor=[1|0]fwd=[1|0] -
add control_pipe entry priority=<priority>,pipe_id=<pipe_id>,pipe_queue=<pipe_queue>[,<optional_parameters>]
Available optional parameters:match_mask=[1|0]fwd=[1|0] -
destroy pipe pipe_id=<pipe_id> -
rm entry pipe_queue=<pipe_queue>,entry_id=[entry_id] -
port pipes flush port_id=[port_id] -
port pipes dump port_id=[port_id],file=[file_name] -
query entry_id=[entry_id] -
create [struct] [field=value,…]
Struct options:pipe_match,entry_match,match_mask,actions,monitor,fwd,fwd_missMatch struct fields:FieldsField Optionsflagsport_metaouter.eth.src_macouter.eth.dst_macouter.eth.typeouter.vlan_tciouter.l3_typeipv4, ipv6outer.src_ip_addrouter.dst_ip_addrouter.l4_type_exttcp, udp, greouter.tcp.flagsFIN, SYN, RST, PSH, ACK, URG, ECE, CWRouter.tcp_src_portouter.tcp_dst_portouter.udp_src_portouter.udp_dst_porttun_typevxlan_tun_idgre_keygtp_teidinner.eth.src_macinner.eth.dst_macinner.eth.typeinner.vlan_tciinner.l3_typeipv4, ipv6inner.src_ip_addrinner.dst_ip_addrinner.l4_type_exttcp, udpinner.tcp.flagsFIN, SYN, RST, PSH, ACK, URG, ECE, CWRinner.tcp_src_portinner.tcp_dst_portinner.udp_src_portinner.udp_dst_portActions struct fields:FieldsField Optionsdecaptrue, falsemod_src_macmod_dst_macmod_src_ip_typeipv4, ipv6mod_src_ip_addrmod_dst_ip_typeipv4, ipv6mod_dst_ip_addrmod_src_portmod_dst_portttlhas_encaptrue, falseencap_src_macencap_dst_macencap_src_ip_typeipv4, ipv6encap_src_ip_addrencap_dst_ip_typeipv4, ipv6encap_dst_ip_addrencap_tup_typevxlan, gtpu, greencap_vxlan-tun_idencap_gre_keyencap_gtp_teidFWD struct fields:FieldsField Optionstyperss, port, pipe, droprss_flagsrss_queuesnum_of_queuesport_idnext_pipe_idMonitor struct fields:flagscircbsaging
The physical port number (only one physical port is supported) will always be 0 and all representor ports are numbered from 1 to N where N is the number of representors being used. For example:
-
Physical port ID: 0
-
VF0 representor port ID: 1
-
VF1 representor port ID: 2
-
VF2 representor port ID: 3
The following is an example of creating a pipe and adding one entry into it:
create fwd type=port,port_id=0xffff
create pipe port_id=0,name=p0_to_vf1,root_enable=1,fwd=1
create fwd type=port,port_id=1
add entry pipe_queue=0,fwd=1,pipe_id=1012
          ....
rm entry pipe_queue=0,entry_id=447
-
Pipe is configured on port ID 0 (physical port).
-
Entry is configured to forward all traffic directly into port ID 1 (VF0).
-
When the forwarding rule is no longer needed, the entry is deleted.
-
Ultimately, both entries are deleted, each according to the unique random ID it was given:
Troubleshooting
Refer to the NVIDIA BlueField Platform Software Troubleshooting Guide for any issue encountered with the installation or execution of the DOCA applications.
Application Code Flow
-
Parse application argument.
-
Initialize the arg parser resources and register DOCA general parameters.
doca_argp_init();
-
Register DOCA Flow switch mode application parameters.
register_doca_flow_switch_param();
-
Parse app parameters.
doca_argp_start();
-
-
Initiate DOCA Flow switch mode application parameters.
init_doca_flow_switch_common(); -
Initialize DPDK ports and queues.
dpdk_queues_and_ports_init();
-
Initialize DOCA Switch.
switch_init();-
Initialize DOCA Flow.
-
Create port pairs.
-
Create Flow Pipes Manger module.
-
Register an action for each relevant CLI command.
-
-
Initialize Flow Parser.
flow_parser_init();-
Reset all internal Flow Parser structures.
-
Start the command line interface.
-
Receive user commands, parse them, and call the required DOCA Flow API command.
-
Close the interactive shell once a "quit" command is entered.
-
-
Clean Flow Parser resources.
flow_parser_cleanup();
-
Destroy Switch resources.
switch_destroy();-
Destroy Flow Pipes Manager resources.
-
-
Destroy DOCA Flow.
switch_destroy();
-
Destroy DPDK ports and queues.
dpdk_queues_and_ports_fini();
-
DPDK finish.
dpdk_fini();-
Call
rte_eal_destroy()to destroy initialized EAL resources.
-
-
Arg parser destroy.
doca_argp_destroy();
References
-
/opt/mellanox/doca/applications/switch/
Last updated: