Performance testing verifies that the end-to-end solution works properly under different loads and traffic patterns.
Once the InfiniBand fabric is configured and is healthy based on the NVPS best practices, the network is ready to deliver maximum performance.
ClusterKit is the recommended tool for InfiniBand end-to-end performance validation. ClusterKit is a multifaceted node assessment tool for high-performance clusters. It is capable of testing latency, bandwidth, adequate bandwidth, memory bandwidth, GFLOPS by node, per-rack collective performance, and bandwidth and latency between GPUs and local/remote memory.
The tool employs well-known techniques and tests to achieve these performance metrics. It is intended to give the user a general look of the cluster's health and performance.
Setup
-
Create a shared directory that all systems under test (SUTs) can access.
-
Ensure that all SUTs have keyless SSH access to each other, with strict host key disabled.
-
Download the suitable HPC-X package from here - in the download tab under Resources at the bottom.
-
Untar the package.
tar jxf <package>
-
cd into ClusterKit sub-directory.
cd <shared-dir>/<package>/clusterkit
-
Create file 'hostfile.txt'.
vi hostfile.txt
-
Insert the SUTs names, and save. For example:
node1
node2
node3
...
-
Find active HCAs names to be tested.
ibnodes | grep <node-name>
Make sure that the tested HCAs appear as active HCAs for all the SUTs (run ibnodes and grep for each nodes).
Keep the list of tested HCAs in sorted order.
-
Create 'run_clusterkit.sh' script file.
vi run_clusterkit.sh
-
Paste the following script.
Bash#!/bin/bash HPCX_DIR=$HPCX_DIR HOSTFILE=$HPCX_DIR/clusterkit/hostfile.txt CK_DIR=$HPCX_DIR/clusterkit ############################## # temporary - udpate output scripts file=$CK_DIR/bin/output/run.sh [ -e $file ] && (grep -q "\--no-cache-dir" $file || sed -i 's/pip install/pip install --no-cache-dir/g' $file) file=$CK_DIR/bin/clusterkit.sh [ -e $file ] && sed -i "/^output_dir/s|=.*$|=\${CK_OUTPUT_SUBDIR:-\"\"}|g" $file ############################# hcas=(<HCA_NUMBERS>) declare -A hca_name <HCA_NAMES_ASSIGNMENT> mpi_opt+="-x CK_OUTPUT_SUBDIR -x CLUSTERKIT_HCA" DATE=$(date "+%Y%m%d_%H%M%S") CK_DATE_DIR=$CK_DIR/$DATE for i in "${hcas[@]}"; do device=${hca_name[${i}]} export CK_OUTPUT_SUBDIR=${CK_DATE_DIR}_${device} export CLUSTERKIT_HCA=$i $CK_DIR/bin/clusterkit.sh --mpi_opt "$mpi_opt" --hpcx_dir $HPCX_DIR --hostfile $HOSTFILE --normalize --mapper $CK_DIR/core_to_hca.sh --exe_opt --unidirectional done
-
Substitute <HCA_NUMBERS> with list of tested HCAs numbers, separated with space.
For example, if in step 8 we gathered these HCAs to be tested: mlx5_1, mlx5_2, mlx5_5,
then replace <HCA_NUMBERS> with: 1 2 5 -
Substitute <HCA_NAMES_ASSIGNMENT> with insertion of the tested HCAs into the 'hca_name' array.
Similar to the previous example (step 11), replace <HCA_NAMES_ASSIGNMENT> with:Bashhca_name["1"]=mlx5_1 hca_name["2"]=mlx5_2 hca_name["5"]=mlx5_5The final script (after all substitutions) for this example should look like this:
Bash#!/bin/bash HPCX_DIR=$HPCX_DIR HOSTFILE=$HPCX_DIR/clusterkit/hostfile.txt CK_DIR=$HPCX_DIR/clusterkit ############################## # temporary - udpate output scripts file=$CK_DIR/bin/output/run.sh [ -e $file ] && (grep -q "\--no-cache-dir" $file || sed -i 's/pip install/pip install --no-cache-dir/g' $file) file=$CK_DIR/bin/clusterkit.sh [ -e $file ] && sed -i "/^output_dir/s|=.*$|=\${CK_OUTPUT_SUBDIR:-\"\"}|g" $file ############################# hcas=(1 2 5) declare -A hca_name hca_name["1"]=mlx5_1 hca_name["2"]=mlx5_2 hca_name["5"]=mlx5_5 mpi_opt+="-x CK_OUTPUT_SUBDIR -x CLUSTERKIT_HCA" DATE=$(date "+%Y%m%d_%H%M%S") CK_DATE_DIR=$CK_DIR/$DATE for i in "${hcas[@]}"; do device=${hca_name[${i}]} export CK_OUTPUT_SUBDIR=${CK_DATE_DIR}_${device} export CLUSTERKIT_HCA=$i $CK_DIR/bin/clusterkit.sh --mpi_opt "$mpi_opt" --hpcx_dir $HPCX_DIR --hostfile $HOSTFILE --normalize --mapper $CK_DIR/core_to_hca.sh --exe_opt --unidirectional done
-
Save the script file, and make it executable.
chmod 777 run_clusterkit.sh
-
Create 'core_to_hca.sh' script file.
vi core_to_hca.sh
-
Paste the following script.
Bash#!/bin/bash -x case $CLUSTERKIT_HCA in <CORES> esac taskset -c $core $*
-
Replace <CORES> as the following instructions:For each tested HCA, find 2 core numbers across all SUTs cat /sys/class/infiniband/<HCA>/device/local_cpulist Make sure to find 2 cores that appear in all nodes for the same HCA. For example, if outputs of this command with HCA 'mlx5_1' in all nodes contain cores 1, 2, then you can use them with that HCASimilar to the example we used before, if all hosts agreed that:- HCA 'mlx5_1' supported with cores 0, 10 (across all nodes)- HCA 'mlx5_2' supported with cores 0, 10 (across all nodes)- HCA 'mlx5_5' supported with cores 1, 11 (across all nodes)Then replace <CORES>Replace <CORES> in the script as the following:Similar to the example we used before, if all hosts agreed that (according to the previous sub-step 16.a.):- HCA 'mlx5_1' supported with cores 0, 10 (across all nodes)- HCA 'mlx5_2' supported with cores 0, 10 (across all nodes)- HCA 'mlx5_5' supported with cores 1, 11 (across all nodes)Then replace <CORES> with: 1) core=0,10; export UCX_NET_DEVICES=mlx5_1:1;; 2) core=0,10; export UCX_NET_DEVICES=mlx5_2:1;; 5) core=1,11; export UCX_NET_DEVICES=mlx5_5:1;; The final script for that example should look like: #!/bin/bash -x case $CLUSTERKIT_HCA in 1) core=0,10; export UCX_NET_DEVICES=mlx5_1:1;; 2) core=0,10; export UCX_NET_DEVICES=mlx5_2:1;; 5) core=1,11; export UCX_NET_DEVICES=mlx5_5:1;; esac taskset -c $core $*
-
Save the script file, and make it executable.
chmod 777 core_to_hca.sh
-
Verify/update output script configuration file.Check the configuration file. # while still in clusterkit/ sub-dir vi bin/output/output_config.ini Search for 'data_dir='.Verify that the value is the actual path to ibdiagnet directory, usually at: /var/tmp/ibdiagnet2/.
Run ClusterKit test
-
Go to HPCX root directory.
cd <SHARED-DIR>/<HPCX-PACKAGE-DIR>/
-
Export environment variables (required in each new shell/session).
export HPCX_DIR=$PWD
export CK_DIR=$HPCX_DIR/clusterkit
-
Run the script.
./clusterkit/run_clusterkit.sh
-
For each of the tested HCAs, results should be available at: <HPCX-PACKAGE-DIR>/clusterkit/<test-timestamp>_<HCA>.
For further information, see ClusterKit.
Results Verification
Your cluster's performance is satisfactory when the minimum achieved result is at least 95% of the maximum available bandwidth, as illustrated in the table below.
For your convenience, the technology of your cluster interconnect is shown in the header of the bandwidth.txt file.
Expected InfiniBand Performance (for 4x Connections)
|
Technology |
Speed, Gb/s |
95% performance, MB/s |
|---|---|---|
|
HDR |
200 |
23,030 |
|
NDR |
400 |
46,060 |
|
XDR |
800 |
TBD |
Visualize results
Analyzing the results involves using the UFM–Fabric Visualization Plugin, which is packaged as a docker image that can be run by any docker engine.
-
Install docker, if needed.
-
Pull and run the docker image to run the visualizer app.
sudo docker pull mellanox/ufmfv
sudo docker run -dit --name ufmfv -p 9000:9000 mellanox/ufmfv
-
Enter to the server GUI at: http://<server-ip>:9000.
-
Upload/import the results, using the import button.
Upload the .json files only (not the .txt) of the latency/bandwidth tests.

-
Select the new row that was added to the Validation Job table.
Tests table should appear now.
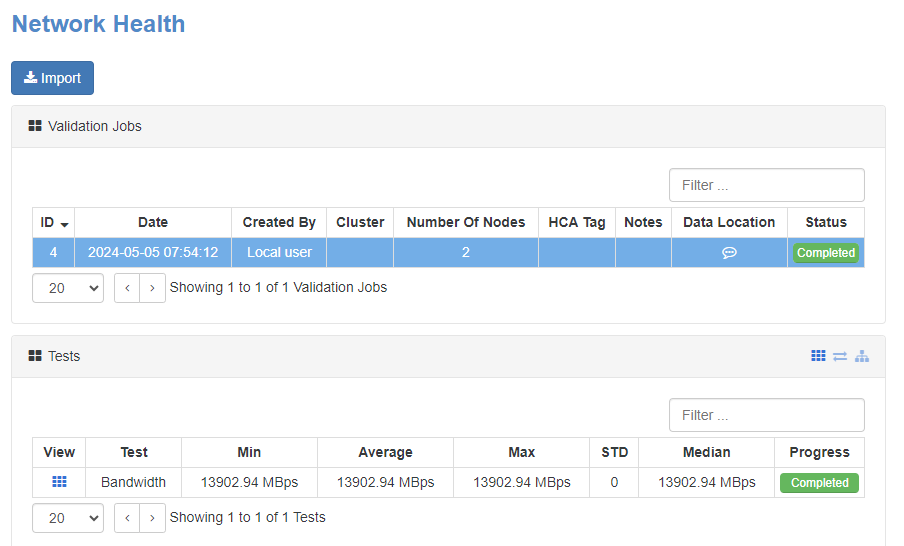
-
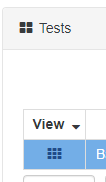
Click on the small matrix icon in the 'View' cell of the new row under 'Tests' table to open the visualization of the uploaded test.
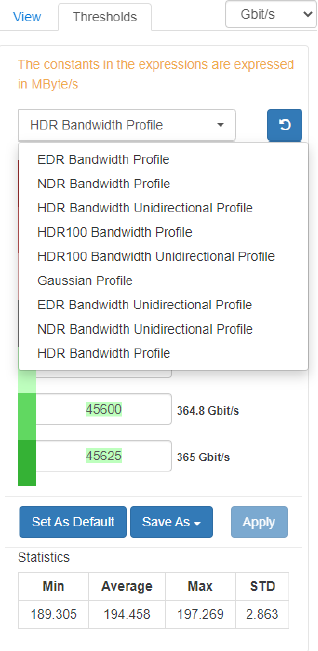
-
Choose the suitable thresholds from the panel on the right.
Normal Results
Normal results are shown in the figure below. The green ‘better’ latency results on the diagonal, as these are nodes that are on the same switch, so have the smallest possible latency. This is because there are no additional switch hops and the data goes through just two cables, and there is never congestion/blocking.
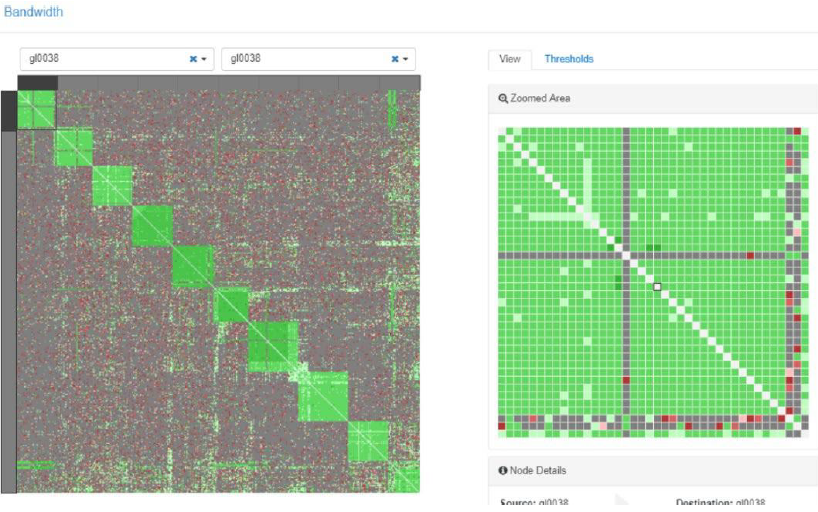
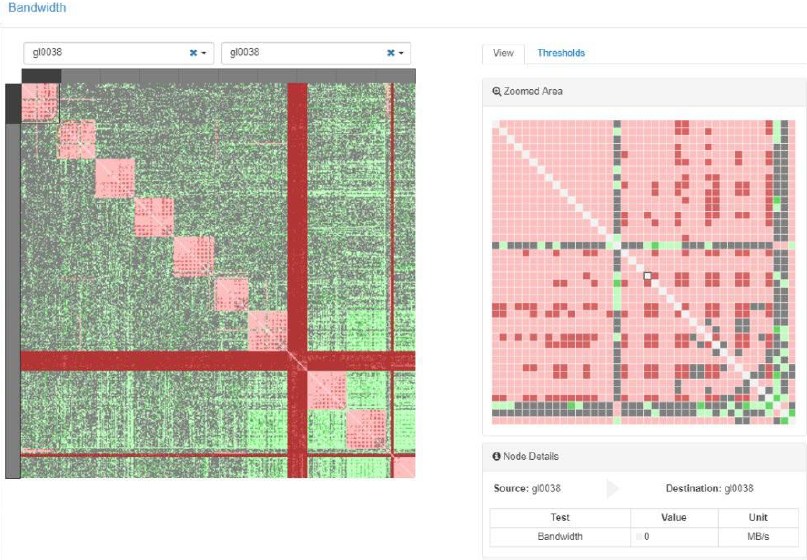
Abnormal results
Two actual abnormal results are shown in the figure below. The first is that nodes on the same switch exhibit poor behavior. This result was used to diagnose an issue with split cables.
The second issue is the red +, which is an indication that a given node has poor performance with all other nodes. In this particular case, quite a few nodes are problematic. The width of the ‘+’ indicates that it is not just a single node but several. There were two poorly performing nodes in this example.
Last updated: