
SSD Wipe
The SSD wipe command below performs a Secure Erase and Crypto Erase.
-
Cryptographic Erase (CE) is a secure method for sanitizing entire drives and storage devices by deleting the encryption keys used to protect the data.
-
Secure erasure is the process of permanently and irreversibly removing data from a storage device, ensuring that the data cannot be recovered using any means, even with advanced data recovery tools.
Prerequisites
Before performing the SSD wipe, complete the following requirements:
-
Record the currently installed NVOS version.
-
Verify that all system component versions are aligned with the installed release.
-
Ensure that the same NVOS version is available for the recovery procedure.
-
Back up any required system configuration or data.
-
Establish and verify a working serial console connection.
After the SSD wipe and subsequent reboot, no operating system will be installed on the system. NVOS SSH access will no longer be available, and the recovery procedure must be performed through the serial console.
Serial Console Connection Using SoL
On GB200 and newer NVLink switches with BMC Serial over LAN support, the host serial console can be accessed using SoL (Serial over LAN).
SoL provides access to the host CPU console through an SSH connection to TCP port 2200 on the BMC.
SoL is implemented using the open-source openbmc/obmc-console project, which provides the OpenBMC host-console infrastructure.
Enable SoL
SoL is disabled by default.
-
Connect to the BMC:
ssh root@<bmc-ip> -
Enter the BMC password.
-
Start the SoL services:
systemctl start obmc-console-ssh.socket systemctl start obmc-console@ttyS2.service -
Connect to the host CPU console:
ssh -p 2200 root@<bmc-ip>
-
Enter the BMC password.
While SoL is enabled, console output remains visible through the physical serial port, but input cannot be entered through the physical serial connection.
Verify the SoL Connection
Verify that the serial console connection is working before performing the SSD wipe.
From an NVOS SSH session, run:
who
Example output:
admin    pts/0        2026-07-28 10:58 (.1.2.3.4)
admin    ttyS0        2026-07-28 11:07
Confirm that a serial TTY session appears in the output.
To verify that console output is visible through SoL, keep the BMC port 2200 session open. From a separate NVOS SSH session, run:
sudo sh -c 'echo HELLO-FROM-SSH > /dev/console'
Confirm that the following message appears in the SoL session:
HELLO-FROM-SSH
Warning: Do not proceed with the SSD wipe unless the serial console connection has been successfully verified.
SoL Service Notes
The obmc-console service must be started only after the BMC-ready script has completed. This prevents the BMC-ready script from changing the UART selection in the CPLD after a SoL session has been initiated.
The obmc-console server and the serial-getty service both use /dev/ttyS2. Therefore:
-
obmc-consoleconflicts withserial-getty. -
Enabling
obmc-consoledisablesserial-getty. -
serial-gettyremains disabled whileobmc-consoleis enabled, even when no SoL SSH sessions are active. -
SoL is disabled following a BMC reboot and must be enabled again when required.
Perform Disk Wipe
Before initiating this procedure, make sure to note the currently installed NVOS version and verify that all system component versions are aligned with the release.
-
Pre-Required is to be connected via serial.
After the Disk Wipe procedure and reboot, there will be no OS installed, and you will need to proceed with the Recovery procedure detailed in the section below. So, the requirement is to have a connection via serial.
Serial connection:
In GB200 and newer, there is the ability from the BMC device to see the serial connection by using the feature name:
SoL - Serial Over LAN
SoL allows the user to access the host CPU console by connecting to port 2200 via SSH to the BMC.SoL is implemented by the open-source project: openbmc/obmc-console: OpenBMC host console infrastructure
SoL module view: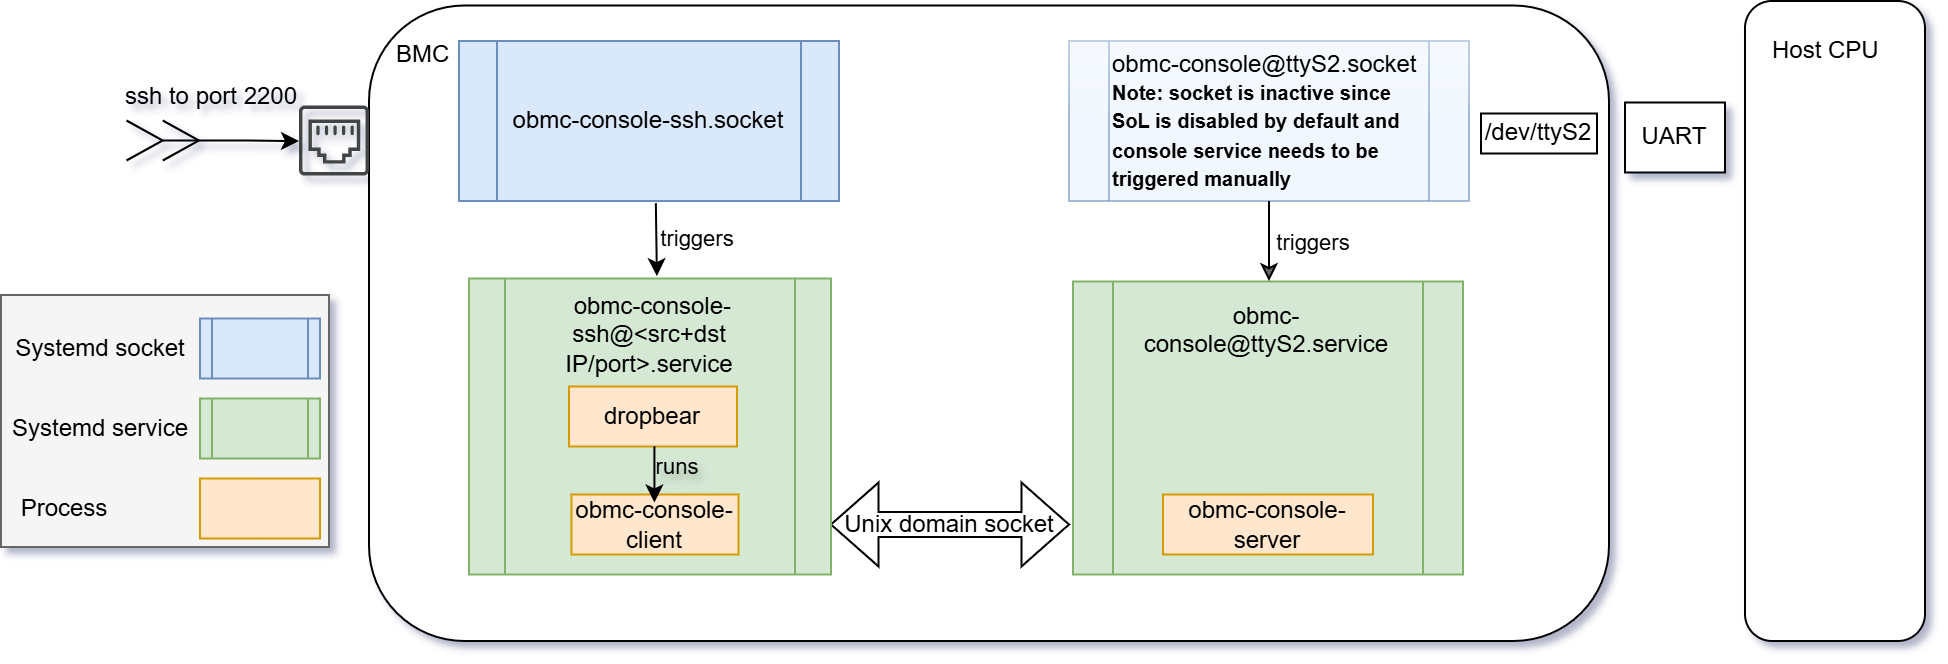
How to connect via serial:-
Enable the services from the BMC (by default the SoL is disabled)
Connect to BMC:ssh root@<bmc-ip>Enter BMC password.
-
Enable the SoL feature
-
systemctl start obmc-console-ssh.socket systemctl start obmc-console@ttyS2.service -
Connect to the CPU console:
ssh -p 2200 root@<bmc ip>Enter BMC password.
Note: User will still see console output on the physical serial port but will not be able to enter any input.
-
To assert that this serial connection is indeed working before proceeding with the SSD Wipe is expected to see a tty node.
From NVOS SSH connectionadmin@juliet-XXX:~$ who admin pts/0 2026-07-28 10:58 (.1.2.3.4) admin ttyS0 2026-07-28 11:07 -
In addition, from the NVOS SSH connection, you can write to the console and see that the serial is showing the inputs,
From one terminal connected to NVOS via SSH, type the cmd below, and from the BMC 2200 port connection you will see the msg (if the connection is indeed working)
Example:sudo sh -c 'echo HELLO-FROM-SSH > /dev/console' -
In order to disconnect SoL sessions and disable obmc console service from the BMC Linux shell do:
systemctl stop obmc-console@ttyS2.service systemctl stop obmc-console-ssh.socket systemctl start serial-getty@ttyS2.service -
Notes:
-
Persistency
Following a BMC reboot SoL service shall be disabled. -
Service dependencies
-
obmc-console service should start only once bmc ready script has been completed in order to avoid a situation where bmc ready scripts changes uart selection in CPLD after SoL session has been initiated.
-
getty and obmc console server are both using /dev/ttyS2.
Therefore:-
obmc-console service conflicts with serial-getty service.
-
getty will be disabled as soon as obmc console server is enabled and shall remain disabled as long as console server is enabled even when no ssh sessions are active.
-
-
-
-
-
To perform the SSD wipe action, run the following command:
Bashadmin@nvos:~$ nv action erase system disk
More details can be found in the Resource Management Commands section.Note that once the action is completed, it will be impossible to recover the SSD data. Additionally, the user will be able to connect to the system until the next reboot, as the file system (only mandatory directories) is loaded into RAM. After a reboot, the user will not be able to see any SSD partitions.
-
Reboot after the SSD wipe action finishes, use the following command:
/sbin/reboot
Persistency
Following a BMC reboot SoL service shall be disabled.
Recovery Flow After SSD Wipe
Prerequisites
Before starting the recovery process, ensure the following requirements are met:
During recovery, use the same NVOS version that was previously installed to avoid version incompatibility with other platform components.
-
PXE Server Setup
-
A PXE (Preboot Execution Environment) server must be installed and running in the lab network
-
The PXE server should be configured to point to the NVIDIA ONIE image and automatically boot from it without user interaction
-
-
Required Resources
-
NVIDIA ONIE image
-
NVOS image
-
Provisioning package
-
Performing an SSD wipe will erase the previous NVOS configuration, and it will not be recoverable. Ensure that any required configurations or data are backed up before proceeding.
Recovery Steps
-
Wait for NVIDIA ONIE installation to finish (should take up to 3 minutes).
-
Connect to ONIE via ssh. Please refer to UM for ONIE default credentials.
-
Once connected to ONIE, stop onie install by running
onie-stop. -
Copy provisioning package (e.g., sed_provisioning_83.03.0001.tgz) to
/tmp. -
Extract provisioning script and run it.
cd /tmp tar –xzf sed_provisioning_83.03.0001.tgz ./sedutil_init.sh -
Wait for the script to finish (which can take up to 2 minutes). The device will perform power-cycle.
-
Perform a new NVOS image install following the guidelines in the Installing a New NVOS Image section.
IMA (Integrity Measurement Architecture)
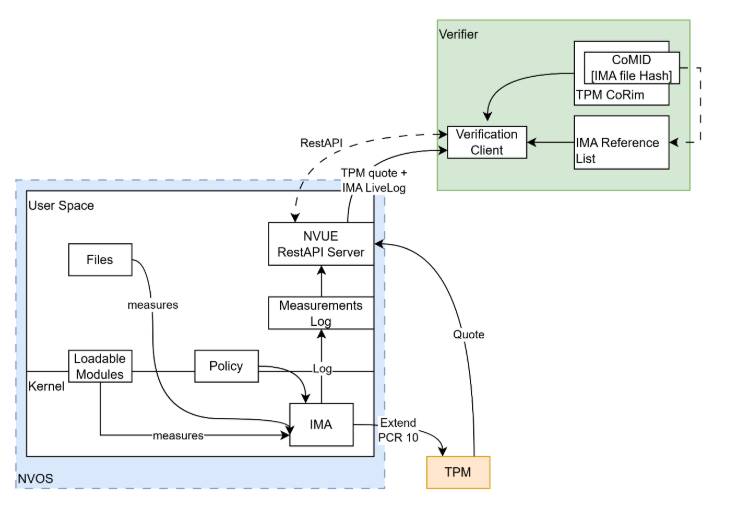
IMA is a Linux kernel subsystem that extends NVOS secure-boot protections into runtime. Secure boot verifies the bootloader, kernel, and kernel modules at boot. IMA subsequently measures (hashes) selected system components whenever they are accessed, records each measurement in the IMA measurement log, and extends it into a TPM Platform Configuration Register (PCR). A remote verifier can use this evidence to confirm that the system was not modified after boot.
How IMA Works
-
Measurement: Before use, IMA measures executables during execution, shared libraries when they are memory-mapped for execution, kernel modules before loading, firmware blobs before loading onto NICs, and the kexec kernel, initramfs, and command line.
NVOS enables only IMA measurement. IMA Appraisal, which can deny access when a measurement does not match an expected value, and IMA Audit are not enabled. This avoids runtime enforcement and associated performance impact.
-
Attestation: Each IMA measurement extends TPM PCR 10. A signed TPM quote for PCR 10, combined with the live IMA measurement log, enables an external verifier to compare the running system against a known-good (golden) reference list.
IMA is disabled by default. It is available only on NVOS, including NVOS InfiniBand and NVOS NVLink platforms. IMA is not available on Cumulus Linux or HBN builds.
Prerequisites
-
Changes to the IMA state take effect only after a reboot. An initramfs hook loads the IMA policy early in the boot process, before systemd starts.
-
CoRIM verification must be available.
Enable IMA
-
Enable IMA and apply the configuration:
switch (config) # system security ima state enabled switch (config) # nv config apply switch (config) # nv config save -
Reboot the switch:
switch (config) # reboot
Generate a Signed Quote for PCR 10
Generate a TPM quote for PCR 10:
admin@switch:~$ nv action generate system security tpm 10 <quote>
The TPM quote extends the existing TPM quote command and provides the attestation evidence for IMA measurements.
Upload the Live IMA Measurement Log
Upload the current IMA measurement log to a remote server:
admin@switch:~$ nv action upload system security ima measurements scp://user:pass@host/dir/
Upload the TPM Quote
Upload the TPM quote to the same remote location as the measurement log:
admin@switch:~$ nv action upload system security tpm quotes.json scp://user:pass@host/dir/
Use the uploaded TPM quote and IMA measurement log together for remote attestation and CoRIM-based verification.
IMA Verifier
An IMA verifier is an external, customer-implemented component that validates the integrity of a running NVOS system. The verifier compares runtime artifacts produced by the switch with the known-good reference artifacts NVIDIA provides with the applicable NVOS release.
NVOS does not include an IMA verifier. It produces and uploads the artifacts required for verification, including the IMA measurement log and TPM quote. Customers are responsible for implementing, operating, and integrating the verifier into their attestation workflow.
Terminology
Reference artifacts (provided by NVIDIA, part of the NVOS release):
|
Term |
Definition |
|---|---|
|
IMA Reference List |
The list of authorized file hashes for this NVOS release — one entry per executable, shared library, kernel module, firmware file, and kexec artifact that is authorized to run. |
|
CoRIM (Concise Reference Integrity Manifest) |
A signed manifest, shipped with the release, that carries reference integrity values used for attestation. |
|
CoMID (Concise Module Identifier) |
An entry within the CoRIM containing the hash of the IMA Reference List, used to verify the list has not been altered. |
Runtime artifacts (produced by the switch, uploaded via NVUE):
|
Term |
Definition |
|---|---|
|
IMA Measurement Log |
The live, on-box record of every file the IMA has measured since boot, maintained by the kernel's IMA subsystem. |
|
PCR 10 (Platform Configuration Register 10) |
A register inside the TPM that is cumulatively extended with each new IMA measurement. Its final value is a single hash representing the entire measurement log. |
|
TPM Quote |
A signed attestation of the current PCR 10 value, generated by the TPM. The signature proves the value originated from that switch's TPM hardware. |
Attestation Comparison Requirements
|
Compare |
Against |
Confirms |
|---|---|---|
|
Hash of the IMA Reference List |
The hash recorded in the CoMID |
The reference list used for verification is the authentic one shipped by NVIDIA and has not been substituted. |
|
The IMA Measurement Log |
PCR 10, as recorded in the signed TPM Quote
|
The measurement log matches what the TPM actually recorded — it has not been altered after collection.
|
|
Each entry in the IMA Measurement Log |
The IMA Reference List |
Every file that ran on the switch was expected and authorized — no unapproved or modified file was executed and boot_aggregate.
|
All three comparisons must succeed for the switch to be considered
attested. A failure in any one indicates that either the reference
data, the measurement log, or the switch's runtime state has been
tampered with.Security Commands
Last updated: