

It is recommended to upgrade your NVIDIA® BlueField® networking platform (DPU or SuperNIC) to the latest software and firmware versions available to benefit from new features and latest bug fixes.
This section assumes that a BlueField has already been installed in a server according to the instructions detailed in the BlueField's hardware user guide.
The following table lists an overview of the steps required to install Ubuntu BFB on your BlueField:
|
Step |
Procedure |
Direct Link |
|---|---|---|
|
1 |
Verify that RShim is already running on BMC |
Deploying BlueField Software Using BFB from BMC | id (4.8.0)DeployingBlueFieldSoftwareUsingBFBfromBMC EnsureRShimisRunningonBMC |
|
2 |
Change the default credentials using |
|
|
3 |
Install the Ubuntu BFB image |
Deploying BlueField Software Using BFB from BMC | id (4.8.0)DeployingBlueFieldSoftwareUsingBFBfromBMC BFBInstallation |
|
4 |
Verify installation completed successfully |
Deploying BlueField Software Using BFB from BMC | id (4.8.0)DeployingBlueFieldSoftwareUsingBFBfromBMC VerifyBFBisInstalled |
|
5 |
Upgrade the firmware on your BlueField |
Deploying BlueField Software Using BFB from BMC | id (4.8.0)DeployingBlueFieldSoftwareUsingBFBfromBMC FirmwareUpgrade |
It is important to learn your BlueField's device-id to perform some of the software installations or upgrades in this guide.
To determine the device ID of the BlueField Platform on your setup, run:
host# mst start
host# mst status -v
Example output:
MST modules:
------------
    MST PCI module is not loaded
    MST PCI configuration module loaded
PCI devices:
------------
DEVICE_TYPE             MST                           PCI       RDMA            NET                       NUMA
BlueField2(rev:1)       /dev/mst/mt41686_pciconf0.1   3b:00.1   mlx5_1          net-ens1f1                0

BlueField2(rev:1)       /dev/mst/mt41686_pciconf0     3b:00.0   mlx5_0          net-ens1f0                0

BlueField3(rev:1)       /dev/mst/mt41692_pciconf0.1   e2:00.1   mlx5_1          net-ens7f1np1             4

BlueField3(rev:1)       /dev/mst/mt41692_pciconf0     e2:00.0   mlx5_0          net-ens7f0np0             4
The device IDs for the BlueField-2 and BlueField-3 networking platforms in this example are /dev/mst/mt41686_pciconf0 and /dev/mst/mt41692_pciconf0 respectively.
Ensure RShim is Running on BMC
Display the current setting. Run:
# cat /dev/rshim<N>/misc | grep DEV_NAME
DEV_NAME        usb-1.0
This output indicates that the RShim service is ready to use. If you do not receive this output:
-
Restart RShim service:
sudo systemctl restart rshim
-
Verify the current setting again. Run:
# cat /dev/rshim<N>/misc | grep DEV_NAMEIf
DEV_NAMEdoes not appear, then proceed to "RShim driver not loading on BlueField with integrated BMC".
BFB Installation
To update the software on the NVIDIA® BlueField® device, the BlueField must be booted up without mounting the eMMC flash device. This requires an external boot flow where a BFB (which includes ATF, UEFI, Arm OS, NIC firmware, and initramfs) is pushed from an external host via USB or PCIe. On BlueField devices with an integrated BMC, the USB interface is internally connected to the BMC and is enabled by default. Therefore, you must verify that the RShim driver is running on the BMC. This provides the ability to push a bootstream over the USB interface to perform an external boot.
NVIDIA® BlueField® devices support software deployment and upgrade through various BFB image types. For details on available image formats and their contents, refer to the "Types and Methods of Updating BlueField Software Image" page.
BFB Installation
BlueField software and firmware can be deployed using one of two methods:
|
Update Flow |
Description |
Supported Image Types |
|---|---|---|
|
Offline Update Flow |
Traditional method where the DPU or SuperNIC is taken out of service immediately when the update begins. The device reboots into maintenance mode, applies firmware, system image, and DOCA component updates, and reboots again to activate the new versions. Ensures a clean, immediate transition but involves downtime. This flow supports recovery as well. |
|
|
Deferred Update Flow |
BlueField-3 supports a Deferred Update Flow, which enables administrators to update firmware and DOCA components without immediate service interruption. This capability allows a DPU or SuperNIC to continue servicing workloads while a new firmware bundle and user-space/kernel DOCA components are staged in the background. The new versions become active only after an activation command and reset are applied, minimizing downtime in production environments. |
|
BFB Installation Procedure
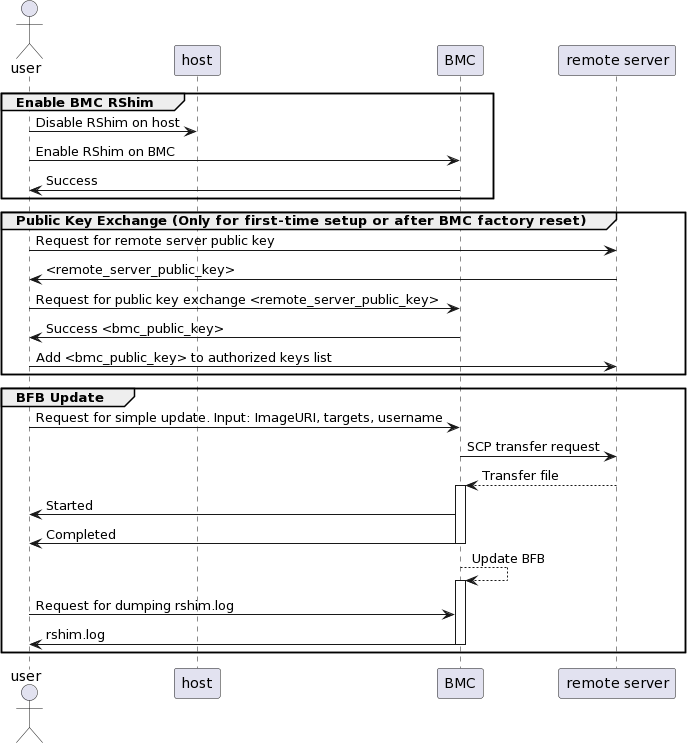
The BFB deployment process consists of these main stages:
|
|
Stage |
Description |
|---|---|---|
|
1 |
Disable RShim (if applicable) |
Ensure that the RShim interface is disabled on the host side where the given DPU resides to prevent interference with the BFB update process. |
|
2 |
Transfer the BFB image |
Initiate the image transfer using one of the supported methods:
|
|
3 |
Monitor installation progress |
Track the update process and verify installation status through Redfish logs, BMC console, or CLI output. |
|
4 |
Apply the new version |
Reboot the system to activate the new firmware and software. The specific reboot behavior depends on the selected update flow (offline or deferred). |
Update Flow
Changing Default Credentials Using bf.cfg
If installing the BF-Bundle BFB with BlueField Arm OS, Ubuntu users are prompted to change the default password (ubuntu) for the default user (ubuntu) upon first login. Logging in will not be possible even if the login prompt appears until all services are up (DPU is ready message appears in /dev/rshim0/misc).
Alternatively, Ubuntu users can provide a unique password that will be applied at the end of the BFB installation. This password must be defined in a bf.cfg configuration file. To set the password for the ubuntu user:
-
Create password hash. Run:
# openssl passwd -1 Password: Verifying - Password: $1$3B0RIrfX$TlHry93NFUJzg3Nya00rE1 -
Add the password hash in quotes to the
bf.cfgfile:The# vim bf.cfg ubuntu_PASSWORD='$1$3B0RIrfX$TlHry93NFUJzg3Nya00rE1'
bf.cfgfile is used with the bfb-install script in the steps that follow.
Update Flow Image Transfer
Offline Update Flow
Perform the following steps to update the device using the offline flow:
-
(SuperNIC only) Unbind the PFs from the host driver before starting the update. Run the following on the host:
echo 0000:21:00.0 > /sys/bus/pci/drivers/mlx5_core/unbind # Example PCIe ID for the first PF
echo 0000:21:00.1 > /sys/bus/pci/drivers/mlx5_core/unbind # Example PCIe ID for the second PF (if present)
-
Run the following Redfish command to initiate the update:
curl -k -u root:'<password>' -H "Content-Type: application/json" -X POST -d '{"TransferProtocol":"SCP", "ImageURI":"<image_uri>","Targets":["redfish/v1/UpdateService/FirmwareInventory/DPU_OS"], "Username":"<username>"}' https://<bmc_ip>/redfish/v1/UpdateService/Actions/UpdateService.SimpleUpdateThis command initiates a soft reset on BlueField and pushes the boot stream. For NVIDIA-supplied BFBs, the eMMC is flashed automatically once the boot stream is pushed. Upon success, a
runningmessage is received.After the BMC boots, it may take a few seconds (6-8 seconds for BlueField-2, and 2 seconds for BlueField-3) until the BlueField BSP (
DPU_OS) is up. -
(SuperNIC only) Once the installation is complete, bind the SuperNIC PFs back to the host driver:
echo 0000:21:00.0 > /sys/bus/pci/drivers/mlx5_core/bind # Example PCI ID for the first PF
echo 0000:21:00.1 > /sys/bus/pci/drivers/mlx5_core/bind # Example PCI ID for the second PF (if present)
Deferred Update Flow
Supported at beta level.
Deferred update flow enables upgrading DOCA components on NVIDIA® BlueField® platforms running in DPU mode while keeping services operational throughout the process. The update is applied only after a coordinated reset, minimizing downtime.
Deferred Update Flow Prerequisites
-
Download the per-SKU
fw-bundleBFB from DOCA Downloads page.The installed firmware must be BSP 4.13.0 (DOCA 3.2.0) or later.
-
Repackage the
bf-fwbundlein flat format using thebfb-tool:Expected output:bfb-tool repack --bfb bf-fwbundle-<version>.bfb --psid <PSID> --output-format flat
BFB: .../bf-fwbundle-*.flat.bfb
-
(Optional) If a
bf.cfgfile is required, bundle it into the flat BFB usingmlx-mkbfb.mlx-mkbfb --boot-args bf.cfg <input_flat.bfb> <output_cfg_flat.bfb> -
If operating in DPU mode, add the DPU-BMC credentials to
/etc/bf-upgrade.confon the Arm OS using the standardbf.cfgformat. For more details, refer to "Customizing BlueField Software Deployment". -
(Optional) To coordinate the BlueField reboot with the host reboot, run the following on the BlueField Arm OS:
mlxconfig -d /dev/mst/<device> set INT_CPU_AUTO_SHUTDOWN=1This must be configured in advance, as it requires a BlueField system-level reset to take effect.
Initiate Firmware Deferred Update Flow Transfer
curl -k -u root:'<password>' -H "Content-Type: application/json" -X POST -d '{"TransferProtocol":"HTTP", "ImageURI":"<image_uri>","Targets":["redfish/v1/UpdateService/FirmwareInventory/DPU_OS"], "Username":"<username>", "Stage":true}' https://<bmc_ip>/redfish/v1/UpdateService/Actions/UpdateService.SimpleUpdate
The parameter Stage is only supported when Targets is set to redfish/v1/UpdateService/ FirmwareInventory/DPU_OS. Another deferred update will fail if the staging has not completed.
Example success message if the request is valid and a task is created:
{
  "@odata.id": "/redfish/v1/TaskService/Tasks/<task_id>",
  "@odata.type": "#Task.v1_4_3.Task", "Id": "<task_id>",
  "TaskState": "Running", "TaskStatus": "OK"
}
Transfer Command Parameters
-
image_uri– specifies the complete location of the BFB file on the remote server. It is constructed by joining the Remote Server IP and the Absolute File Path with a single forward slash (i.e.,<Remote_IP>/<Absolute_Path>).Because absolute paths start with a slash (e.g.,
/tmp/...), the final string will typically contain a double slash (//) between the IP and the directory. For example, if the IP is10.10.10.10and the file path is/tmp/image.bfb, the resulting URI is:"ImageURI": "10.10.10.10//tmp/image.bfb". -
TransferProtocol– set to eitherSCP,HTTP,HTTPSIf using HTTPS, make sure the BMC has a certificate to authenticate the HTTPS server. Or install a valid certificate to authenticate:
curl -c cjar -b cjar -k -u root:'<password>' -X POST https://$bmc/redfish/v1/Managers/Bluefield_BMC/ Truststore/Certificates -d @CAcert.json
-
username– username on the remote server (only required for SCP) -
bmc_ip– BMC IP address -
Stage– a value ofTrueindicates a deferred flow, a value ofFalseor omitting this parameter indicates an offline update flow
Setting Up Secure Connection
Relevant only for SCP users with Redfish.
The following is an example for how to generate the server public key on Ubuntu 22.04 and it may be different on other OS distributions/versions.
-
Gather the public SSH host keys of the server holding the
new.bfbfile. Run the following against the server holding thenew.bfbfile ("Remote Server"):OpenSSH is required for this step.
ssh-keyscan -t <key_type> <remote_server_ip>Where:
-
key_type– the type of key associated with the server storing the BFB file (e.g., ed25519) -
remote_server_ip– the IP address of the server hosting the BFB file
-
-
Retrieve the remote server's public key from the response, and send the following Redfish command to the BlueField BMC:
curl -k -u root:'<password>' -H "Content-Type: application/json" -X POST -d '{"RemoteServerIP":"<remote_server_ip>", "RemoteServerKeyString":"<remote_server_public_key>"}' https://<bmc_ip>/redfish/v1/UpdateService/Actions/Oem/NvidiaUpdateService.PublicKeyExchangeWhere:
-
password– BlueField BMC password -
remote_server_ip– the IP address of the server hosting the BFB file -
remote_server_public_key– remote server's public key from thessh-keyscanresponse, which contains both the type and the public key with one space between the two fields (i.e., "<type> <public_key>") -
bmc_ip– BMC IP address
-
-
Extract the BMC public key information (i.e., "
<type> <bmc_public_key> <username>@<hostname>") from thePublicKeyExchangeresponse and append it to theauthorized_keysfile on the remote server holding the BFB file. This enables password-less key-based authentication for users.{ "@Message.ExtendedInfo": [ { "@odata.type": "#Message.v1_1_1.Message", "Message": "Please add the following public key info to ~/.ssh/authorized_keys on the remote server", "MessageArgs": [ "<type> <bmc_public_key> root@dpu-bmc" ] }, { "@odata.type": "#Message.v1_1_1.Message", "Message": "The request completed successfully.", "MessageArgs": [], "MessageId": "Base.1.15.0.Success", "MessageSeverity": "OK", "Resolution": "None" } ] }
Tracking Image Transfer Status and Progress
After receiving a success message of a valid SimpleUpdate request and a running task state. Run the following Redfish command to track image transfer status and progress:
curl -k -u root:'<password>' -X GET https://<bmc_ip>/redfish/v1/TaskService/Tasks/<task_id>
During the transfer, the PercentComplete value remains at 0 for offline update flow. If no errors occur, the TaskState is set to Running, and a keep-alive message is generated every 5 minutes. Once the transfer is completed, the PercentComplete is set to 100, and the TaskState is updated to Completed. Upon failure, a message is generated with the relevant resolution.
Example:
    {
      "@odata.type": "#MessageRegistry.v1_4_1.MessageRegistry",
      "Message": "Image 'new.bfb' is being transferred to '/dev/rshim0/boot'.",
      "MessageArgs": [
        "new.bfb",
        "/dev/rshim0/boot"
      ],
      "MessageId": "Update.1.0.TransferringToComponent",
      "Resolution": "Transfer started",
      "Severity": "OK"
    },
  …

  "PercentComplete": 60,
  "StartTime": "2024-06-10T19:39:03+00:00",
  "TaskMonitor": "/redfish/v1/TaskService/Tasks/1/Monitor",
  "TaskState": "Running",
  "TaskStatus": "OK"
Installation Status and Activation
Tracking Offline Update Flow Installation Status
In the Offline Update Flow, once the image transfer finishes, users can use the RShim miscellaneous messages log dump to track the installation's progress and status.
-
Initiate request for dump download:
sudo curl -k -u root:'<password>' -d '{"DiagnosticDataType": "Manager"}' -X POST https://<ip_address>/redfish/v1/Managers/Bluefield_BMC/LogServices/Dump/Actions/LogService.CollectDiagnosticDataWhere:
-
<ip-address>– BMC IP address -
<password>– BMC password
-
-
Use the received task ID to poll for dump completion:
sudo curl -k -u root:'<password>' -H 'Content-Type: application/json' -X GET https://<ip_address>/redfish/v1/TaskService/Tasks/<task_id>Where:
-
<ip-address>– BMC IP address -
<password>– BMC password -
<task_id>– Task ID received from the first command
-
-
Once dump is complete, download and review the dump:
sudo curl -k -u root:'<password>' -H 'Content-Type: application/json' -X GET https://<ip_address>/redfish/v1/Managers/Bluefield_BMC/LogServices/Dump/Entries/<entry_id>/attachment --output </path/to/tar/log_dump.tar.xz>Where:
-
<ip-address>– BMC IP address -
<password>– BMC password -
<entry_id>– The entry ID of the dump inredfish/v1/Managers/Bluefield_BMC/LogServices/Dump/Entries -
</path/to/tar/log_dump.tar.xz>– path to download the log dumplog_dump.tar.xz
-
-
Untar the file to review the logs. For example:
tar xvfJ log_dump.tar.xz
-
The log is contained in the
rshim.logfile. The log displaysReboot,finished,DPU is ready, orIn Enhanced NIC modewhen BFB installation completes.If the downloaded log file does not contain any of these strings, keep downloading the log file until they appear.
-
When installation is complete, you may crosscheck the new BFB version against the version provided to verify a successful upgrade:
curl -k -u root:"<PASSWORD>" -H "Content-Type: application/json" -X GET https://<bmc_ip>/redfish/v1/UpdateService/FirmwareInventory/DPU_OSExample response:
"@odata.id": "/redfish/v1/UpdateService/FirmwareInventory/DPU_OS",
 "@odata.type": "#SoftwareInventory.v1_4_0.SoftwareInventory",
 "Description": "Host image",
 "Id": "DPU_OS",
 "Members@odata.count": 1,
 "Name": "Software Inventory",
 "RelatedItem": [
   {
     "@odata.id": "/redfish/v1/Systems/Bluefield/Bios"
   }
 ],
 "SoftwareId": "",
 "Status": {
   "Conditions": [],
   "Health": "OK",
   "HealthRollup": "OK",
   "State": "Enabled"
 },
 "Updateable": true,
 "Version": "DOCA_2.2.0_BSP_4.2.1_Ubuntu_22.04-8.23-07"
Deferred Update Flow
Checking Staging Status
Check the staging status after the transfer (i.e., the SimpleUpdate task) is completed successfully. A successful result of the staging procedure will be com.nvidia.BF.Rshim.Status.Completed after staging completes.
curl -k -u root:'<password>' -H "Content-Type: application/json" -X GET https://<bmc_ip>/redfish/v1/Managers/Bluefield_BMC/Actions/Oem/NvidiaManager.GetUpdateStatus
{
  "UpdateStatus": "com.nvidia.BF.Rshim.Status.Completed"
}
The UpdateStatus can be:
-
'com.nvidia.BF.Rshim.Status.Invalid'This references not having RShim on BMC side.
-
'com.nvidia.BF.Rshim.Status.Idle' -
'com.nvidia.BF.Rshim.Status.InProgress' -
'com.nvidia.BF.Rshim.Status.Completed' -
'com.nvidia.BF.Rshim.Status.Failed'
The default status is com.nvidia.BF.Rshim.Status.Idle and it take a while to update the status from com.nvidia.BF.Rshim.Status.Idle to com.nvidia.BF.Rshim.Status.InProgress after the SimpleUpdate command is sent. The final status should be com.nvidia.BF.Rshim.Status.Completed or com.nvidia.BF.Rshim.Status.Failed.
Activate the Firmware Components
Once staging is completed successfully, issue the Activate command. Activation is required to apply the new staged components:
curl -k -u root:'<password>' \
     -H "Content-Type: application/json" \
     -X POST https://<bmc_ip>/redfish/v1/Managers/Bluefield_BMC/Actions/Oem/NvidiaManager.Activate
Notes on BMC firmware activation:
-
Regular BFB bundle – BMC firmware is updated without needing this manual activation command.
-
PLDM BFB bundle – This activation command is required to apply the new BMC firmware.
DOCA Components Update
To complete an update to a new GA release, the DOCA Components on the Arm OS are to be updated as well. User may SSH into the DPU Arm OS and use standard Linux tools to update the DOCA components. See section "Upgrading BlueField Using Standard Linux Tools" in DOCA documentation for more details.
Applying New BFB Image
The following are different options for applying the new version:
|
Reset Type |
Mode of Operation |
Applying Reset Steps |
Notes |
|---|---|---|---|
|
Cold Boot (AC/DC Power Cycle) |
|
|
|
|
Standard Warm Reboot |
|
|
|
|
Coordinated Reset (Server + DPU) |
DPU Mode |
|
|
Verify New Components are Running
After DPU reboots, check that the components have been updated:
curl -k -u root:'<Password>' -X GET https://<bmc ip>/redfish/v1/UpdateService/FirmwareInventory/DPU_NIC
curl -k -u root:'<Password>' -X GET https://<bmc ip>/redfish/v1/UpdateService/FirmwareInventory/DPU_ATF
curl -k -u root:'<Password>' -X GET https://<bmc ip>/redfish/v1/UpdateService/FirmwareInventory/DPU_UEFI
Troubleshooting Scenarios
-
If RShim is disabled:
{
  "error": {
    "@Message.ExtendedInfo": [
      {
        "@odata.type": "#Message.v1_1_1.Message",
        "Message": "The requested resource of type Target named '/dev/rshim0/boot' was not found.",
        "MessageArgs": [
          "Target",
          "/dev/rshim0/boot"
        ],
        "MessageId": "Base.1.15.0.ResourceNotFound",
        "MessageSeverity": "Critical",
        "Resolution": "Provide a valid resource identifier and resubmit the request."
      }
    ],
    "code": "Base.1.15.0.ResourceNotFound",
    "message": "The requested resource of type Target named '/dev/rshim0/boot' was not found."
}
-
If a username or any other required field is missing:
{ "Username@Message.ExtendedInfo": [ { "@odata.type": "#Message.v1_1_1.Message", "Message": "The create operation failed because the required property Username was missing from the request.", "MessageArgs": [ "Username" ], "MessageId": "Base.1.15.0.CreateFailedMissingReqProperties", "MessageSeverity": "Critical", "Resolution": "Correct the body to include the required property with a valid value and resubmit the request if the operation failed." } ] } -
If host identity is not confirmed or the provided host key is wrong:
{
      "@odata.type": "#MessageRegistry.v1_4_1.MessageRegistry",
      "Message": "Transfer of image '<file_name>' to '/dev/rshim0/boot' failed.",
      "MessageArgs": [
        "<file_name>,
        "/dev/rshim0/boot"
      ],
      "MessageId": "Update.1.0.TransferFailed",
      "Resolution": " Unknown Host: Please provide server's public key using PublicKeyExchange ",
      "Severity": "Critical"
    }
…
"PercentComplete": 0,
  "StartTime": "<start_time>",
  "TaskMonitor": "/redfish/v1/TaskService/Tasks/<task_id>/Monitor",
  "TaskState": "Exception",
  "TaskStatus": "Critical"
In this case, revoke the remote server key using the following Redfish command:
curl -k -u root:'<password>' -H "Content-Type: application/json" -X POST -d '{"RemoteServerIP":"<remote_server_ip>"}' https://<bmc_ip>/redfish/v1/UpdateService/Actions/Oem/NvidiaUpdateService.RevokeAllRemoteServerPublicKeysWhere:
-
remote_server_ip– remote server's IP address -
bmc_ip– BMC IP address
Then repeat the following steps:
-
-
If the BMC identity is not confirmed:
{
      "@odata.type": "#MessageRegistry.v1_4_1.MessageRegistry",
      "Message": "Transfer of image '<file_name>' to '/dev/rshim0/boot' failed.",
      "MessageArgs": [
        "<file_name>",
        "/dev/rshim0/boot"
      ],
      "MessageId": "Update.1.0.TransferFailed",
      "Resolution": "Unauthorized Client: Please use the PublicKeyExchange action to receive the system's public key and add it as an authorized key on the remote server",
      "Severity": "Critical"
      }
…
"PercentComplete": 0,
  "StartTime": "<start_time>",
  "TaskMonitor": "/redfish/v1/TaskService/Tasks/<task_id>/Monitor",
  "TaskState": "Exception",
  "TaskStatus": "Critical"
In this case, verify that the BMC key has been added correctly to the
authorized_keyfile on the remote server.
-
If SCP fails:
{
      "@odata.type": "#MessageRegistry.v1_4_1.MessageRegistry",
      "Message": "Transfer of image '<file_name>' to '/dev/rshim0/boot' failed.",
      "MessageArgs": [
        "<file_name>",
        "/dev/rshim0/boot"
      ],
      "MessageId": "Update.1.0.TransferFailed",
      "Resolution": "Failed to launch SCP",
      "Severity": "Critical"
      }
…
"PercentComplete": 0,
  "StartTime": "<start_time>",
  "TaskMonitor": "/redfish/v1/TaskService/Tasks/<task_id>/Monitor",
  "TaskState": "Exception",
  "TaskStatus": "Critical"
For comprehensive list of the supported parameters to customize bf.cfg during BFB installation, refer to section "bf.cfg Parameters".
Verify BFB is Installed
After installation of the Ubuntu OS is complete, the following note appears in /dev/rshim0/misc on first boot:
...
INFO[MISC]: Linux up
INFO[MISC]: DPU is ready
"DPU is ready" indicates that all the relevant services are up and users can login the system.
After the installation of the Ubuntu 20.04 BFB, the configuration detailed in the following sections is generated.
Make sure all the services (including cloud-init) are started on BlueField and to perform a graceful shutdown before power cycling the host server.
BlueField OS image version is stored under /etc/mlnx-release in the BlueField:
# cat /etc/mlnx-release
bf-bundle-2.7.0-<version>_ubuntu-22.04_prod
Firmware Upgrade
To upgrade firmware:
-
Access the BlueField using one of the available interfaces (RShim console, BMC console, SSH via
oob_net0ortmfifo_net0interfaces). -
Upgrade the firmware on BlueField. Run:
sudo /opt/mellanox/mlnx-fw-updater/mlnx_fw_updater.pl --force-fw-updateExample output:
Device #1:
----------

  Device Type:      BlueField-2
  [...]
  Versions:         Current        Available
     FW             <Old_FW>       <New_FW>
Important! To apply NVConfig changes, stop here and follow the steps in section "Updating NVConfig Params". In this case, the following step #3 is redundant.
-
Perform a BlueField system reboot for the upgrade to take effect.
Updating NVConfig Params
-
Optional. To reset the BlueField NIC firmware configuration (aka Nvconfig params) to their factory default values, run the following from the BlueField ARM OS or from the host OS:
# sudo mlxconfig -d /dev/mst/<MST device> -y reset

Reset configuration for device /dev/mst/<MST device>? (y/n) [n] : y
Applying... Done!
-I- Please reboot machine to load new configurations.
For now, please ignore tool's instruction to reboot
To learn what MST device the BlueField has on your setup, run:
mst start
mst status
Example output taken on a multiple BlueField host:
// The MST device corresponds with PCI Bus address.

MST modules:
------------
    MST PCI module is not loaded
    MST PCI configuration module loaded

MST devices:
------------
/dev/mst/mt41692_pciconf0        - PCI configuration cycles access.
                                   domain:bus:dev.fn=0000:03:00.0 addr.reg=88 data.reg=92 cr_bar.gw_offset=-1
                                   Chip revision is: 01
/dev/mst/mt41692_pciconf1        - PCI configuration cycles access.
                                   domain:bus:dev.fn=0000:83:00.0 addr.reg=88 data.reg=92 cr_bar.gw_offset=-1
                                   Chip revision is: 01
/dev/mst/mt41686_pciconf0        - PCI configuration cycles access.
                                   domain:bus:dev.fn=0000:a3:00.0 addr.reg=88 data.reg=92 cr_bar.gw_offset=-1
                                   Chip revision is: 01
The MST device IDs for the BlueField-2 and BlueField-3 devices in this example are
/dev/mst/mt41686_pciconf0and/dev/mst/mt41692_pciconf0respectively.
-
(Optional) Enable NVMe emulation. Run:
sudo mlxconfig -d <MST device> -y s NVME_EMULATION_ENABLE=1
-
Skip this step if your BlueField is Ethernet only. Please refer to section "Supported Platforms and Interoperability" under the Release Notes to learn your BlueField type.
If you have an InfiniBand-and-Ethernet-capable BlueField, the default link type of the ports will be configured to IB. If you want to change the link type to Ethernet, please run the following configuration:
sudo mlxconfig -d <MST device> -y s LINK_TYPE_P1=2 LINK_TYPE_P2=2
-
Perform a BlueField system-level reset for the new settings to take effect.
Last updated: