This document provides an overview and configuration of scalable functions (sub-functions, or SFs) for NVIDIA® BlueField® DPU.
Introduction
Scalable functions (SFs), or sub-functions, are very similar to virtual functions (VFs) which are part of a Single Root I/O Virtualization (SR-IOV) solution. I/O virtualization is one of the key features used in data centers today. It improves the performance of enterprise servers by giving virtual machines direct access to hardware I/O devices. The SR-IOV specification allows one PCI Express (PCIe) device to present itself to the host as multiple distinct "virtual" devices. This is done with a new PCIe capability structure added to a traditional PCIe function (i.e., a physical function or PF).
The PF provides control over the creation and allocation of new VFs. VFs share the device's underlying hardware and PCIe. A key feature of the SR-IOV specification is that VFs are very lightweight so that many of them can be implemented in a single device.
To utilize the capabilities of VF in the BlueField, SFs are used. SFs allow support for a larger number of functions than VFs, and more importantly, they allow running multiple services concurrently on the DPU.
An SF is a lightweight function which has a parent PCIe function on which it is deployed. The SF, therefore, has access to the capabilities and resources of its parent PCIe function and has its own function capabilities and its own resources. This means that an SF would also have its own dedicated queues (i.e., txq, rxq).
SFs co-exist with PCIe SR-IOV virtual functions (on the host) but also do not require enabling PCIe SR-IOV.
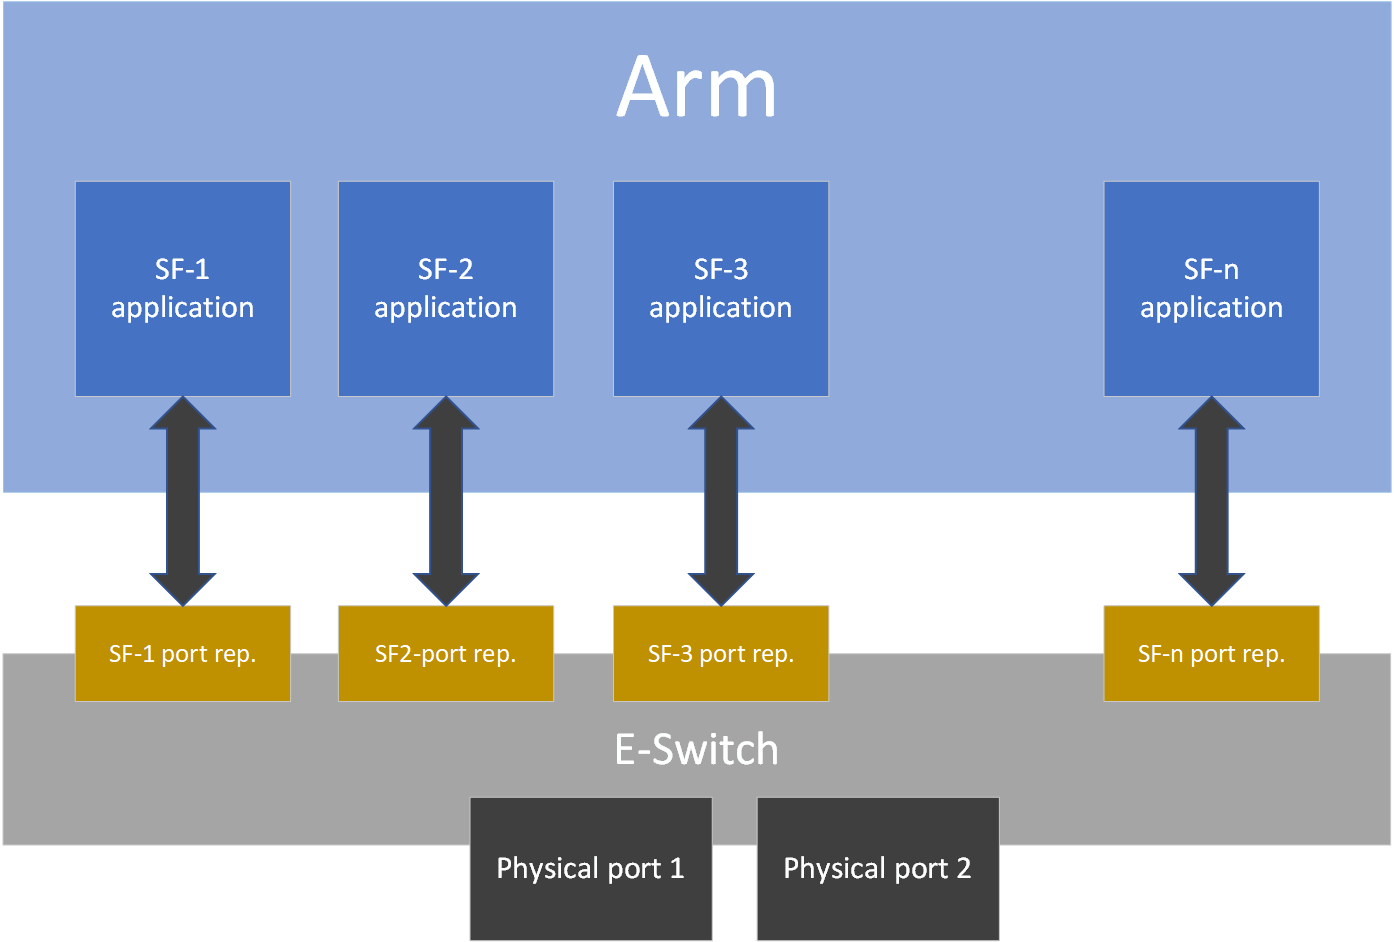
SFs support E-Switch representation offload like existing PF and VF representors. An SF shares PCIe-level resources with other SFs and/or with its parent PCIe function.
Prerequisites
Refer to the NVIDIA DOCA Installation Guide for Linux for details on how to install BlueField related software.
-
Make sure your firmware version is 20.30.1004 or higher
-
To enable SF support on the device, change the PCIe address for each port:
$ mlxconfig -d 0000:03:00.0 s PF_BAR2_ENABLE=0 PER_PF_NUM_SF=1 PF_TOTAL_SF=236
 PF_SF_BAR_SIZE=10

PF_BAR2_ENABLE: if this config is set, then all PFs and ECPFs have the same number of SFs. This should be off (deprecated).
If set. PF_TOTAL_SF and PF_SF_BAR_SIZE won’t work.
PER_PF_NUM_SF: If this config is set, each PF and ECPF configure/control its own number of SFs.
THE ABOVE TWO CONFIGS AFFECS BOTH BF AND HOST, TREAT WITH CARE!
Also, only one of them can be set. It is INVALID to set them both

PF_TOTAL_SF: maximum number of SFs we wish to configure for the given PF/ECPF.
PF_SF_BAR_SIZE: size of each SF at the BAR2. The size is in powers of 2 in KB.
For example: PF_SF_BAR_SIZE=10 means each SF is taking 1MB of the BAR.
             PF_TOTAL_SF=14 means this PCI function can create up to 14 SFs.
             In total: FW will allocate 14MB of BAR2.
A cold reboot is needed for the effect to take place.
SF Configuration
To use an SF, a 3-step setup sequence must be followed first:
-
Create.
-
Configure.
-
Deploy.

These steps can be performed using mlxdevm tool.
Configuration Using mlxdevm Tool
-
Create the SF.
SFs are managed using the
mlxdevmtool supplied with iproute2 package. The tool is found at/opt/mellanox/iproute2/sbin/mlxdevm.An SF is created using the
mlxdevmtool. The SF is created by adding a port ofpcisfflavor.To create an SF port representor, run:
/opt/mellanox/iproute2/sbin/mlxdevm port add pci/<pci_address> flavour pcisf pfnum <corresponding pfnum> sfnum <sfnum>
Each SF must have a unique number (
<sfnum>).For example:
/opt/mellanox/iproute2/sbin/mlxdevm port add pci/0000:03:00.0 flavour pcisf pfnum 0 sfnum 4Output example:
pci/0000:30:00.0/229409: type eth netdev eth0 flavour pcisf controller 0 pfnum 0 sfnum 4
   function:
	hw_addr 00:00:00:00:00:00 state inactive opstate detached roce true max_uc_macs 128 trust off
The number 229409 is required to complete the following two steps (i.e., configuration and deployment).
pci/0000:03:00.0/229409is called the SF index.pci/<pci_address>/<sf_index>can be replaced with<representor_name>. For example:pci/0000:03:00.0/229409 = en3f0pf0sf4To see information about the created SF such as its MAC address, trust mode, or state (active/inactive), run the following command:
/opt/mellanox/iproute2/sbin/mlxdevm port showOutput example:
pci/0000:30:00.0/229409: type eth netdev en3f0pf0sf4 eth0 flavor pcisf controller 0 pfnum 0 sfnum 4
    function:
      hw_addr 00:00:00:00:00:00 state inactive opstate detached roce true max_uc_macs 128 trust off
-
Configure the SF.
A subfunction representor (SF port representor) is created but it is not deployed yet. Users should configure the hardware address (e.g., MAC address), set trust mode to on, and activate the SF before deploying it.
The following steps can be executed as separate commands (at any order) or combined as one:
-
To configure the hardware address, run:
/opt/mellanox/iproute2/sbin/mlxdevm port function set pci/<pci_address>/<sf_index> hw_addr <MAC address>
-
To set the trust mode to on, run:
/opt/mellanox/iproute2/sbin/mlxdevm port function set pci/<pci_address>/<sf_index> trust on
-
To activate the created SF, run:
/opt/mellanox/iproute2/sbin/mlxdevm port function set pci/<pci_address>/<sf_index> state active
Alternatively, to configure the MAC address, set trust mode on, and set the state as active, run:
/opt/mellanox/iproute2/sbin/mlxdevm port function set pci/<pci_address>/<sf_index> hw_addr <mac_address> trust on state activeFor example:
/opt/mellanox/iproute2/sbin/mlxdevm port function set pci/0000:03:00.0/229409 hw_addr 00:00:00:00:04:0 trust on state active
The SF capabilities above must be set before deploying the SF.
-
-
Deploy the SF.
To unbind the SF from the default config driver and bind the actual SF driver, run:
echo mlx5_core.sf.<next_serial> >  /sys/bus/auxiliary/drivers/mlx5_core.sf_cfg/unbind
echo mlx5_core.sf.<next_serial>  > /sys/bus/auxiliary/drivers/mlx5_core.sf/bind
For example:
echo mlx5_core.sf.4  > /sys/bus/auxiliary/drivers/mlx5_core.sf_cfg/unbind
echo mlx5_core.sf.4  > /sys/bus/auxiliary/drivers/mlx5_core.sf/bind
<next_serial>is a number produced by the firmware when creating the SF (this is the gvmi number of the SF).mlxdevmtool when creating the SF. To obtain it, refer to the useful commands provided below.Useful commands:
-
To see the available sub-functions, run:
$ devlink dev showFor example, if you run the command before creating, configuring, and deploying the SF (using the steps detailed earlier), the output would appear as follows:
pci/0000:03:00.0
pci/0000:03:00.1
auxiliary/mlx5_core.sf.2
auxiliary/mlx5_core.sf.3
After creating, configuring, and deploying the SF, the output would be:
pci/0000:03:00.0
pci/0000:03:00.1
auxiliary/mlx5_core.sf.2
auxiliary/mlx5_core.sf.3
auxiliary/mlx5_core.sf.4
Note that the
<next_serial>number is 4 for the created SF. -
To see the
sfnumof each sub-function, run:cat /sys/bus/auxiliary/devices/mlx5_core.sf.<next_serial>/sfnumFor example:
cat /sys/bus/auxiliary/devices/mlx5_core.sf.4/sfnumExample output:
cat /sys/bus/auxiliary/devices/mlx5_core.sf.4/sfnum
4
-
To remove an SF, you must first make its state inactive and only then remove the SF representor.
To make the SF's state inactive, run:
/opt/mellanox/iproute2/sbin/mlxdevm port function set pci/<pci_address>/<sf_index> state inactiveTo delete the SF port representor, run:
/opt/mellanox/iproute2/sbin/mlxdevm port del pci/<pci_address>/<sf_index>For example:
/opt/mellanox/iproute2/sbin/mlxdevm port function set pci/0000:03:00.0/229409 state inactive
/opt/mellanox/iproute2/sbin/mlxdevm port del pci/0000:03:00.0/229409
-
-
Use the SF.
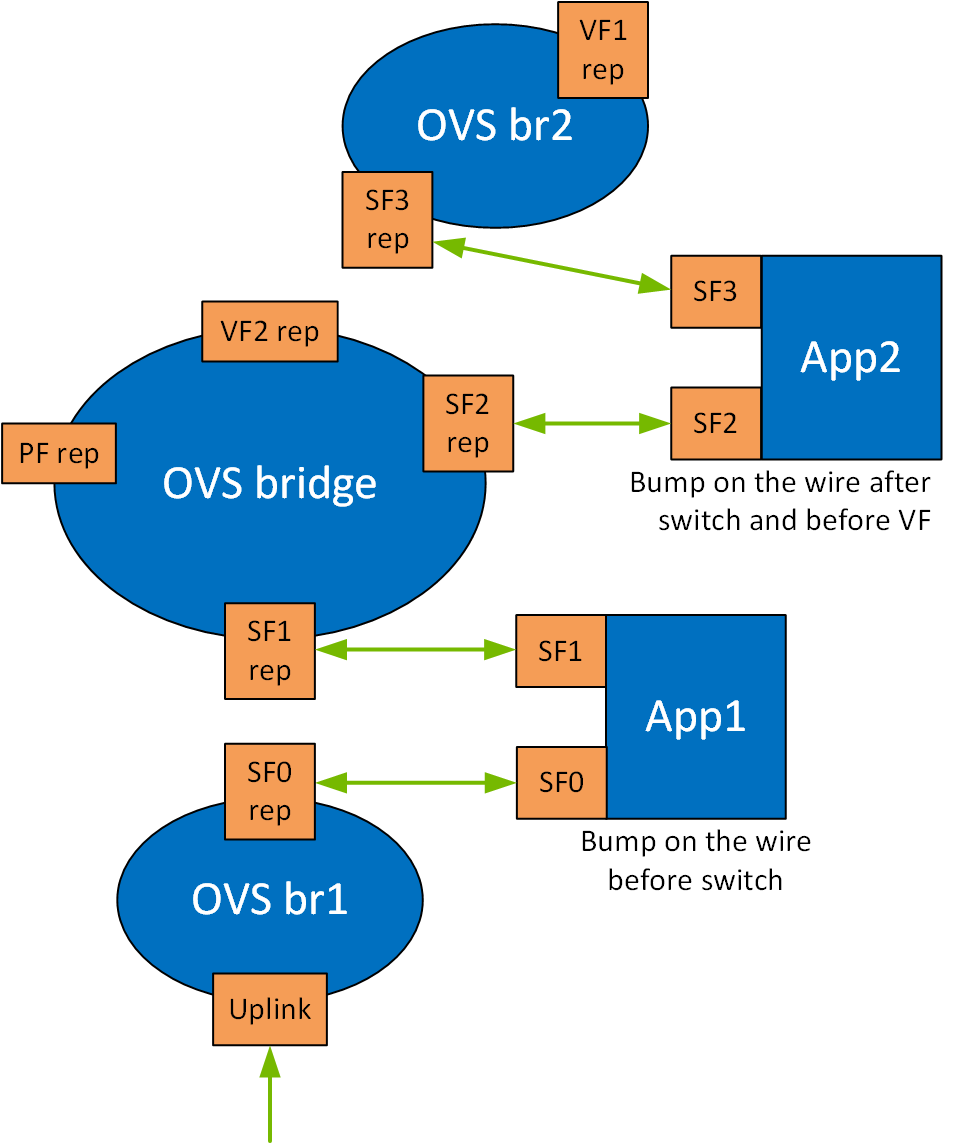
Running the application on the DPU requires OVS configuration. By creating SFs, an SF representor for the OVS is also created and nameden3f0pf*sf*. Therefore, each representor needs to be connected to the correct OVS bridge.Two SFs related to the same PCIe are necessary for the configuration in the illustration.
The following example configures 2 SFs and adds their representors to the OVS.
-
Create, configure, and deploy the SFs. Run:
/opt/mellanox/iproute2/sbin/mlxdevm port add pci/0000:03:00.0 flavour pcisf pfnum 0 sfnum 4
/opt/mellanox/iproute2/sbin/mlxdevm port add pci/0000:03:00.0 flavour pcisf pfnum 0 sfnum 5
Using the command
mlxdevm port show, you can see the SF indices of the created SFs./opt/mellanox/iproute2/sbin/mlxdevm port showOutput example:
pci/0000:30:00.0/229409: type eth netdev en3f0pf0sf4 flavour pcisf controller 0 pfnum 0 sfnum 4
   function:
	hw_addr 00:00:00:00:00:00 state inactive opstate detached roce true max_uc_macs 128 trust off
pci/0000:30:00.0/229410: type eth netdev en3f0pf0sf5 flavour pcisf controller 0 pfnum 0 sfnum 5
   function:
	hw_addr 00:00:00:00:00:00 state inactive opstate detached roce true max_uc_macs 128 trust off
-
Configure the MAC address, set trust mode on, and activate the created SFs:
/opt/mellanox/iproute2/sbin/mlxdevm port function set pci/0000:03:00.0/229409 hw_addr 02:25:f2:8d:a2:4c trust on state active
/opt/mellanox/iproute2/sbin/mlxdevm port function set pci/0000:03:00.0/229410 hw_addr 02:25:f2:8d:a2:5c trust on state active
Using
ifconfig, you may see that there are 2 added network interfaces:en3f0pf0sf4anden3f0pf0sf5for the two respective SF port representors. -
Delete existing OVS bridges (optional).
For example, run the following command to delete an OVS bridge called
ovsbr1:ovs-vsctl del-br ovsbr1
-
Create two bridges
sf_bridge1andsf_bridge2and configure them as follows:ovs-vsctl add-br sf_bridge1 ovs-vsctl add-br sf_bridge2 ovs-vsctl add-port sf_bridge1 p0 ovs-vsctl add-port sf_bridge2 pf0hpf
-
Add the port representors to the OVS bridges:
ovs-vsctl add-port sf_bridge1 en3f0pf0sf4
ovs-vsctl add-port sf_bridge2 en3f0pf0sf5
The OVS bridges after adding the SF representors:
Bridge sf_bridge1
     Port p0
         Interface p0
     Port sf_bridge1
         Interface sf_bridge1
             type: internal
     Port en3f0pf0sf4
         Interface en3f0pf0sf4
Bridge sf_bridge2
     Port sf_bridge2
         Interface sf_bridge2
             type: internal
     Port en3f0pf0sf5
         Interface en3f0pf0sf5
     Port pf0hpf
         Interface pf0hpf
ovs_version: "2.14.1"
The interface might be down by default. Remember to
ifconfingthe interface to "up" status.
When deleting the SF port representor, you must also de-attach it from the bridge it is connected to using the command
ovs-vsctl port-del en3f0pf0sf*. Otherwise, the port representor will still be connected to the bridge but would not be recognizable.To run the application, use the following command to initialize the SFs during runtime:
*Executable_binary* -a auxiliary:mlx5_core.sf.* -a auxiliary:mlx5_core.sf.*For example:
doca_<app_name> -a auxiliary:mlx5_core.sf.4,sft_en=1 -a auxiliary:mlx5_core.sf.5,sft_en=1 -- [application_flags]
-
Last updated: