This guide provides instructions on using the DOCA SNAP-4 service on top of the NVIDIA® BlueField®-3 DPU.
Introduction
NVIDIA® BlueField® SNAP and virtio-blk SNAP (storage-defined network accelerated processing) technology enables hardware-accelerated virtualization of local storage. NVMe/virtio-blk SNAP presents networked storage as a local block-storage device (e.g., SSD) emulating a local drive on the PCIe bus. The host OS or hypervisor uses its standard storage driver, unaware that communication is done, not with a physical drive, but with NVMe/virtio-blk SNAP framework. Any logic may be applied to the I/O requests or to the data via the NVMe/virtio-blk SNAP framework prior to redirecting the request and/or data over a fabric-based network to remote or local storage targets.
NVMe/virtio-blk SNAP is based on the NVIDIA® BlueField® DPU family technology and combines unique software-defined hardware-accelerated storage virtualization with the advanced networking and programmability capabilities of the DPU. NVMe/virtio-blk SNAP together with the BlueField DPU enable a world of applications addressing storage and networking efficiency and performance.
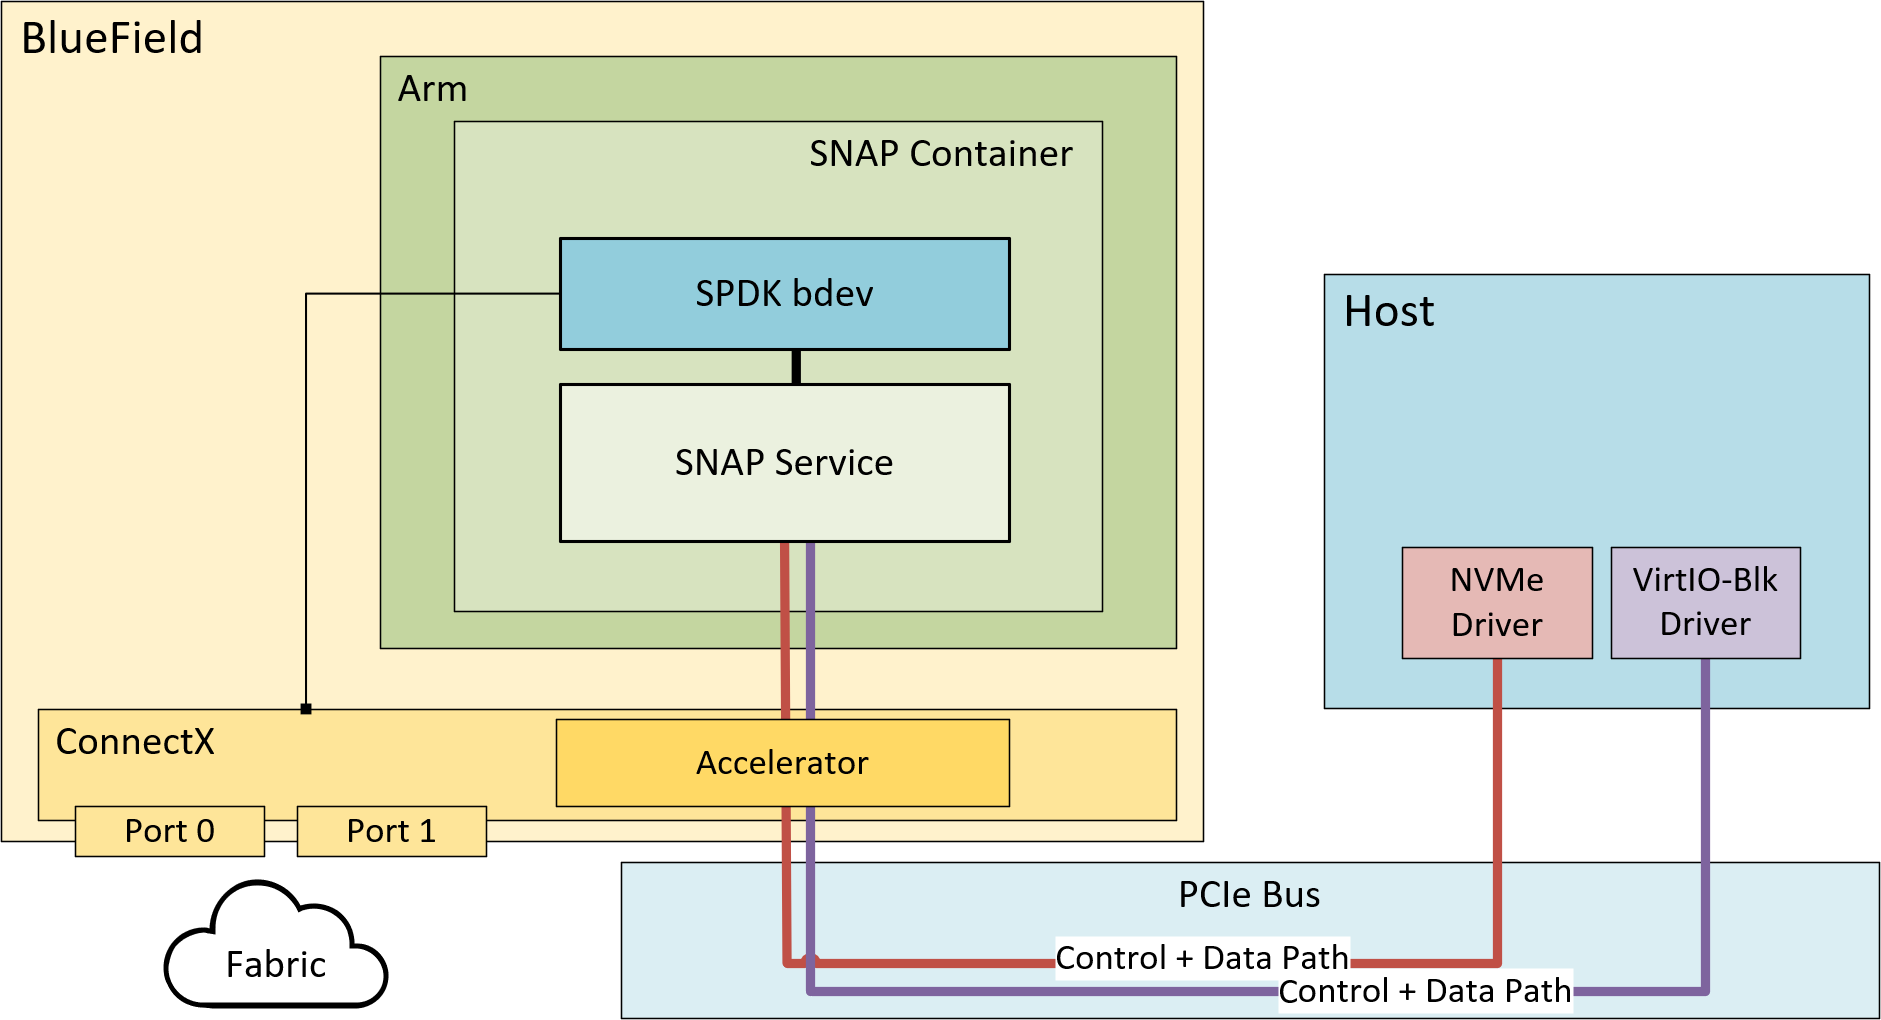
The traffic arriving from the host towards the emulated PCIe device is redirected to its matching storage controller opened on the mlnx_snap service.
The controller implements the device specification and may expose backend device accordingly (in this use case SPDK is used as the storage stack that exposes backend devices). When a command is received, the controller executes it.
Admin commands are mostly answered immediately, while I/O commands are redirected to the backend device for processing.
The request-handling pipeline is completely asynchronous, and the workload is distributed across all Arm cores (allocated to SPDK application) to achieve the best performance.
The following are key concepts for SNAP:
-
Full flexibility in fabric/transport/protocol (e.g. NVMe-oF/iSCSI/other, RDMA/TCP, ETH/IB)
-
NVMe and virtio-blk emulation support
-
Programmability
-
Easy data manipulation
-
Allowing zero-copy DMA from the remote storage to the host
-
Using Arm cores for data path
BlueField SNAP for NVIDIA® BlueField®-2 DPU is licensed software. Users must purchase a license per BlueField-2 DPU to use them.
NVIDIA® BlueField®-3 DPU does not have license requirements to run BlueField SNAP.
SNAP as Container
In this approach, the container could be downloaded from NVIDIA NGC and could be easily deployed on the DPU.
The yaml file includes SNAP binaries aligned with the latest spdk.nvda version. In this case, the SNAP sources are not available, and it is not possible to modify SNAP to support different SPDK versions (SNAP as an SDK package should be used for that).
SNAP 4.x is not pre-installed on the BFB but can be downloaded manually on demand.
For instructions on how to install the SNAP container, please see "DOCA SNAP-4 Service Guide | id (2.9.2 LTS)DOCASNAP 4ServiceGuide SNAPContainerDeployment".
SNAP as a Package
The SNAP development package (custom) is intended for those wishing to customize the SNAP service to their environment, usually to work with a proprietary bdev and not with the spdk.nvda version. This allows users to gain full access to the service code and the lib headers which enables them to compile their changes.
SNAP Emulation Lib
This includes the protocols libraries and the interaction with the firmware/hardware (PRM) as well as:
-
Plain shared objects (
*.so) -
Static archives (
*.a) -
pkgconfig definitions (
*.pc) -
Include files (
*.h)
SNAP Service Sources
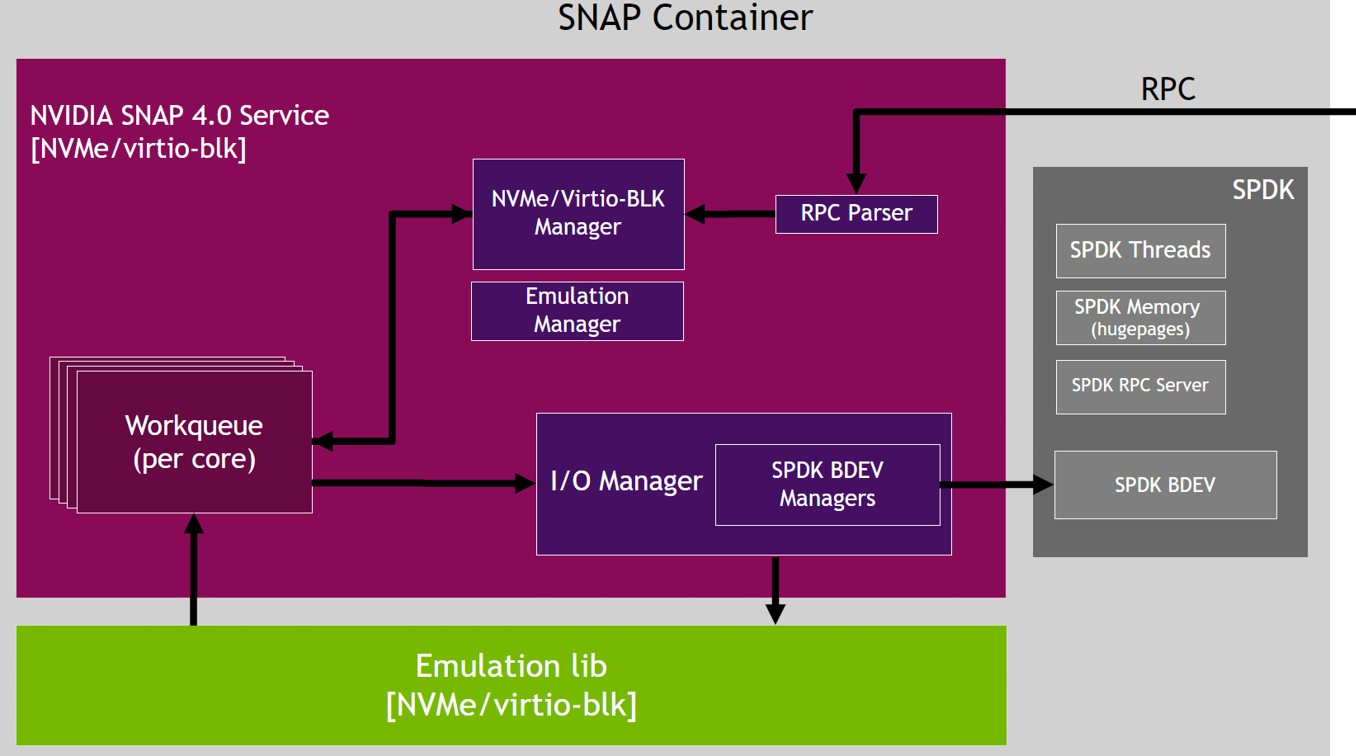
This includes the following managers:
-
Emulation device managers:
-
Emulation manager – manages the device emulations, function discovery, and function events
-
Hotplug manager – manages the device emulations hotplug and hot-unplug
-
Config manager – handles common configurations and RCPs (which are not protocol-specific)
-
Service infrastructure managers:
-
Memory manager – handles the SNAP mempool which is used to copy into the Arm memory when zero-copy between the host and the remote target is not used
-
Thread manager – handles the SPDK threads
-
Protocol specific control path managers:
-
NVMe manager – handles the NVMe subsystem, NVMe controller and Namespace functionalities
-
VBLK manager – handles the virtio-blk controller functionalities
-
IO manager:
-
Implements the IO path for regular and optimized flows (RDMA ZC and TCP XLIO ZC)
-
Handles the bdev creation and functionalities
SNAP Service Dependencies
SNAP service depends on the following libraries:
-
SPDK – depends on the bdev and the SPDK resources, such as SPDK threads, SPDK memory, and SPDK RPC service
-
XLIO (for NVMeTCP acceleration)
SNAP Service Flows
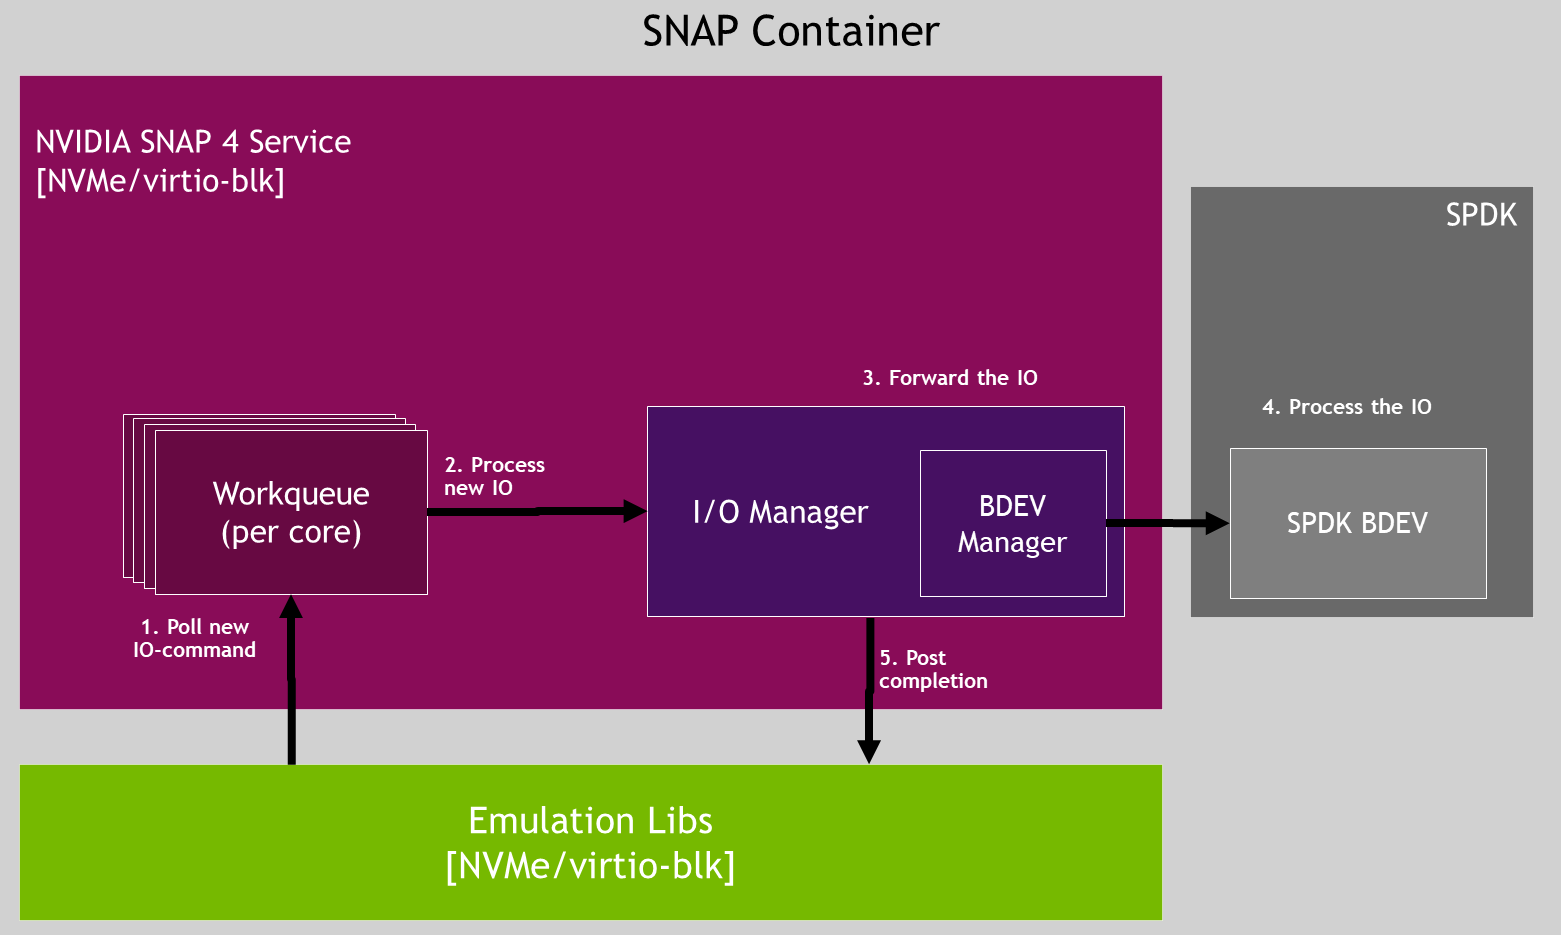
IO Flows
Example of RDMA zero-copy read/write IO flow:
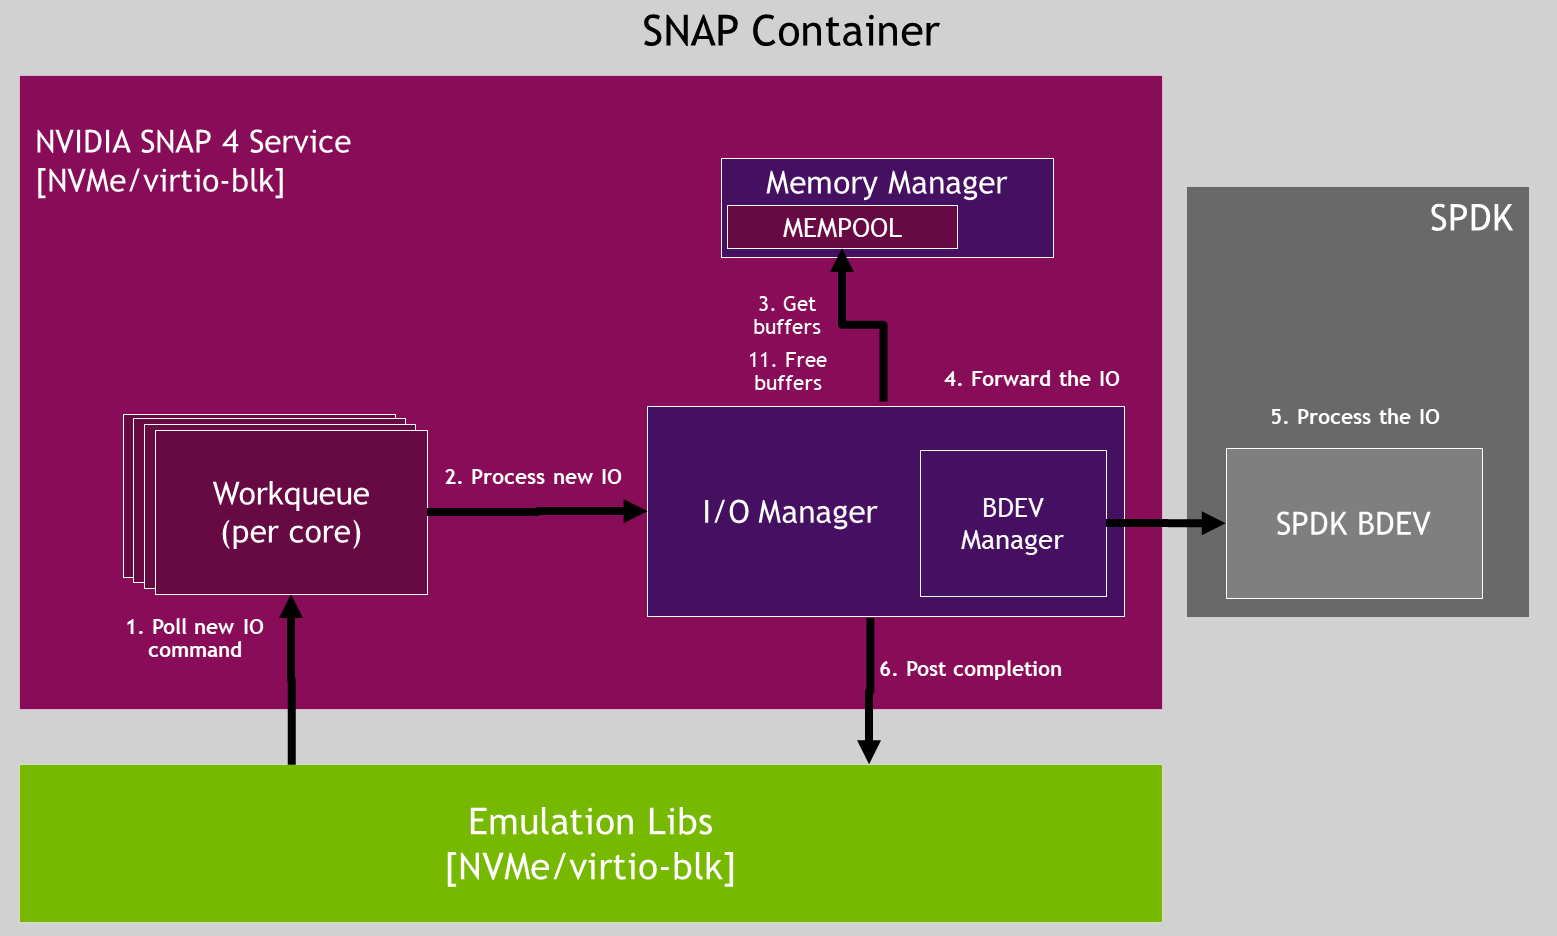
Example of RDMA non-zero-copy read IO flow:
Data Path Providers
SNAP facilitates user-configurable providers to assist in offloading data-path applications from the host. These include: Device emulation, IO-intensive operations, and DMA operations.
-
DPA provider – DPA (data path accelerator) is a cluster of multi-core and multi-execution-unit RISC-V processors embedded within the BlueField
-
DPU provider – Handling the data-path applications from the host using the BlueField CPU. This mode improves IO latency and reduces SNAP downtime during crash recovery.
DPA is the default provider in SNAP for NVMe and virtio-blk.
Only DPU mode is supported with virtio-blk. To set DPU mode, use the environment variable VIRTIO_EMU_PROVIDER=dpu to modify the the variable on the YAML. Refer to the "DOCA SNAP-4 Service Guide | id (2.9.2 LTS)DOCASNAP 4ServiceGuide SNAPEnvironmentVariables" page for more information.
SNAP Deployment
This section describes how to deploy SNAP as a container.
SNAP does not come pre-installed with the BFB.
Installing Full DOCA Image on DPU
To install NVIDIA® BlueField®-3 BFB:
[host] sudo bfb-install --rshim <rshimN> --bfb <image_path.bfb>
For more information, please refer to section "Installing Full DOCA Image on DPU" in the DOCA Installation Guide for Linux.
Firmware Installation
[dpu] sudo /opt/mellanox/mlnx-fw-updater/mlnx_fw_updater.pl --force-fw-update
For more information, please refer to section "Upgrading Firmware" in the DOCA Installation Guide for Linux.
Firmware Configuration
FW configuration may expose new emulated PCI functions, which can be later used by the host's OS. As such, user must make sure all exposed PCI functions (static/hotplug PFs, VFs) are backed by a supporting SNAP SW configuration, otherwise these functions will remain malfunctioning and host behavior will be undefined.
-
Clear the firmware config before implementing the required configuration:
[dpu] mst start [dpu] mlxconfig -d /dev/mst/mt41692_pciconf0 reset -
Review the firmware configuration:
[dpu] mlxconfig -d /dev/mst/mt41692_pciconf0 queryOutput example:
mlxconfig -d /dev/mst/mt41692_pciconf0 -e query | grep NVME
Configurations:                                      Default         Current         Next Boot
*        NVME_EMULATION_ENABLE                       False(0)        True(1)         True(1)
*        NVME_EMULATION_NUM_VF                       0               125             125
*        NVME_EMULATION_NUM_PF                       1               2               2
         NVME_EMULATION_VENDOR_ID                    5555            5555            5555
         NVME_EMULATION_DEVICE_ID                    24577           24577           24577
         NVME_EMULATION_CLASS_CODE                   67586           67586           67586
         NVME_EMULATION_REVISION_ID                  0               0               0
         NVME_EMULATION_SUBSYSTEM_VENDOR_ID          0               0               0
Where the output provides 5 columns:
-
Non-default configuration marker (*)
-
Firmware configuration name
-
Default firmware value
-
Current firmware value
-
Firmware value after reboot – shows a configuration update which is pending system reboot
-
-
To enable storage emulation options, the first DPU must be set to work in internal CPU model:
[dpu] mlxconfig -d /dev/mst/mt41692_pciconf0 s INTERNAL_CPU_MODEL=1 -
To enable the firmware config with virtio-blk emulation PF:
[dpu] mlxconfig -d /dev/mst/mt41692_pciconf0 s VIRTIO_BLK_EMULATION_ENABLE=1 VIRTIO_BLK_EMULATION_NUM_PF=1 -
To enable the firmware config with NVMe emulation PF:
[dpu] mlxconfig -d /dev/mst/mt41692_pciconf0 s NVME_EMULATION_ENABLE=1 NVME_EMULATION_NUM_PF=1
For a complete list of the SNAP firmware configuration options, refer to appendix "DOCA SNAP-4 Service Guide | id (2.9.2 LTS)DOCASNAP 4ServiceGuide DPUFirmwareConfiguration".
Power cycle is required to apply firmware configuration changes.
RDMA/RoCE Firmware Configuration
RoCE communication is blocked for BlueField OS's default interfaces (named ECPFs, typically mlx5_0 and mlx5_1). If RoCE traffic is required, additional network functions must be added, scalable functions (or SFs), which do support RoCE transport.
To enable RDMA/RoCE:
[dpu] mlxconfig -d /dev/mst/mt41692_pciconf0 s PER_PF_NUM_SF=1
[dpu] mlxconfig -d /dev/mst/mt41692_pciconf0 s PF_SF_BAR_SIZE=8 PF_TOTAL_SF=2
[dpu] mlxconfig -d /dev/mst/mt41692_pciconf0.1 s PF_SF_BAR_SIZE=8 PF_TOTAL_SF=2
This is not required when working over TCP or RDMA over InfiniBand.
SR-IOV Firmware Configuration
SNAP supports up to 512 total VFs on NVMe and up to 2000 total VFs on virtio-blk. The VFs may be spread between up to 4 virtio-blk PFs or 2 NVMe PFs.
The following examples are for reference. For complete details on parameter ranges, refer to appendix "DOCA SNAP-4 Service Guide | id (2.9.2 LTS)DOCASNAP 4ServiceGuide DPUFirmwareConfiguration".
-
Common example:
[dpu] mlxconfig -d /dev/mst/mt41692_pciconf0 s SRIOV_EN=1 PER_PF_NUM_SF=1 LINK_TYPE_P1=2 LINK_TYPE_P2=2 PF_TOTAL_SF=1 PF_SF_BAR_SIZE=8 TX_SCHEDULER_BURST=15When using 64KB pagesize OS,
PF_SF_BAR_SIZE=10(instead of 8) should be configured. -
Virtio-blk 250 VFs example (1 queue per VF):
[dpu] mlxconfig -d /dev/mst/mt41692_pciconf0 s VIRTIO_BLK_EMULATION_ENABLE=1 VIRTIO_BLK_EMULATION_NUM_VF=125 VIRTIO_BLK_EMULATION_NUM_PF=2 VIRTIO_BLK_EMULATION_NUM_MSIX=2 -
Virtio-blk 1000 VFs example (1 queue per VF):
[dpu] mlxconfig -d /dev/mst/mt41692_pciconf0 s VIRTIO_BLK_EMULATION_ENABLE=1 VIRTIO_BLK_EMULATION_NUM_VF=250 VIRTIO_BLK_EMULATION_NUM_PF=4 VIRTIO_BLK_EMULATION_NUM_MSIX=2 VIRTIO_NET_EMULATION_ENABLE=0 NUM_OF_VFS=0 PCI_SWITCH_EMULATION_ENABLE=0 -
NVMe 250 VFs example (1 IO-queue per VF):
[dpu] mlxconfig -d /dev/mst/mt41692_pciconf0 s NVME_EMULATION_ENABLE=1 NVME_EMULATION_NUM_VF=125 NVME_EMULATION_NUM_PF=2 NVME_EMULATION_NUM_MSIX=2
Hot-plug Firmware Configuration
Once enabling PCIe switch emulation, BlueField can support up to 31 hotplug NVMe/Virtio-blk functions. "PCI_SWITCH_EMULATION_NUM_PORT-1" hot-plugged PCIe functions. These slots are shared among all DPU users and applications and may hold hot-plugged devices of type NVMe, virtio-blk, virtio-fs, or others (e.g., virtio-net).
To enable PCIe switch emulation and determine the number of hot-plugged ports to be used:
[dpu] mlxconfig -d /dev/mst/mt41692_pciconf0 s PCI_SWITCH_EMULATION_ENABLE=1 PCI_SWITCH_EMULATION_NUM_PORT=32
PCI_SWITCH_EMULATION_NUM_PORT equals 1 + the number of hot-plugged PCIe functions.
For additional information regarding hot plugging a device, refer to section "DOCA SNAP-4 Service Guide | id (2.9.2 LTS)DOCASNAP 4ServiceGuide HotpluggedPCIeFunctionsManagement".
Hotplug is not guaranteed to work on AMD machines.
Enabling PCI_SWITCH_EMULATION_ENABLE could potentially impact SR-IOV capabilities on Intel and AMD machines.
Currently, hotplug PFs do not support SR-IOV.
UEFI Firmware Configuration
To use the storage emulation as a boot device, it is recommended to use the DPU's embedded UEFI expansion ROM drivers to be used by the UEFI instead of the original vendor's BIOS ones.
To enable UEFI drivers:
[dpu] mlxconfig -d /dev/mst/mt41692_pciconf0 s EXP_ROM_VIRTIO_BLK_UEFI_x86_ENABLE=1 EXP_ROM_NVME_UEFI_x86_ENABLE=1
DPU Configurations
Modifying SF Trust Level to Enable Encryption
To allow the mlx5_2 and mlx5_3 SFs to support encryption, it is necessary to designate them as trusted:
-
Configure the trust level by editing
/etc/mellanox/mlnx-sf.conf, adding the command/usr/bin/mlxreg:/usr/bin/mlxreg -d 03:00.0 –-reg_name VHCA_TRUST_LEVEL –-yes –-indexes "vhca_id=0x0,all_vhca=0x1" –-set "trust_level=0x1" /usr/bin/mlxreg -d 03:00.1 --reg_name VHCA_TRUST_LEVEL --yes --indexes "vhca_id=0x0,all_vhca=0x1" --set "trust_level=0x1" /sbin/mlnx-sf –action create -–device 0000:03:00.0 -–sfnum 0 --hwaddr 02:11:3c:13:ad:82 /sbin/mlnx-sf –action create -–device 0000:03:00.1 -–sfnum 0 --hwaddr 02:76:78:b9:6f:52 -
Reboot the DPU to apply changes.
Setting Device IP and MTU
To configure the MTU, restrict the external host port ownership:
[dpu] # mlxprivhost -d /dev/mst/mt41692_pciconf0 r --disable_port_owner
List the DPU device’s functions and IP addresses:
[dpu] # ip -br a
Set the IP on the SF function of the relevant port and the MTU:
[dpu] # ip addr add 1.1.1.1/24 dev enp3s0f0s0
[dpu] # ip addr add 1.1.1.2/24 dev enp3s0f1s0
[dpu] # ip link set dev enp3s0f0s0 up
[dpu] # ip link set dev enp3s0f1s0 up
[dpu] # sudo ip link set p0 mtu 9000
[dpu] # sudo ip link set p1 mtu 9000
[dpu] # sudo ip link set enp3s0f0s0 mtu 9000
[dpu] # sudo ip link set enp3s0f1s0 mtu 9000
[dpu] # ovs-vsctl set int en3f0pf0sf0 mtu_request=9000
[dpu] # ovs-vsctl set int en3f1pf1sf0 mtu_request=9000
After reboot, IP and MTU configurations of devices will be lost. To configure persistent network interfaces, refer to appendix "DOCA SNAP-4 Service Guide | id (2.9.2 LTS)DOCASNAP 4ServiceGuide ConfigurePersistentNetworkInterfaces".
SNAP NVMe/TCP XLIO does not support dynamically changing IP during deployment.
System Configurations
Configure the system's network buffers:
-
Append the following line to the end of the
/etc/sysctl.conffile:net.core.rmem_max = 16777216 net.ipv4.tcp_rmem = 4096 16777216 16777216 net.core.wmem_max = 16777216 -
Run the following:
[dpu] sysctl --system
DPA Core Mask
The data path accelerator (DPA) is a cluster of 16 cores with 16 execution units (EUs) per core.
Only EUs 0-170 are available for SNAP.
SNAP supports reservation of DPA EUs for NVMe or virtio-blk controllers. By default, all available EUs, 0-170, are shared between NVMe, virtio-blk, and other DPA applications on the system (e.g., virtio-net).
To assign specific set of EUs, set the following environment variable:
-
For NVMe:
dpa_nvme_core_mask=0x<EU_mask> -
For virtio-blk:
dpa_virtq_split_core_mask=0x<EU_mask>
The core mask must contain valid hexadecimal digits (it is parsed right to left). For example, dpa_virtq_split_core_mask=0xff00 sets 8 EUs (i.e., EUs 8-16).
There is a hardware limit of 128 queues (threads) per DPA EU.
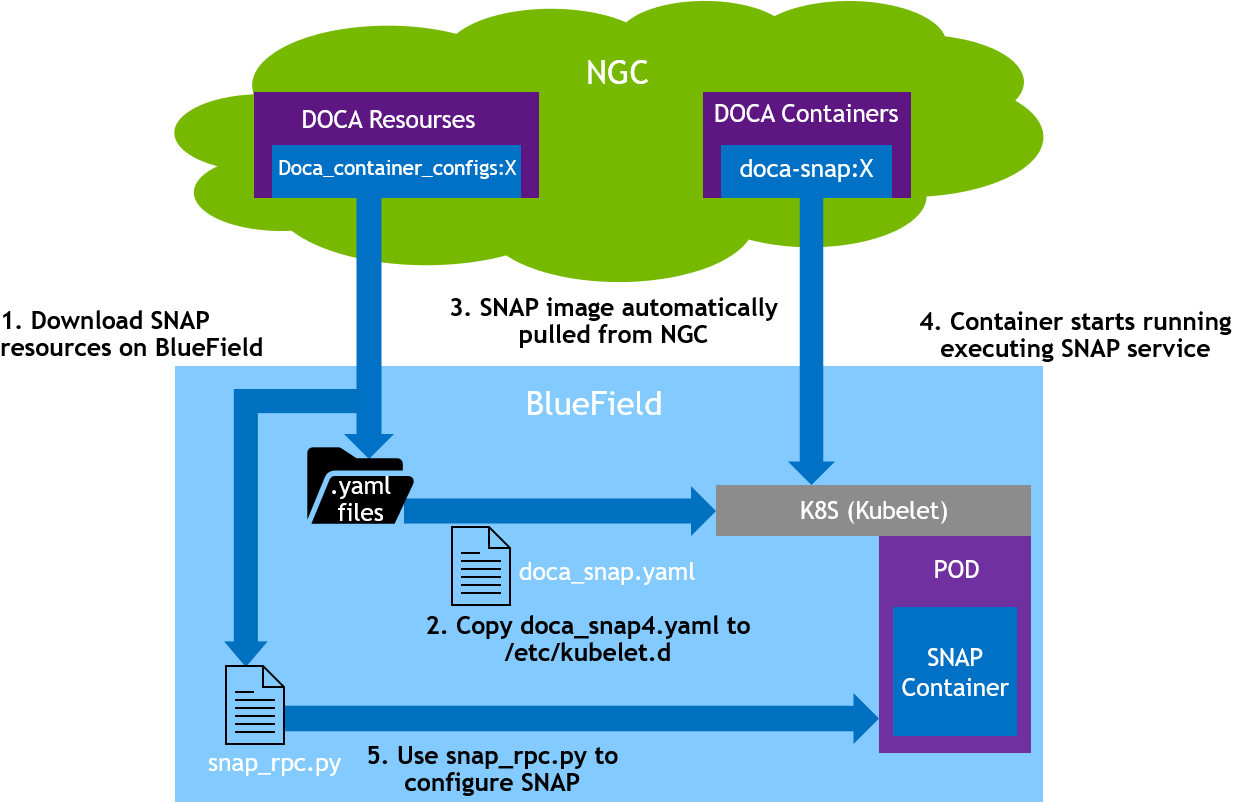
SNAP Container Deployment
SNAP container is available on the DOCA SNAP NVIDIA NGC catalog page.
SNAP container deployment on top of the BlueField DPU requires the following sequence:
-
Setup preparation and SNAP resource download for container deployment. See section "DOCA SNAP-4 Service Guide | id (2.9.2 LTS)DOCASNAP 4ServiceGuide PreparationSteps" for details.
-
Adjust the
doca_snap.yamlfor advanced configuration if needed according to section "DOCA SNAP-4 Service Guide | id (2.9.2 LTS)DOCASNAP 4ServiceGuide AdjustingYAMLConfiguration". -
Deploy the container. The image is automatically pulled from NGC. See section "DOCA SNAP-4 Service Guide | id (2.9.2 LTS)DOCASNAP 4ServiceGuide SpawningSNAPContainer" for details.
The following is an example of the SNAP container setup.
Preparation Steps
Step 1: Allocate Hugepages
Generic
Allocate 4GiB hugepages for the SNAP container according to the DPU OS's Hugepagesize value:
-
Query the
Hugepagesizevalue:[dpu] grep Hugepagesize /proc/meminfoIn Ubuntu, the value should be 2048KB. In CentOS 8.x, the value should be 524288KB.
-
Append the following line to the end of the
/etc/sysctl.conffile:-
For Ubuntu or CentOS 7.x setups (i.e.,
Hugepagesize= 2048 kB):vm.nr_hugepages = 2048
-
For CentOS 8.x setups (i.e.,
Hugepagesize= 524288 kB):vm.nr_hugepages = 8
-
-
Run the following:
[dpu] sysctl --system
If live upgrade is utilized in this deployment, it is necessary to allocate twice the amount of resources listed above for the upgraded container.
If other applications are running concurrently within the setup and are consuming hugepages, make sure to allocate additional hugepages beyond the amount described in this section for those applications.
When deploying SNAP with a high scale of connections (i.e., disks 500 or more), the default allocation of hugepages (4GiB) becomes insufficient. This shortage of hugepages can be identified through error messages in the SNAP and SPDK layers. These error messages typically indicate failures in creating or modifying QPs or other objects.
Step 2: Create nvda_snap Folder
The folder /etc/nvda_snap is used by the container for automatic configuration after deployment.
Downloading YAML Configuration
The .yaml file configuration for the SNAP container is doca_snap.yaml. The download command of the .yaml file can be found on the DOCA SNAP NGC page.
Internet connectivity is necessary for downloading SNAP resources. To deploy the container on DPUs without Internet connectivity, refer to appendix "DOCA SNAP-4 Service Guide | id (2.9.2 LTS)DOCASNAP 4ServiceGuide DeployingContaineronSetupsWithoutInternetConnectivity".
Adjusting YAML Configuration
The .yaml file can easily be edited for advanced configuration.
-
The SNAP
.yamlfile is configured by default to support Ubuntu setups (i.e.,Hugepagesize= 2048 kB) by using hugepages-2Mi.To support other setups, edit the hugepages section according to the DPU OS's relevant
Hugepagesizevalue. For example, to support CentOS 8.x configureHugepagesizeto 512MB:limits: hugepages-512Mi: "<number-of-hugepages>Gi"When deploying SNAP with a large number of controllers (500 or more), the default allocation of hugepages (2GB) becomes insufficient. This shortage of hugepages can be identified through error messages, typically indicate failures in creating or modifying QPs or other objects. In these cases more hugepages needed.
-
The following example edits the
.yamlfile to request 16 CPU cores for the SNAP container and 4Gi memory, 2Gi of them are hugepages:resources: requests: memory: "2Gi" cpu: "8" limits: hugepages-2Mi: "2Gi" memory: "4Gi" cpu: "16" env: - name: APP_ARGS value: "-m 0xffff"If all BlueField-3 cores are requested, the user must verify no other containers are in conflict over the CPU resources.
-
To automatically configure SNAP container upon deployment:
-
Add
spdk_rpc_init.conffile under/etc/nvda_snap/. File example:bdev_malloc_create 64 512 -
Add
snap_rpc_init.conffile under/etc/nvda_snap/.Virtio-blk file example:
virtio_blk_controller_create --pf_id 0 --bdev Malloc0NVMe file example:
nvme_subsystem_create --nqn nqn.2022-10.io.nvda.nvme:0 nvme_namespace_create -b Malloc0 -n 1 --nqn nqn.2022-10.io.nvda.nvme:0 --uuid 16dab065-ddc9-8a7a-108e-9a489254a839 nvme_controller_create --nqn nqn.2022-10.io.nvda.nvme:0 --ctrl NVMeCtrl1 --pf_id 0 --suspended nvme_controller_attach_ns -c NVMeCtrl1 -n 1 nvme_controller_resume -c NVMeCtrl1 -
Edit the
.yamlfile accordingly (uncomment):env: - name: SPDK_RPC_INIT_CONF value: "/etc/nvda_snap/spdk_rpc_init.conf" - name: SNAP_RPC_INIT_CONF value: "/etc/nvda_snap/snap_rpc_init.conf"It is user responsibility to make sure SNAP configuration matches firmware configuration. That is, an emulated controller must be opened on all existing (static/hotplug) emulated PCIe functions (either through automatic or manual configuration). A PCIe function without a supporting controller is considered malfunctioned, and host behavior with it is anomalous.
-
Spawning SNAP Container
Run the Kubernetes tool:
[dpu] systemctl restart containerd
[dpu] systemctl restart kubelet
[dpu] systemctl enable kubelet
[dpu] systemctl enable containerd
Copy the updated doca_snap.yaml file to the /etc/kubelet.d directory.
Kubelet automatically pulls the container image from NGC described in the YAML file and spawns a pod executing the container.
cp doca_snap.yaml /etc/kubelet.d/
The SNAP service starts initialization immediately, which may take a few seconds. To verify SNAP is running:
-
Look for the message "SNAP Service running successfully" in the log
-
Send
spdk_rpc.py spdk_get_versionto confirm whether SNAP is operational or still initializing
Debug and Log
View currently active pods, and their IDs (it might take up to 20 seconds for the pod to start):
crictl pods
Example output:
POD ID              CREATED               STATE         NAME
0379ac2c4f34c       About a minute ago    Ready         snap
View currently active containers, and their IDs:
crictl ps
View existing containers and their ID:
crictl ps -a
Examine the logs of a given container (SNAP logs):
crictl logs <container_id>
Examine the kubelet logs if something does not work as expected:
journalctl -u kubelet
The container log file is saved automatically by Kubelet under /var/log/containers.
Refer to section "DOCA SNAP-4 Service Guide | id (2.9.2 LTS)DOCASNAP 4ServiceGuide RPCLogHistory" for more logging information.
Stop, Start, Restart SNAP Container
SNAP binaries are deployed within a Docker container as SNAP service, which is managed as a supervisorctl service. Supervisorctl provides a layer of control and configuration for various deployment options.
-
In the event of a SNAP crash or restart, supervisorctl detects the action and waits for the exited process to release its resources. It then deploys a new SNAP process within the same container, which initiates a recovery flow to replace the terminated process.
-
In the event of a container crash or restart, kubeletclt detects the action and waits for the exited container to release its resources. It then deploys a new container with a new SNAP process, which initiates a recovery flow to replace the terminated process.
After containers crash or exit, the kubelet restarts them with an exponential back-off delay (10s, 20s, 40s, etc.) which is capped at five minutes. Once a container has run for 10 minutes without an issue, the kubelet resets the restart back-off timer for that container. Restarting the SNAP service without restarting the container helps avoid the occurrence of back-off delays.
Different SNAP Termination Options
Container Termination
-
To kill the container, remove the
.yamlfile form/etc/kubelet.d/. To start the container,cpthe.yamlfile back to the same path:cp doca_snap.yaml /etc/kubelet.d/ -
To restart the container (with sig-term) using
crictl, use the-t(timeout) option:crictl stop -t 10 <container-id>
SNAP Process Termination
-
To restart the SNAP service without restarting the container, kill the SNAP service process on the DPU. Different signals can be used for different termination options. For example:
pkill -9 -f snap
SNAP service termination may take time as it releases all allocated resources. The duration depends on the scale of the use case and any other applications sharing resources with SNAP.
SNAP Source Package Deployment
System Preparation
Allocate 4GiB hugepages for the SNAP container according to the DPU OS's Hugepagesize value:
-
Query the
Hugepagesizevalue:[dpu] grep Hugepagesize /proc/meminfo
In Ubuntu, the value should be 2048KB. In CentOS 8.x, the value should be 524288KB.
-
Append the following line to the end of the
/etc/sysctl.conffile:-
For Ubuntu or CentOS 7.x setups (i.e.,
Hugepagesize= 2048 kB):vm.nr_hugepages = 2048
-
For CentOS 8.x setups (i.e.,
Hugepagesize= 524288 kB):vm.nr_hugepages = 8
-
-
Run the following:
[dpu] sysctl --system
If live upgrade is utilized in this deployment, it is necessary to allocate twice the amount of resources listed above for the upgraded container.
If other applications are running concurrently within the setup and are consuming hugepages, make sure to allocate additional hugepages beyond the amount described in this section for those applications.
When deploying SNAP with a high scale of connections (i.e., disks 500 or more), the default allocation of hugepages (4GiB) becomes insufficient. This shortage of hugepages can be identified through error messages in the SNAP and SPDK layers. These error messages typically indicate failures in creating or modifying QPs or other objects.
Installing SNAP Source Package
Install the package:
-
For Ubuntu, run:
dpkg -i snap-sources_<version>_arm64.* -
For CentOS, run:
rpm -i snap-sources_<version>_arm64.*
Build, Compile, and Install Sources
To build SNAP with a custom SPDK, see section "DOCA SNAP-4 Service Guide | id (2.9.2 LTS)DOCASNAP 4ServiceGuide ReplacetheBFBSPDK".
-
Move to the sources folder. Run:
cd /opt/nvidia/nvda_snap/src/ -
Build the sources. Run:
meson /tmp/build -
Compile the sources. Run:
meson compile -C /tmp/build -
Install the sources. Run:
meson install -C /tmp/build
Configure SNAP Environment Variables
To config the environment variables of SNAP, run:
source /opt/nvidia/nvda_snap/src/scripts/set_environment_variables.sh
Run SNAP Service
/opt/nvidia/nvda_snap/bin/snap_service
Replace the BFB SPDK (Optional)
Start with installing SPDK.
For legacy SPDK versions (e.g., SPDK 19.04) see appendix "DOCA SNAP-4 Service Guide | id (2.9.2 LTS)DOCASNAP 4ServiceGuide InstallLegacySPDK".
To build SNAP with a custom SPDK, instead of following the basic build steps, perform the following:
-
Move to the sources folder. Run:
cd /opt/nvidia/nvda_snap/src/ -
Build the sources with spdk-compat enabled and provide the path to the custom SPDK. Run:
meson setup /tmp/build -Denable-spdk-compat=true -Dsnap_spdk_prefix=</path/to/custom/spdk> -
Compile the sources. Run:
meson compile -C /tmp/build -
Install the sources. Run:
meson install -C /tmp/build -
Configure SNAP env variables and run SNAP service as explained in section "DOCA SNAP-4 Service Guide | id (2.9.2 LTS)DOCASNAP 4ServiceGuide ConfigureSNAPEnvironmentVariables" and "DOCA SNAP-4 Service Guide | id (2.9.2 LTS)DOCASNAP 4ServiceGuide RunSNAPService".
Build with Debug Prints Enabled (Optional)
Instead of the basic build steps, perform the following:
-
Move to the sources folder. Run:
cd /opt/nvidia/nvda_snap/src/ -
Build the sources with
buildtype=debug. Run:meson --buildtype=debug /tmp/build -
Compile the sources. Run:
meson compile -C /tmp/build -
Install the sources. Run:
meson install -C /tmp/build -
Configure SNAP env variables and run SNAP service as explained in section "DOCA SNAP-4 Service Guide | id (2.9.2 LTS)DOCASNAP 4ServiceGuide ConfigureSNAPEnvironmentVariables" and "DOCA SNAP-4 Service Guide | id (2.9.2 LTS)DOCASNAP 4ServiceGuide RunSNAPService".
Automate SNAP Configuration (Optional)
The script run_snap.sh automates SNAP deployment. Users must modify the following files to align with their setup. If different directories are utilized by the user, edits must be made to run_snap.sh accordingly:
-
Edit SNAP env variables in:
/opt/nvidia/nvda_snap/bin/set_environment_variables.sh -
Edit SPDK initialization RPCs calls:
/opt/nvidia/nvda_snap/bin/spdk_rpc_init.conf -
Edit SNAP initialization RPCs calls:
/opt/nvidia/nvda_snap/bin/snap_rpc_init.conf
Run the script:
/opt/nvidia/nvda_snap/bin/run_snap.sh
SNAP Environment Variables
Supported Environment Variables
|
Name |
Description |
Default |
|---|---|---|
|
|
Enable/disable RDMA zero-copy transport type. For more info refer to section "Zero Copy (SNAP-direct)". |
1 (enabled) |
|
|
It is recommended that namespaces discovered from the same remote target are not shared by different PCIe emulations. If it is desirable to do that, users should set the variable By doing so, the user must ensure that SPDK bdev always completes IOs (either with success or failure) in a reasonable time. Otherwise, the system may stall until all IOs return. |
1 (enabled) |
|
|
Enable/disable virtio-blk recovery using shared memory files. This allows recovering without using |
1 (enabled) |
|
|
The name of the RDMA device configured to have emulation management capabilities. If the variable is not defined (default), SNAP searches through all available devices to find the emulation manager (which may slow down initialization process). Unless configured otherwise, SNAP selects the first ECPF (i.e., "mlx5_0") as the emulation manager. |
NULL (not configured) |
YAML Configuration
To change the SNAP environment variables add the following to the doca_snap.yaml and continue from section "DOCA SNAP-4 Service Guide | id (2.9.2 LTS)DOCASNAP 4ServiceGuide AdjustingYAMLConfiguration".
env:
      - name: VARIABLE_NAME
        value: "VALUE"
For example:
env:
      - name: SNAP_RDMA_ZCOPY_ENABLE
        value: "1"
Source Package Configuration
To change the SNAP environment variables:
-
Add/modify the configuration under
scripts/set_environment_variables.sh. -
Rerun:
source scripts/set_environment_variables.sh -
Rerun SNAP.
SNAP RPC Commands
Remote procedure call (RPC) protocol is used to control the SNAP service. NVMe/virtio-blk SNAP, like other standard SPDK applications, supports JSON-based RPC protocol commands to control any resources and create, delete, query, or modify commands easily from CLI.
SNAP supports all standard SPDK RPC commands in addition to an extended SNAP-specific command set. SPDK standard commands are executed by the spdk_rpc.py tool while the SNAP-specific command set extension is executed by the snap_rpc.py tool.
Full spdk_rpc.py command set documentation can be found in the SPDK official documentation site.
Full snap_rpc.py extended commands are detailed further down in this chapter.
Using JSON-based RPC Protocol
The JSON-based RPC protocol can be used via the snap_rpc.py script that is inside the SNAP container and crictl tool.
The SNAP container is CRI-compatible.
-
To query the active container ID:
crictl ps -s running -q --name snap -
To post RPCs to the container using
crictl:crictl exec <container-id> snap_rpc.py <RPC-method>For example:
crictl exec 0379ac2c4f34c snap_rpc.py emulation_function_listIn addition, an alias can be used:
alias snap_rpc.py="crictl ps -s running -q --name snap | xargs -I{} crictl exec -i {} snap_rpc.py " alias spdk_rpc.py="crictl ps -s running -q --name snap | xargs -I{} crictl exec -i {} spdk_rpc.py " -
To open a bash shell to the container that can be used to post RPCs:
crictl exec -it <container-id> bash
Log Management
snap_log_level_set
SNAP allows dynamically changing the log level of the logger backend using the snap_log_level_set. Any log under the requested level is shown.
|
Parameter |
Mandatory? |
Type |
Description |
|---|---|---|---|
|
|
Yes |
Number |
Log level
|
PCIe Function Management
Emulated PCIe functions are managed through IB devices called emulation managers. Emulation managers are ordinary IB devices with special privileges to control PCIe communication and device emulations towards the host OS.
SNAP queries an emulation manager that supports the requested set of capabilities.
The emulation manager holds a list of the emulated PCIe functions it controls. PCIe functions may be approached later in 3 ways:
-
vuid– recommended as it is guaranteed to remain constant (see appendix "DOCA SNAP-4 Service Guide | id (2.9.2 LTS)DOCASNAP 4ServiceGuide PCIeBDFtoVUIDTranslation" for details) -
vhca_id -
Function index (i.e.,
pf_idorvf_id)
emulation_function_list
emulation_function_list lists all existing functions.
The following is an example response for the emulation_function_list command:
[
  {
    "hotplugged": true,
    "hotplug state": "POWER_ON",
    "emulation_type": "VBLK",
    "pf_index": 0,
    "pci_bdf": "87:00.0",
    "vhca_id": 5,
    "vuid": "MT2306XZ009TVBLKS1D0F0",
    "ctrl_id": "VblkCtrl1",
    "num_vfs": 0,
    "vfs": []
  }
]
Use -a or --all, to show all inactive VF functions.
SNAP supports 2 types of PCIe functions:
-
Static functions – PCIe functions configured at the firmware configuration stage (physical and virtual). Refer to appendix "DOCA SNAP-4 Service Guide | id (2.9.2 LTS)DOCASNAP 4ServiceGuide DPUFirmwareConfiguration" for additional information.
-
Hot-pluggable functions – PCIe functions configured dynamically at runtime. Users can add detachable functions. Refer to section "Hot-pluggable PCIe Functions Management" for additional information.
Hot-pluggable PCIe Functions Management
Hotplug PCIe functions are configured dynamically at runtime using RPCs. Once a new PCIe function is hot plugged, it appears in the host’s PCIe device list and remains persistent until explicitly unplugged or the system undergoes a cold reboot. Importantly, this persistence continues even if the SNAP process terminates. Therefore, it is advised not to include hotplug/hotunplug actions in automatic initialization scripts (e.g., snap_rpc_init.conf).
Hotplug PFs do not support SR-IOV.
Two-step PCIe Hotplug
The following RPC commands are used to dynamically add or remove PCIe PFs (i.e., hot-plugged functions) in the DPU application.
Once a PCIe function is created (via virtio_blk_function_create), it is accessible and manageable within the DPU application but is not immediately visible to the host OS/kernel. This differs from the legacy API, where creation and host exposure occurs simultaneously. Instead, exposing or hiding PCIe functions to the host OS is managed by separate RPC commands (virtio_blk_controller_hotplug and virtio_blk_controller_hotunplug). After hot unplugging, the function can be safely removed from the DPU (using virtio_blk_function_destroy).
A key advantage of this approach is the ability to pre-configure a controller on the function, enabling it to serve the host driver as soon as it is exposed. In fact, users must create a controller to use the virtio_blk_controller_hotplug API, which is required to make the function visible to the host OS.
|
Command |
Description |
|---|---|
| DOCA SNAP-4 Service Guide | id (2.9.2 LTS)DOCASNAP 4ServiceGuide virtio_blk_function_create |
Create a new virtio-blk emulation function |
| DOCA SNAP-4 Service Guide | id (2.9.2 LTS)DOCASNAP 4ServiceGuide virtio_blk_controller_hotplug |
Exposes (hot plugs) the emulation function to the host OS |
| DOCA SNAP-4 Service Guide | id (2.9.2 LTS)DOCASNAP 4ServiceGuide virtio_blk_controller_hotunplug |
Removes (hot unplugs) the emulation function from the host OS |
| DOCA SNAP-4 Service Guide | id (2.9.2 LTS)DOCASNAP 4ServiceGuide virtio_blk_function_destroy |
Delete an existing virtio-blk emulation function |
virtio_blk_function_create
Create a new virtio-blk emulation function.
Command parameters:
|
Parameter |
Mandatory? |
Type |
Description |
|---|---|---|---|
|
|
No |
String |
Emulation manager to manage hotplug function (unused) |
virtio_blk_function_destroy
Delete an existing virtio-blk emulation function.
Command parameters:
|
Parameter |
Mandatory? |
Type |
Description |
|---|---|---|---|
|
|
Yes |
String |
Identifier of the hotplugged function to delete |
virtio_blk_controller_hotplug
Exposes (hot plugs) the emulation function to the host OS.
Command parameters:
|
Parameter |
Mandatory? |
Type |
Description |
|---|---|---|---|
|
|
Yes |
String |
Controller to expose to the host OS |
|
|
No |
Bool |
Block until host discovers and acknowledges the new command |
|
|
No |
int |
Time (in msecs) to wait until giving up. Only valid when |
virtio_blk_controller_hotunplug
Removes (hot unplugs) the emulation function from the host OS.
Command parameters:
|
Parameter |
Mandatory? |
Type |
Description |
|---|---|---|---|
|
|
Yes |
String |
Controller to expose to the host OS |
|
|
No |
Bool |
Block until host identifies and removes the function |
The non-legacy API is not supported yet for NVMe protocol.
When not using wait_for_done approach, it is the user's responsibility to verify host identifies the new hotplugged function. This can be done by querying the pci_hotplug_state parameter in emulation_function_list RPC output.
Two-step PCIe Hotplug/Unplug Example
# Bringup
spdk_rpc.py bdev_nvme_attach_controller -b nvme0 -t rdma -a 1.1.1.1 -f ipv4 -s 4420 -n nqn.2022-10.io.nvda.nvme:swx-storage
snap_rpc.py virtio_blk_function_create
snap_rpc.py virtio_blk_controller_create --vuid MT2114X12200VBLKS1D0F0 --bdev nvme0n1
snap_rpc.py virtio_blk_controller_hotplug -c VblkCtrl1

# Cleanup
snap_rpc.py virtio_blk_controller_hotunplug -c VblkCtrl1
snap_rpc.py virtio_blk_controller_destroy -c VblkCtrl1
snap_rpc.py virtio_blk_function_destroy --vuid MT2114X12200VBLKS1D0F0
spdk_rpc.py bdev_nvme_detach_controller nvme0
(Deprecated) Legacy API
Hotplug Legacy Commands
The following commands hot plug a new PCIe function to the system.
After a new PCIe function is plugged, it is immediately shown on the host's PCIe devices list until it is either explicitly unplugged or the system goes through a cold reboot. Therefore, it is user responsibility to open a controller instance to manage the new function immediately after a function's creation. Keeping a hotplugged function without a matching controller to manage may cause anomalous behavior on the host OS driver.
|
Command |
Description |
|---|---|
| DOCA SNAP-4 Service Guide | id (2.9.2 LTS)DOCASNAP 4ServiceGuide virtio_blk_emulation_device_attach |
Attach virtio-blk emulation function |
| DOCA SNAP-4 Service Guide | id (2.9.2 LTS)DOCASNAP 4ServiceGuide nvme_emulation_device_attach |
Attach NVMe emulation function |
virtio_blk_emulation_device_attach
Attach virtio-blk emulation function.
Command parameters:
|
Parameter |
Mandatory? |
Type |
Description |
|---|---|---|---|
|
|
No |
Number |
Device ID |
|
|
No |
Number |
Vendor ID |
|
|
No |
Number |
Subsystem device ID |
|
|
No |
Number |
Subsystem vendor ID |
|
|
No |
Number |
Revision ID |
|
|
No |
Number |
Class code |
|
|
No |
Number |
MSI-X table size |
|
|
No |
Number |
Maximal number of VFs allowed |
|
|
No |
String |
Block device to use as backend |
|
|
No |
Number |
Number of IO queues (default 1, range 1-62). The actual number of queues is limited by the number of queues supported by the hardware. It is recommended that the number of MSIX be greater than the number of IO queues (1 is used for the config interrupt). |
|
|
No |
Number |
Queue depth (default 256, range 1-256) It is only possible to modify the queue depth if the driver is not loaded. |
|
|
No |
Boolean |
Transitional device support. See section " Virtio-blk Transitional Device Support " for more details. |
|
|
No |
Boolean |
N/A – not supported |
nvme_emulation_device_attach
Attach NVMe emulation function.
Command parameters:
|
Parameter |
Mandatory? |
Type |
Description |
|---|---|---|---|
|
|
No |
Number |
Device ID |
|
|
No |
Number |
Vendor ID |
|
|
No |
Number |
Subsystem device ID |
|
|
No |
Number |
Subsystem vendor ID |
|
|
No |
Number |
Revision ID |
|
|
No |
Number |
Class code |
|
|
No |
Number |
MSI-X table size |
|
|
No |
Number |
Maximal number of VFs allowed |
|
|
No |
Number |
Number of IO queues (default 31, range 1-31). The actual number of queues is limited by the number of queues supported by the hardware. It is recommended that the number of MSIX be greater than the number of IO queues (1 is used for the config interrupt). |
|
|
No |
String |
Specification version (currently only |
Hot Unplug Legacy Commands
The following commands hot-unplug a PCIe function from the system in 2 steps:
|
|
Command |
Description |
|---|---|---|
|
1 |
DOCA SNAP-4 Service Guide | id (2.9.2 LTS)DOCASNAP 4ServiceGuide emulation_device_detach_prepare |
Prepare emulation function to be detached |
|
2 |
DOCA SNAP-4 Service Guide | id (2.9.2 LTS)DOCASNAP 4ServiceGuide emulation_device_detach |
Detach emulation function |
emulation_device_detach_prepare
This is the first step for detaching an emulation device. It prepares the system to detach a hot plugged emulation function. In case of success, the host's hotplug device state changes and you may safely proceed to the emulation_device_detach command.
The controller attached to the emulation function must be created and active when executing this command.
Command parameters:
|
Parameter |
Mandatory? |
Type |
Description |
|---|---|---|---|
|
|
No |
Number |
vHCA ID of PCIe function |
|
|
No |
String |
PCIe device VUID |
|
|
No |
String |
Controller ID |
At least one identifier must be provided to describe the PCIe function to be detached.
emulation_device_detach
This is the second step which completes detaching of the hotplugged emulation function. If the detach preparation times out, you may perform a surprise unplug using --force with the command.
The driver must be unprobed, otherwise errors may occur.
Command parameters:
|
Parameter |
Mandatory? |
Type |
Description |
|---|---|---|---|
|
|
No |
Number |
vHCA ID of PCIe function |
|
|
no |
String |
PCIe device VUID |
|
|
No |
Boolean |
Detach with failed preparation |
At least one identifier must be provided to describe the PCIe function to be detached.
Virtio-blk Hot Plug/Unplug Example
// Bringup
spdk_rpc.py bdev_nvme_attach_controller -b nvme0 -t rdma -a 1.1.1.1 -f ipv4 -s 4420 -n nqn.2022-10.io.nvda.nvme:swx-storage
snap_rpc.py virtio_blk_emulation_device_attach
snap_rpc.py virtio_blk_controller_create --vuid MT2114X12200VBLKS1D0F0 --bdev nvme0n1

// Cleanup
snap_rpc.py emulation_device_detach_prepare --vuid MT2114X12200VBLKS1D0F0
snap_rpc.py virtio_blk_controller_destroy -c VblkCtrl1
snap_rpc.py emulation_device_detach --vuid MT2114X12200VBLKS1D0F0
spdk_rpc.py bdev_nvme_detach_controller nvme0
(Deprecated) SPDK Bdev Management
The following RPCs are deprecated and are no longer supported:
-
spdk_bdev_create -
spdk_bdev_destroy -
bdev_list
These RPCs were optional. If not performed, SNAP would automatically generate SNAP block devices (bdevs).
Virtio-blk Emulation Management
Virtio-blk emulation is a storage protocol belonging to the virtio family of devices. These devices are found in virtual environments yet by design look like physical devices to the user within the virtual machine.
Each virtio-blk device (e.g., virtio-blk PCIe entry) exposed to the host, whether it is PF or VF, must be backed by a virtio-blk controller.
Virtio-blk limitations:
-
Probing a virtio-blk driver on the host without an already functioning virtio-blk controller may cause the host to hang until such controller is opened successfully (no timeout mechanism exists).
-
Upon creation of a virtio-blk controller, a backend device must already exist.
Virtio-blk Emulation Management Commands
virtio_blk_controller_create
Create a new SNAP-based virtio-blk controller over a specific PCIe function on the host. To specify the PCIe function to open a controller upon must be provided as described in section "DOCA SNAP-4 Service Guide | id (2.9.2 LTS)DOCASNAP 4ServiceGuide PCIeFunctionManagement":
-
vuid(recommended as it is guaranteed to remain constant). -
vhca_id. -
Function index –
pf_id,vf_id.
The mapping for pci_index can be queried by running emulation_function_list.
Command parameters:
|
Parameter |
Mandatory? |
Type |
Description |
|---|---|---|---|
|
|
No |
String |
PCIe device VUID |
|
|
No |
Number |
vHCA ID of PCIe function |
|
|
No |
Number |
PCIe PF index to start emulation on |
|
|
No |
Number |
PCIe VF index to start emulation on (if the controller is meant to be opened on a VF) |
|
|
No |
String |
PCIe device BDF |
|
|
No |
String |
Controller ID |
|
|
No
|
Number |
Number of IO queues (default 1, range 1-64). |
|
|
No |
Number |
Queue depth (default 256, range 1-256) |
|
|
No |
Number |
Maximal SGE data transfer size (default 4096, range 1– |
|
|
No |
Number |
Maximal SGE list length (default 1, range 1- |
|
|
No |
String |
SNAP SPDK block device to use as backend |
|
|
No |
String |
Serial number for the controller |
|
|
No |
0/1 |
Enables live migration and NVIDIA vDPA |
|
|
No |
0/1 |
Dynamic MSIX for SR-IOV VFs on this PF. Only valid for PFs. |
|
|
No |
Number |
Control the number of MSIX tables to associate with this controller. Valid only for VFs (whose parent PF controller is created using the This field is mandatory when the VF's MSIX is reclaimed using |
|
|
No |
0/1 |
Support virtio-blk crash recovery. Enabling this parameter to 1 may impact virtio-blk performance (default is 0). For more information, refer to section " DOCA SNAP-4 Service Guide | id (2.9.2 LTS)DOCASNAP 4ServiceGuide Virtio blkCrashRecovery". |
|
|
No |
0/1 |
Enables indirect descriptors support for the controller's virt-queues. When using the virtio-blk kernel driver, if indirect descriptors are enabled, it is always used by the driver. Using indirect descriptors for all IO traffic patterns may hurt performance in most cases. |
|
read_only |
No |
0/1 |
Creates read only virtio-blk controller. |
|
suspended |
No |
0/1 |
Creates controller in suspended state. |
|
live_update_listener |
No |
0/1 |
Creates controller with the ability to listen for live update notifications via IPC. |
|
|
No |
0/1 |
N/A – not supported |
|
|
No |
0/1 |
N/A – not supported |
Example response:
{
  "jsonrpc": "2.0",
  "id": 1,
  "result": "VblkCtrl1"
}
virtio_blk_controller_destroy
Destroy a previously created virtio-blk controller. The controller can be uniquely identified by the controller's name as acquired from virtio_blk_controller_create().
Command parameters:
|
Parameter |
Mandatory? |
Type |
Description |
|---|---|---|---|
|
|
Yes |
String |
Controller name |
|
force |
No |
Boolean |
Force destroying VF controller for SR-IOV |
virtio_blk_controller_suspend
While suspended, the controller stops receiving new requests from the host driver and only finishes handling of requests already in flight. All suspended requests (if any) are processed after resume.
Command parameters:
|
Parameter |
Mandatory? |
Type |
Description |
|---|---|---|---|
|
|
Yes |
String |
Controller name |
virtio_blk_controller_resume
After the controller stops receiving new requests from the host driver (i.e., is suspended) and only finishes handling of requests already in flight, the resume command will resume the handling of IOs by the controller.
Command parameters:
|
Parameter |
Mandatory? |
Type |
Description |
|---|---|---|---|
|
|
Yes |
String |
Controller name |
virtio_blk_controller_bdev_attach
Attach the specified bdev into virtIO-blk SNAP controller. It is possible to change the serial ID (using the vblk_id parameter) if a new bdev is attached.
Command parameters:
|
Parameter |
Mandatory? |
Type |
Description |
|---|---|---|---|
|
|
Yes |
String |
Controller name |
|
|
Yes |
String |
Block device name |
|
|
No |
String |
Serial number for controller |
virtio_blk_controller_bdev_detach
You may replace the bdev for virtio-blk controller. First, you should detach bdev from the controller. When bdev is detached, the controller stops receiving new requests from the host driver (i.e., is suspended) and finishes handling requests already in flight only.
At this point, you may attach a new bdev or destroy the controller.
When a new bdev is attached, the controller resumes handling all outstanding I/Os.
The block size cannot be changed if the driver is loaded.
bdev may be replaced with a different block size if the driver is not loaded.
A controller with no bdev attached to it is considered a temporary state, in which the controller is not fully operational, and may not respond to some actions requested by the driver.
If there is no imminent intention to call virtio_blk_controller_bdev_attach, it is advised to attach a none bdev instead. For example:
snap_rpc.py virtio_blk_controller_bdev_attach -c VblkCtrl1 --bdev none --dbg_bdev_type null
Command parameters:
|
Parameter |
Mandatory? |
Type |
Description |
|---|---|---|---|
|
|
Yes |
String |
Controller name |
virtio_blk_controller_list
List virtio-blk SNAP controller.
Command parameters:
|
Parameter |
Mandatory? |
Type |
Description |
|---|---|---|---|
|
|
No |
String |
Controller name |
Example response:
{
  "ctrl_id": "VblkCtrl2",
  "vhca_id": 38,
  "num_queues": 4,
  "queue_size": 256,
  "seg_max": 32,
  "size_max": 65536,
  "bdev": "Nvme1",
  "plugged": true,
  "indirect_desc": true,
  "num_msix": 2,
  "min configurable num_msix": 2,
  "max configurable num_msix": 32
}
virtio_blk_controller_modify
This function allows user to modify some of the controller's parameters in real-time, after it was already created.
Modifications can only be done when the emulated function is in idle state - thus there is no driver communicating with it.
Command parameters:
|
Parameter |
Mandatory? |
Type |
Description |
|---|---|---|---|
|
|
No |
String |
Controller Name |
|
num_queues |
No |
int |
Number of queues for the controller |
|
num_msix |
No |
int |
Number of MSIX to be used for a controller. Relevant only for VF controllers (when dynamic MSIX feature is enabled). |
Standard virtio-blk kernel driver currently does not support PCI FLR. As such,
virtio_blk_controller_dbg_io_stats_get
Debug counters are per-controller I/O stats that can help knowing the I/O distribution between different queues of the controller and the total I/O received on the controller.
Command parameters:
|
Parameter |
Mandatory? |
Type |
Description |
|---|---|---|---|
|
|
Yes |
String |
Controller name |
Example response:
"ctrl_id": "VblkCtrl2",
"queues": [
  {
    "queue_id": 0,
    "core_id": 0,
    "read_io_count": 19987068,
    "write_io_count": 6319931,
    "flush_io_count": 0
  },
  {
    "queue_id": 1,
    "core_id": 1,
    "read_io_count": 9769556,
    "write_io_count": 3180098,
    "flush_io_count": 0
  }
],
"read_io_count": 29756624,
"write_io_count": 9500029,
"flush_io_count": 0
    }
virtio_blk_controller_dbg_debug_stats_get
Debug counters are per-controller debug statistics that can help knowing the controller and queues health and status.
Command parameters:
|
Parameter |
Mandatory? |
Type |
Description |
|---|---|---|---|
|
|
Yes |
String |
Controller name |
Example response:
{
  "ctrl_id": "VblkCtrl1",
  "queues": [
    {
      "qid": 0,
      "state": "RUNNING",
      "hw_available_index": 6,
      "sw_available_index": 6,
      "hw_used_index": 6,
      "sw_used_index": 6,
      "hw_received_descs": 13,
      "hw_completed_descs": 13
    },
    {
      "qid": 1,
      "state": "RUNNING",
      "hw_available_index": 2,
      "sw_available_index": 2,
      "hw_used_index": 2,
      "sw_used_index": 2,
      "hw_received_descs": 6,
      "hw_completed_descs": 6
    },
    {
      "qid": 2,
      "state": "RUNNING",
      "hw_available_index": 0,
      "sw_available_index": 0,
      "hw_used_index": 0,
      "sw_used_index": 0,
      "hw_received_descs": 4,
      "hw_completed_descs": 4
    },
    {
      "qid": 3,
      "state": "RUNNING",
      "hw_available_index": 0,
      "sw_available_index": 0,
      "hw_used_index": 0,
      "sw_used_index": 0,
      "hw_received_descs": 3,
      "hw_completed_descs": 3
    }
  ]
}
virtio_blk_controller_state_save
Save the state of the suspended virtio-blk SNAP controller.
Command parameters:
|
Parameter |
Mandatory? |
Type |
Description |
|---|---|---|---|
|
|
Yes |
String |
Controller name |
|
|
Yes |
String |
Filename to save state to |
virtio_blk_controller_state_restore
Restore the state of the suspended virtio-blk SNAP controller.
Command parameters:
|
Parameter |
Mandatory? |
Type |
Description |
|---|---|---|---|
|
|
Yes |
String |
Controller name |
|
|
Yes |
String |
Filename to save state to |
virtio_blk_controller_vfs_msix_reclaim
Reclaim virtio-blk SNAP controller VFs MSIX back to the free MSIX pool. Valid only for PFs.
Command parameters:
|
Parameter |
Mandatory? |
Type |
Description |
|---|---|---|---|
|
|
Yes |
String |
Controller name |
Virtio-blk Configuration Examples
Virtio-blk Configuration for Single Controller
spdk_rpc.py bdev_nvme_attach_controller -b nvme0 -t rdma -a 1.1.1.1 -f ipv4 -s 4420 -n nqn.2022-10.io.nvda.nvme:swx-storage
snap_rpc.py virtio_blk_controller_create --vuid MT2114X12200VBLKS1D0F0 --bdev nvme0n1
Virtio-blk Cleanup for Single Controller
snap_rpc.py virtio_blk_controller_destroy -c VblkCtrl1
spdk_rpc.py bdev_nvme_detach_controller nvme0
Virtio-blk Dynamic Configuration For 125 VFs
-
Update the firmware configuration as described section "DOCA SNAP-4 Service Guide | id (2.9.2 LTS)DOCASNAP 4ServiceGuide SR IOVFirmwareConfiguration".
-
Reboot the host.
-
Run:
[dpu] spdk_rpc.py bdev_nvme_attach_controller -b nvme0 -t rdma -a 1.1.1.1 -f ipv4 -s 4420 -n nqn.2022-10.io.nvda.nvme:swx-storage
[dpu] snap_rpc.py virtio_blk_controller_create --vuid MT2114X12200VBLKS1D0F0

[host] modprobe -v virtio-pci && modprobe -v virtio-blk
[host] echo 125 > /sys/bus/pci/devices/0000:86:00.3/sriov_numvfs

[dpu] for i in `seq 0 124`; do snap_rpc.py virtio_blk_controller_create --pf_id 0 --vf_id $i --bdev nvme0n1; done;
When SR-IOV is enabled, it is recommended to destroy virtio-blk controllers on VFs using the following and not the
virito_blk_controller_destroyRPC command:[host] echo 0 > /sys/bus/pci/devices/0000:86:00.3/sriov_numvfsTo destroy a single virtio-blk controller, run:
[dpu] ./snap_rpc.py -t 1000 virtio_blk_controller_destroy -c VblkCtrl5 –f
Virtio-blk Suspend, Resume Example
[host] // Run fio
[dpu] snap_rpc.py virtio_blk_controller_suspend -c VBLKCtrl1
[host] // IOs will get suspended
[dpu] snap_rpc.py virtio_blk_controller_resume -c VBLKCtrl1
[host] // fio will resume sending IOs
Virtio-blk Bdev Attach, Detach Example
[host] // Run fio
[dpu] snap_rpc.py virtio_blk_controller_bdev_detach -c VBLKCtrl1
[host] // Bdev will be detached and IOs will get suspended
[dpu] snap_rpc.py virtio_blk_controller_bdev_attach -c VBLKCtrl1 --bdev null2
[host] // The null2 bdev will be attached into controller and fio will resume sending IOs
Notes
-
Virtio-blk protocol controller supports one backend device only
-
Virtio-blk protocol does not support administration commands to add backends. Thus, all backend attributes are communicated to the host virtio-blk driver over PCIe BAR and must be accessible during driver probing. Therefore, backends can only be changed once the PCIe function is not in use by any host storage driver.
NVMe Emulation Management
NVMe Subsystem
The NVMe subsystem as described in the NVMe specification is a logical entity which encapsulates sets of NVMe backends (or namespaces) and connections (or controllers). NVMe subsystems are extremely useful when working with multiple NVMe controllers especially when using NVMe VFs. Each NVMe subsystem is defined by its serial number (SN), model number (MN), and qualified name (NQN) after creation.
The RPCs listed in this section control the creation and destruction of NVMe subsystems.
NVMe Namespace
NVMe namespaces are the representors of a continuous range of LBAs in the local/remote storage. Each namespace must be linked to a subsystem and have a unique identifier (NSID) across the entire NVMe subsystem (e.g., 2 namespaces cannot share the same NSID even if they are linked to different controllers).
After creation, NVMe namespaces can be attached to a controller.
SNAP does not currently support shared namespaces between different controllers. So, each namespace should be attached to a single controller.
The SNAP application uses an SPDK block device framework as a backend for its NVMe namespaces. Therefore, they should be configured in advance. For more information about SPDK block devices, see SPDK bdev documentation and Appendix SPDK Configuration.
NVMe Controller
Each NVMe device (e.g., NVMe PCIe entry) exposed to the host, whether it is a PF or VF, must be backed by NVMe controller, which is responsible for all protocol communication with the host's driver.
Every new NVMe controller must also be linked to an NVMe subsystem. After creation, NVMe controllers can be addressed using either their name (e.g., "Nvmectrl1") or both their subsystem NQN and controller ID.
Attaching NVMe Namespace to NVMe Controller
After creating an NVMe controller and an NVMe namespace under the same subsystem, the following method is used to attach the namespace to the controller.
NVMe Emulation Management Command
nvme_subsystem_create
Create a new NVMe subsystem to be controlled by one or more NVMe SNAP controllers. An NVMe subsystem includes one or more controllers, zero or more namespaces, and one or more ports. An NVMe subsystem may include a non-volatile memory storage medium and an interface between the controller(s) in the NVMe subsystem and non-volatile memory storage medium.
Command parameters:
|
Parameter |
Mandatory? |
Type |
Description |
|---|---|---|---|
|
|
Yes |
String |
Subsystem qualified name |
|
|
No |
String |
Subsystem serial number |
|
|
No |
String |
Subsystem model number |
|
|
No |
Number |
Maximal namespace ID allowed in the subsystem (default 0xFFFFFFFE; range 1-0xFFFFFFFE) |
|
|
No |
Number |
Maximal number of namespaces allowed in the subsystem (default 1024; range 1-0xFFFFFFFE) |
Example request:
{
  "jsonrpc": "2.0",
  "id": 1,
  "method": "nvme_subsystem_create",
  "params": {
    "nqn": "nqn.2022-10.io.nvda.nvme:0"
  }
}
nvme_subsystem_destroy
Destroy (previously created) NVMe SNAP subsystem.
Command parameters:
|
Parameter |
Mandatory? |
Type |
Description |
|---|---|---|---|
|
|
Yes |
String |
Subsystem qualified name |
|
|
No |
Bool |
Force the deletion of all the controllers and namespaces under the subsystem |
nvme_subsystem_list
List NVMe subsystems.
nvme_namespace_create
Create new NVMe namespaces that represent a continuous range of LBAs in the previously configured bdev. Each namespace must be linked to a subsystem and have a unique identifier (NSID) across the entire NVMe subsystem.
Command parameters:
|
Parameter |
Mandatory? |
Type |
Description |
|---|---|---|---|
|
|
Yes |
String |
Subsystem qualified name |
|
|
Yes |
String |
SPDK block device to use as backend |
|
|
Yes |
Number |
Namespace ID |
|
|
No |
Number |
Namespace UUID To safely detach/attach namespaces, the UUID should be provided to force the UUID to remain persistent. |
|
|
No |
0/1 |
N/A – not supported |
nvme_namespace_destroy
Destroy a previously created NVMe namespaces.
Command parameters:
|
Parameter |
Mandatory? |
Type |
Description |
|---|---|---|---|
|
|
Yes |
String |
Subsystem qualified name |
|
|
Yes |
Number |
Namespace ID |
nvme_namespace_list
List NVMe SNAP namespaces.
Command parameters:
|
Parameter |
Mandatory? |
Type |
Description |
|---|---|---|---|
|
|
No |
String |
Subsystem qualified name |
nvme_controller_create
Create a new SNAP-based NVMe blk controller over a specific PCIe function on the host.
To specify the PCIe function to open the controller upon, pci_index must be provided.
The mapping for pci_index can be queried by running emulation_function_list.
Command parameters:
|
Parameter |
Mandatory? |
Type |
Description |
|---|---|---|---|
|
|
Yes |
String |
Subsystem qualified name |
|
|
No |
Number |
VUID of PCIe function |
|
|
No |
Number |
PCIe PF index to start emulation on |
|
|
No |
Number |
PCIe VF index to start emulation on (if the controller is destined to be opened on a VF) |
|
|
No |
String |
PCIe BDF to start emulation on |
|
|
No |
Number |
vHCA ID of PCIe function |
|
|
No |
Number |
Controller ID |
|
|
No |
Number |
Number of IO queues (default 1, range 1-31). The actual number of queues is limited by the number of queues supported by the hardware.
It is recommended for the number of MSIX to match be greater than the number of IO queues. |
|
|
No |
Number |
MDTS (default 7, range 1-7) |
|
|
No |
Number |
Maximum number firmware slots (default 4) |
|
|
No |
0/1 |
Enable the |
|
|
No |
0/1 |
Set the value of the |
|
|
No |
0/1 |
Set the value of the During crash recovery, all compare and write commands are expected to fail. |
|
|
No |
0/1 |
Set the value of the |
|
|
No |
0/1 |
Open the controller in suspended state (requires an additional call to This is required if NVMe recovery is expected or when creating the controller when the driver is already loaded. Therefore, it is advisable to use it in all scenarios. To resume the controller after attaching namespaces, use |
|
|
No |
String |
Create a controller out of a snapshot file path. Snapshot is previously taken using |
|
|
No |
0/1 |
Enable dynamic MSIX management for the controller (default 0). Applies only for PFs. |
|
|
No |
Number |
Control the number of MSIX tables to associate with this controller. Valid only for VFs (whose parent PF controller is created using the This field is mandatory when the VF's MSIX is reclaimed using |
|
|
No |
0/1 |
Creates NVMe controller with admin queues only (i.e., without IO queues) |
|
|
No |
Number |
Bitmask to support buggy drivers which are non-compliant per NVMe specification.
For more details, see section "OS Issues". |
If not set, the SNAP NVMe controller supports an optional NVMe command only if all the namespaces attached to it when loading the driver support it. To bypass this feature, you may explicitly set the NVMe optional command support bit by using its corresponding flag.
For example, a controller created with –-compare 0 would not support the optional compare NVMe command regardless of its attached namespaces.
Example request:
{
  "jsonrpc": "2.0",
  "id": 1,
  "method": "nvme_controller_create",
  "params": {
    "nqn": "nqn.2022-10.io.nvda.nvme:0",
    "pf_id": 0,
    "num_queues": 8,
  }
}
nvme_controller_destroy
Destroy a previously created NVMe controller. The controller can be uniquely identified by a controller name as acquired from nvme_controller_create.
Command parameters:
|
Parameter |
Mandatory? |
Type |
Description |
|---|---|---|---|
|
|
Yes |
String |
Controller name |
|
|
No |
1/0 |
Release MSIX back to free pool. Applies only for VFs. |
nvme_controller_suspend
While suspended, the controller stops handling new requests from the host driver. All pending requests (if any) will be processed after resume.
Command parameters:
|
Parameter |
Mandatory? |
Type |
Description |
|---|---|---|---|
|
|
Yes |
String |
Controller name |
|
|
No |
Number |
Suspend timeout If IOs are pending in the bdev layer (or in the remote target), the operation fails and resumes after this timeout. If |
|
|
No |
0/1 |
Force suspend even when there are inflight I/Os |
|
|
No |
0/1 |
Suspend only the admin queue |
|
|
No |
0/1 |
Send a live update notification via IPC |
nvme_controller_resume
The resume command continues the (previously-suspended) controller's handling of new requests sent by the driver. If the controller is created in suspended mode, resume is also used to start initial communication with host driver.
Command parameters:
|
Parameter |
Mandatory? |
Type |
Description |
|---|---|---|---|
|
|
Yes |
String |
Controller name |
|
|
No |
0/1 |
Live update resume |
nvme_controller_snapshot_get
Take a snapshot of the current state of the controller and dump it into a file. This file may be used to create a controller based on this snapshot. For the snapshot to be consistent, users should call this function only when the controller is suspended (see nvme_controller_suspend RPC).
Command parameters:
|
Parameter |
Mandatory? |
Type |
Description |
|---|---|---|---|
|
|
Yes |
String |
Controller name |
|
|
Yes |
String |
File path |
nvme_controller_vfs_msix_reclaim
Reclaims all VFs MSIX back to the PF's free MSIX pool.
This function can only be applied on PFs and can only be run when SR-IOV is not set on host side (i.e., sriov_numvfs = 0).
Command parameters:
|
Parameter |
Mandatory? |
Type |
Description |
|---|---|---|---|
|
|
Yes |
String |
Controller name |
nvme_controller_list
Provide a list of all active (created) NVMe controllers with their characteristics.
Command parameters:
|
Parameter |
Mandatory? |
Type |
Description |
|---|---|---|---|
|
|
No |
String |
Subsystem qualified name |
|
|
No |
String |
Only search for a specific controller |
nvme_controller_modify
This function allows user to modify some of the controller's parameters in real-time, after it was already created.
Modifications can only be done when the emulated function is in idle state - thus there is no driver communicating with it.
Command parameters:
|
Parameter |
Mandatory? |
Type |
Description |
|---|---|---|---|
|
|
No |
String |
Controller Name |
|
num_queues |
No |
int |
Number of queues for the controller |
|
num_msix |
No |
int |
Number of MSIX to be used for a controller. Relevant only for VF controllers (when dynamic MSIX feature is enabled). |
nvme_controller_attach_ns
Attach a previously created NVMe namespace to given NVMe controller under the same subsystem.
The result in the response object returns true for success and false for failure.
Command parameters:
|
Parameter |
Mandatory? |
Type |
Description |
|---|---|---|---|
|
|
Yes |
String |
Controller name |
|
|
Yes |
Number |
Namespace ID |
nvme_controller_detach_ns
Detach a previously attached namespace with a given NSID from the NVMe controller.
The result in the response object returns true for success and false for failure.
Command parameters:
|
Parameter |
Mandatory? |
Type |
Description |
|---|---|---|---|
|
|
Yes |
String |
Controller name |
|
|
Yes |
Number |
Namespace ID |
nvme_controller_dbg_io_stats_get
The result in the response object returns true for success and false for failure.
Command parameters:
|
Parameter |
Mandatory? |
Type |
Description |
|---|---|---|---|
|
|
Yes |
String |
Controller name |
"ctrl_id": "NVMeCtrl2",
"queues": [
  {
    "queue_id": 0,
    "core_id": 0,
    "read_io_count": 19987068,
    "write_io_count": 6319931,
    "flush_io_count": 0
  },
  {
    "queue_id": 1,
    "core_id": 1,
    "read_io_count": 9769556,
    "write_io_count": 3180098,
    "flush_io_count": 0
  }
],
"read_io_count": 29756624,
"write_io_count": 9500029,
"flush_io_count": 0
    }
NVMe Configuration Examples
NVMe Configuration for Single Controller
On the DPU:
spdk_rpc.py bdev_nvme_attach_controller -b nvme0 -t rdma -a 1.1.1.1 -f ipv4 -s 4420 -n nqn.2022-10.io.nvda.nvme:swx-storage
snap_rpc.py nvme_subsystem_create --nqn nqn.2022-10.io.nvda.nvme:0
snap_rpc.py nvme_namespace_create -b nvme0n1 -n 1 --nqn nqn.2022-10.io.nvda.nvme:0 --uuid 263826ad-19a3-4feb-bc25-4bc81ee7749e
snap_rpc.py nvme_controller_create --nqn nqn.2022-10.io.nvda.nvme:0 --pf_id 0 --suspended
snap_rpc.py nvme_controller_attach_ns -c NVMeCtrl1 -n 1
snap_rpc.py nvme_controller_resume -c NVMeCtrl1
It is necessary to create a controller in a suspended state. Afterward, the namespaces can be attached, and only then should the controller be resumed using the nvme_controller_resume RPC.
To safely detach/attach namespaces, the UUID must be provided to force the UUID to remain persistent.
NVMe Cleanup for Single Controller
snap_rpc.py nvme_controller_detach_ns -c NVMeCtrl2 -n 1
snap_rpc.py nvme_controller_destroy -c NVMeCtrl2
snap_rpc.py nvme_namespace_destroy -n 1 --nqn nqn.2022-10.io.nvda.nvme:0
snap_rpc.py nvme_subsystem_destroy --nqn nqn.2022-10.io.nvda.nvme:0
spdk_rpc.py bdev_nvme_detach_controller nvme0
NVMe and Hotplug Cleanup for Single Controller
snap_rpc.py nvme_controller_detach_ns -c NVMeCtrl1 -n 1
snap_rpc.py emulation_device_detach_prepare --vuid MT2114X12200VBLKS1D0F0
snap_rpc.py nvme_controller_destroy -c NVMeCtrl1
snap_rpc.py emulation_device_detach --vuid MT2114X12200VBLKS1D0F0
snap_rpc.py nvme_namespace_destroy -n 1 --nqn nqn.2022-10.io.nvda.nvme:0
snap_rpc.py nvme_subsystem_destroy --nqn nqn.2022-10.io.nvda.nvme:0
spdk_rpc.py bdev_nvme_detach_controller nvme0
NVMe Configuration for 125 VFs SR-IOV
-
Update the firmware configuration as described section "DOCA SNAP-4 Service Guide | id (2.9.2 LTS)DOCASNAP 4ServiceGuide SR IOVFirmwareConfiguration".
-
Reboot the host.
-
Create a dummy controller on the parent PF:
[dpu] # snap_rpc.py nvme_subsystem_create --nqn nqn.2022-10.io.nvda.nvme:0 [dpu] # snap_rpc.py nvme_controller_create --nqn nqn.2022-10.io.nvda.nvme:0 --ctrl NVMeCtrl1 --pf_id 0 --admin_only -
Create 125 Bdevs (Remote or Local), 125 NSs and 125 controllers:
[dpu] for i in `seq 0 124`; do \ # spdk_rpc.py bdev_null_create null$((i+1)) 64 512; # snap_rpc.py nvme_namespace_create -b null$((i+1)) -n $((i+1)) --nqn nqn.2022-10.io.nvda.nvme:0 --uuid 3d9c3b54-5c31-410a-b4f0-7cf2afd9e$((i+100)); # snap_rpc.py nvme_controller_create --nqn nqn.2022-10.io.nvda.nvme:0 --ctrl NVMeCtrl$((i+2)) --pf_id 0 --vf_id $i --suspended; # snap_rpc.py nvme_controller_attach_ns -c NVMeCtrl$((i+2)) -n $((i+1)); # snap_rpc.py nvme_controller_resume -c NVMeCtrl$(i+2); done -
Load the driver and configure VFs:
[host] # modprobe -v nvme
[host] # echo 125 > /sys/bus/pci/devices/0000\:25\:00.2/sriov_numvfs
Environment Variable Management
snap_global_param_list
snap_global_param_list lists all existing environment variables.
The following is an example response for the snap_global_param_list command:
[
  "SNAP_ENABLE_POLL_SKIP       : set     : 0  ",
  "SNAP_POLL_CYCLE_SIZE        : not set : 16 ",
  "SNAP_RPC_LOG_ENABLE         : set     : 1  ",
  "SNAP_MEMPOOL_SIZE_MB        : set     : 1024",
  "SNAP_MEMPOOL_4K_BUFFS_PER_CORE : not set : 1024",
  "SNAP_RDMA_ZCOPY_ENABLE      : set     : 1  ",
  "SNAP_TCP_XLIO_ENABLE        : not set : 1  ",
  "SNAP_TCP_XLIO_TX_ZCOPY      : not set : 1  ",
  "MLX5_SHUT_UP_BF             : not set : 0  ",
  "SNAP_SHARED_RX_CQ           : not set : 1  ",
  "SNAP_SHARED_TX_CQ           : not set : 1  ",
...
Advanced Features
RPC Log History
RPC log history (enabled by default) records all the RPC requests (from snap_rpc.py and spdk_rpc.py) sent to the SNAP application and the RPC response for each RPC requests in a dedicated log file, /var/log/snap-log/rpc-log. This file is visible outside the container (i.e., the log file's path on the DPU is /var/log/snap-log/rpc-log as well).
The SNAP_RPC_LOG_ENABLE env can be used to enable (1) or disable (0) this feature.
RPC log history is supported with SPDK version spdk23.01.2-12 and above.
When RPC log history is enabled, the SNAP application writes (in append mode) RPC request and response message to /var/log/snap-log/rpc-log constantly. Pay attention to the size of this file. If it gets too large, delete the file on the DPU before launching the SNAP pod.
SR-IOV
SR-IOV configuration depends on the kernel version:
-
Optimal configuration may be achieved with a new kernel in which the
sriov_drivers_autoprobe sysfsentry exists in/sys/bus/pci/devices/<BDF>/ -
Otherwise, the minimal requirement may be met if the
sriov_totalvfs sysfsentry exists in/sys/bus/pci/devices/<BDF>/
After configuration is finished, no disk is expected to be exposed in the hypervisor. The disk only appears in the VM after the PCIe VF is assigned to it using the virtualization manager. If users want to use the device from the hypervisor, they must bind the PCIe VF manually.
Hot-plug PFs do not support SR-IOV.
It is recommended to add pci=assign-busses to the boot command line when creating more than 127 VFs.
Without this option, the following errors may appear from host and the virtio driver will not probe these devices.
pci 0000:84:00.0: [1af4:1041] type 7f class 0xffffff
pci 0000:84:00.0: unknown header type 7f, ignoring device
Zero Copy (SNAP-direct)
Zero-copy is supported on SPDK 21.07 and higher.
SNAP-direct allows SNAP applications to transfer data directly from the host memory to remote storage without using any staging buffer inside the DPU.
SNAP enables the feature according to the SPDK BDEV configuration only when working against an SPDK NVMe-oF RDMA block device.
To enable zero copy, set the environment variable (as it is enabled by default):
SNAP_RDMA_ZCOPY_ENABLE=1
For more info refer to the section DOCA SNAP-4 Service Guide | id (2.9.2 LTS)DOCASNAP 4ServiceGuide SNAPEnvironmentVariables.
NVMe/TCP XLIO Zero Copy
NVMe/TCP Zero Copy is implemented as a custom NVDA_TCP transport in SPDK NVMe initiator and it is based on a new XLIO socket layer implementation.
The implementation is different for Tx and Rx:
-
The NVMe/TCP Tx Zero Copy is similar between RDMA and TCP in that the data is sent from the host memory directly to the wire without an intermediate copy to Arm memory
-
The NVMe/TCP Rx Zero Copy allows achieving partial zero copy on the Rx flow by eliminating copy from socket buffers (XLIO) to application buffers (SNAP). But data still must be DMA'ed from Arm to host memory.
To enable NVMe/TCP Zero Copy, use SPDK v22.05.nvda --with-xlio (v22.05.nvda or higher).
For more information about XLIO including limitations and bug fixes, refer to the NVIDIA Accelerated IO (XLIO) Documentation.
To enable SNAP TCP XLIO Zero Copy:
-
SNAP container: Set the environment variables and resources in the YAML file:
resources: requests: memory: "4Gi" cpu: "8" limits: hugepages-2Mi: "4Gi" memory: "6Gi" cpu: "16" ## Set according to the local setup env: - name: APP_ARGS value: "--wait-for-rpc" - name: SPDK_XLIO_PATH value: "/usr/lib/libxlio.so" -
SNAP sources: Set the environment variables and resources in the relevant scripts
-
In
run_snap.sh, edit theAPP_ARGSvariable to use the SPDK command line argument--wait-for-rpc:APP_ARGS="--wait-for-rpc" -
In
set_environment_variables.sh, uncomment theSPDK_XLIO_PATHenvironment variable:export SPDK_XLIO_PATH="/usr/lib/libxlio.so"
-
NVMe/TCP XLIO requires a BlueField Arm OS hugepage size of 4G (i.e., 2G more hugepages than non-XLIO). For information on configuring the hugepages, refer to sections "Step 1: Allocate Hugepages" and "DOCA SNAP-4 Service Guide | id (2.9.2 LTS)DOCASNAP 4ServiceGuide AdjustingYAMLConfiguration".
At high scale, it is required to use the global variable XLIO_RX_BUFS=4096 even though it leads to high memory consumption. Using XLIO_RX_BUFS=1024 requires lower memory consumption but limits the ability to scale the workload.
For more info refer to the section "DOCA SNAP-4 Service Guide | id (2.9.2 LTS)DOCASNAP 4ServiceGuide SNAPEnvironmentVariables".
It is recommended to configure NVMe/TCP XLIO with the transport ack timeout option increased to 12.
[dpu] spdk_rpc.py bdev_nvme_set_options --transport-ack-timeout 12
Other bdev_nvme options may be adjusted according to requirements.
Expose an NVMe-oF subsystem with one namespace by using a TCP transport type on the remote SPDK target.
[dpu] spdk_rpc.py sock_set_default_impl -i xlio
[dpu] spdk_rpc.py framework_start_init
[dpu] spdk_rpc.py bdev_nvme_set_options --transport-ack-timeout 12
[dpu] spdk_rpc.py bdev_nvme_attach_controller -b nvme0 -t nvda_tcp -a 3.3.3.3 -f ipv4 -s 4420 -n nqn.2023-01.io.nvmet
[dpu] snap_rpc.py nvme_subsystem_create --nqn nqn.2023-01.com.nvda:nvme:0
[dpu] snap_rpc.py nvme_namespace_create -b nvme0n1 -n 1 --nqn nqn. 2023-01.com.nvda:nvme:0 --uuid 16dab065-ddc9-8a7a-108e-9a489254a839
[dpu] snap_rpc.py nvme_controller_create --nqn nqn.2023-01.com.nvda:nvme:0 --ctrl NVMeCtrl1 --pf_id 0 --suspended --num_queues 16
[dpu] snap_rpc.py nvme_controller_attach_ns -c NVMeCtrl1 -n 1
[dpu] snap_rpc.py nvme_controller_resume -c NVMeCtrl1 -n 1

[host] modprobe -v nvme
[host] fio --filename /dev/nvme0n1 --rw randrw --name=test-randrw --ioengine=libaio --iodepth=64 --bs=4k --direct=1 --numjobs=1 --runtime=63 --time_based --group_reporting --verify=md5
For more information on XLIO, please refer to XLIO documentation.
Encryption
The SPDK version that comes with SNAP supports hardware encryption/decryption offload. To enable AES/XTS, follow the instructions under section "DOCA SNAP-4 Service Guide | id (2.9.2 LTS)DOCASNAP 4ServiceGuide ModifyingSFTrustLeveltoEnableEncryption".
Zero Copy (SNAP-direct) with Encryption
SNAP offers support for zero copy with encryption for bdev_nvme with an RDMA transport.
If another bdev_nvme transport or base bdev other than NVMe is used, then zero copy flow is not supported, and additional DMA operations from the host to the BlueField Arm are performed.
Refer to section "DOCA SNAP-4 Service Guide | id (2.9.2 LTS)DOCASNAP 4ServiceGuide SPDKCryptoExample" to see how to configure zero copy flow with AES_XTS offload.
|
Command |
Description |
|---|---|
|
|
Accepts a list of devices to be used for the crypto operation |
|
|
Creates a crypto key |
|
|
Constructs NVMe block device |
|
|
Creates a virtual block device which encrypts write IO commands and decrypts read IO commands |
mlx5_scan_accel_module
Accepts a list of devices to use for the crypto operation provided in the --allowed-devs parameter. If no devices are specified, then the first device which supports encryption is used.
For best performance, it is recommended to use the devices with the largest InfiniBand MTU (4096). The MTU size can be verified using the ibv_devinfo command (look for the max and active MTU fields). Normally, the mlx5_2 device is expected to have an MTU of 4096 and should be used as an allowed crypto device.
Command parameters:
|
Parameter |
Mandatory? |
Type |
Description |
|---|---|---|---|
|
|
No |
Number |
QP size |
|
|
No |
Number |
Size of the shared requests pool |
|
|
No |
String |
Comma-separated list of allowed device names (e.g., "mlx5_2") Make sure that the device used for RDMA traffic is selected to support zero copy. |
|
|
No |
Boolean |
Enables accel_mlx5 platform driver. Allows AES_XTS RDMA zero copy. |
accel_crypto_key_create
Creates crypto key. One key can be shared by multiple bdevs.
Command parameters:
|
Parameter |
Mandatory? |
Type |
Description |
|---|---|---|---|
|
|
Yes |
Number |
Crypto protocol (AES_XTS) |
|
|
Yes |
Number |
Key |
|
|
Yes |
Number |
Key2 |
|
|
Yes |
String |
Key name |
bdev_nvme_attach_controller
Creates NVMe block device.
Command parameters:
|
Parameter |
Mandatory? |
Type |
Description |
|---|---|---|---|
|
|
Yes |
String |
Name of the NVMe controller, prefix for each bdev name |
|
|
Yes |
String |
NVMe-oF target trtype (e.g., rdma, pcie) |
|
|
Yes |
String |
NVMe-oF target address (e.g., an IP address or BDF) |
|
|
No |
String |
NVMe-oF target trsvcid (e.g., a port number) |
|
|
No |
String |
NVMe-oF target adrfam (e.g., ipv4, ipv6) |
|
|
No |
String |
NVMe-oF target subnqn |
bdev_crypto_create
This RPC creates a virtual crypto block device which adds encryption to the base block device.
Command parameters:
|
Parameter |
Mandatory? |
Type |
Description |
|---|---|---|---|
|
|
Yes |
String |
Name of the base bdev |
|
|
Yes |
String |
Crypto bdev name |
|
|
Yes |
String |
Name of the crypto key created with |
SPDK Crypto Example
The following is an example of a configuration with a crypto virtual block device created on top of bdev_nvme with RDMA transport and zero copy support:
[dpu] # spdk_rpc.py mlx5_scan_accel_module --allowed-devs "mlx5_2" --enable-driver
[dpu] # spdk_rpc.py framework_start_init
[dpu] # spdk_rpc.py accel_crypto_key_create -c AES_XTS -k 00112233445566778899001122334455 -e 11223344556677889900112233445500 -n test_dek
[dpu] # spdk_rpc.py bdev_nvme_attach_controller -b nvme0 -t rdma -a 1.1.1.1 -f ipv4 -s 4420 -n nqn.2016-06.io.spdk:cnode0
[dpu] # spdk_rpc.py bdev_crypto_create nvme0n1 crypto_0 -n test_dek
[dpu] # snap_rpc.py spdk_bdev_create crypto_0
[dpu] # snap_rpc.py nvme_subsystem_create --nqn nqn.2023-05.io.nvda.nvme:0
[dpu] # snap_rpc.py nvme_controller_create --nqn nqn.2023-05.io.nvda.nvme:0 --pf_id 0 --ctrl NVMeCtrl0 --suspended
[dpu] # snap_rpc.py nvme_namespace_create –nqn nqn.2023-05.io.nvda.nvme:0 --bdev_name crypto_0 –-nsid 1 -–uuid 263826ad-19a3-4feb-bc25-4bc81ee7749e
[dpu] # snap_rpc.py nvme_controller_attach_ns –-ctrl NVMeCtrl0 --nsid 1
[dpu] # snap_rpc.py nvme_controller_resume –-ctrl NVMeCtrl0
Virtio-blk Live Migration
Live migration is a standard process supported by QEMU which allows system administrators to pass devices between virtual machines in a live running system. For more information, refer to QEMU VFIO Device Migration documentation.
Live migration is supported for SNAP virtio-blk devices. It can be activated using a driver with proper support (e.g., NVIDIA's proprietary vDPA-based Live Migration Solution).
snap_rpc.py virtio_blk_controller_create --dbg_admin_q …
SNAP Container Live Upgrade
Live upgrade enables updating the SNAP image used by a container without causing SNAP container downtime.
While newer SNAP releases may introduce additional content, potentially causing behavioral differences during the upgrade, the process is designed to ensure backward compatibility. Updates between releases within the same sub-version (e.g., 4.0.0-x to 4.0.0-y) should proceed without issues.
However, updates across different major or minor versions may require changes to system components (e.g., firmware, BFB), which may impact backward compatibility and necessitate a full reboot post update. In those cases, live updates are unnecessary.
Live Upgrade Prerequisites
To enable live upgrade, perform the following modifications:
-
Allocate double hugepages for the destination and source containers.
-
Make sure the requested amount of CPU cores is available.
The default YAML configuration sets the container to request a CPU core range of 8-16. This means that the container is not deployed if there are fewer than 8 available cores, and if there are 16 free cores, the container utilizes all 16.
For instance, if a container is currently using all 16 cores and, during a live upgrade, an additional SNAP container is deployed. In this case, each container uses 8 cores during the upgrade process. Once the source container is terminated, the destination container starts utilizing all 16 cores.
For 8-core DPUs, the
.yamlmust be edited to the range of 4-8 CPU cores. -
Change the name of the
doca_snap.yamlfile that describes the destination container (e.g.,doca_snap_new.yaml) so as to not overwrite the running container.yaml. -
Change the name of the new
.yamlpod in line 16 (e.g.,snap-new). -
Deploy the the destination container by copying the new yaml (e.g.,
doca_snap_new.yaml) to kubelet.
After deploying the destination container, until the live update process is complete, avoid making any configuration changes via RPC. Specifically, do not create or destroy hotplug functions.
When restoring a controller in the destination container during a live update, it is recommended to use the same arguments originally used for controller creation in the source container.
Live Upgrade Flow
The way to live upgrade the SNAP image is to move the SNAP controllers and SPDK block devices between different containers while minimizing the duration of the host VMs impact.

-
Source container – the running container before live upgrade
-
Destination container – the running container after live upgrade
SNAP Container Live Upgrade Procedure
-
Follow the steps in section "DOCA SNAP-4 Service Guide | id (2.9.2 LTS)DOCASNAP 4ServiceGuide LiveUpgradePrerequisites" and deploy the destination SNAP container using the modified
yamlfile. -
Query the source and destination containers:
crictl ps -r -
Check for
SNAP started successfullyin the logs of the destination container, then copy the live update from the container to your environment.[dpu] crictl logs -f <dest-container-id> [dpu] crictl exec <dest-container-id> cp /opt/nvidia/nvda_snap/bin/live_update.py /etc/nvda_snap/ -
Run the
live_update.pyscript to move all active objects from the source container to the destination container:[dpu] cd /etc/nvda_snap [dpu] ./live_update.py -s <source-container-id> -d <dest-container-id> -
Delete the source container.
To post RPCs, use the crictl tool:
crictl exec -it <container-id X> snap_rpc.py <RPC-method>
crictl exec -it <container-id Y> spdk_rpc.py <RPC-method>
To automate the SNAP configuration (e.g., following failure or reboot) as explained in section "DOCA SNAP-4 Service Guide | id (2.9.2 LTS)DOCASNAP 4ServiceGuide AutomateSNAPConfiguration(Optional)",
spdk_rpc_init.confandsnap_rpc_init.confmust not include any configs as part of the live upgrade. Then, once the transition to the new container is done,spdk_rpc_init.confandsnap_rpc_init.confcan be modified with the desired configuration.
SNAP Container Live Upgrade Commands
The live update tool is designed to support fast live updates. It iterates over the available emulation functions and performs the following actions for each one:
-
On the source container:
snap_rpc.py virtio_blk_controller_suspend --ctrl [ctrl_name] --events_only -
On the destination container:
spdk_rpc.py bdev_nvme_attach_controller ... snap_rpc.py virtio_blk_controller_create ... --suspended --live_update_listener -
On the source container:
snap_rpc.py virtio_blk_controller_destroy --ctrl [ctrl_name]
spdk_rpc.py bdev_nvme_detach_controller [bdev_name]
SR-IOV Dynamic MSIX Management
Message Signaled Interrupts eXtended (MSIX) is an interrupt mechanism that allows devices to use multiple interrupt vectors, providing more efficient interrupt handling than traditional interrupt mechanisms such as shared interrupts. In Linux, MSIX is supported in the kernel and is commonly used for high-performance devices such as network adapters, storage controllers, and graphics cards. MSIX provides benefits such as reduced CPU utilization, improved device performance, and better scalability, making it a popular choice for modern hardware.
However, proper configuration and management of MSIX interrupts can be challenging and requires careful tuning to achieve optimal performance, especially in a multi-function environment as SR-IOV.
By default, BlueField distributes MSIX vectors evenly between all virtual PCIe functions (VFs). This approach is not optimal as users may choose to attach VFs to different VMs, each with a different number of resources. Dynamic MSIX management allows the user to manually control of the number of MSIX vectors provided per each VF independently.
Configuration and behavior are similar for all emulation types, and specifically NVMe and virtio-blk.
Dynamic MSIX management is built from several configuration steps:
-
At this point, and in any other time in the future when no VF controllers are opened (
sriov_numvfs=0), all PF-related MSIX vectors can be reclaimed from the VFs to the PF's free MSIX pool. -
User must take some of the MSIX from the free pool and give them to a certain VF during VF controller creation.
-
When destroying a VF controller, the user may choose to release its MSIX back to the pool.
Once configured, the MSIX link to the VFs remains persistent and may change only in the following scenarios:
-
User explicitly requests to return VF MSIXs back to the pool during controller destruction.
-
PF explicitly reclaims all VF MSIXs back to the pool.
-
Arm reboot (FE reset/cold boot) has occurred.
To emphasize, the following scenarios do not change MSIX configuration:
-
Application restart/crash.
-
Closing and reopening PF/VFs without dynamic MSIX support.
The following is an NVMe example of dynamic MSIX configuration steps (similar configuration also applies for virtio-blk):
-
Reclaim all MSIX from VFs to PF's free MSIX pool:
snap_rpc.py nvme_controller_vfs_msix_reclaim <CtrlName> -
Query the controller list to get information about the resources constraints for the PF:
# snap_rpc.py nvme_controller_list -c <CtrlName>
…     'free_msix': 100,
…     'free_queues': 200,
…     'vf_min_msix': 2,
…     'vf_max_msix': 64,
…     'vf_min_queues': 0,
…     'vf_max_queues': 31,
…
Where:
-
free_msixstands for the number of total MSIX available in the PF's free pool, to be assigned for VFs, through the parametervf_num_msix(of the<protocol>_controller_createRPC). -
free_queuesstands for the number of total queues (or "doorbells") available in the PF's free pool, to be assigned for VFs, through the parameternum_queues(of the<protocol>_controller_createRPC). -
vf_min_msixandvf_max_msixtogether define the available configurable range ofvf_num_msixparameter value which can be passed in<protocol>_controller_createRPC for each VF. -
vf_min_queuesandvf_max_queuestogether define the available configurable range ofnum_queuesparameter value which can be passed in<protocol>_controller_createRPC for each VF.
-
-
Distribute MSIX between VFs during their creation process, considering the PF's limitations:
snap_rpc.py nvme_controller_create_ --vf_num_msix <n> --num_queues <m> …It is strongly advised to provide both
vf_num_msixandnum_queuesparameters upon VF controller creation. Providing only one of the values may result in a conflict between MSIX and queue configuration, which may in turn cause the controller/driver to malfunction.In NVMe protocol, MSIX is used by NVMe CQ. Therefore, it is advised to assign 1 MSIX out of the PF's global pool (
free_msix) for each assigned queue.In virtio protocol, MSIX is used by virtqueue and one extra MSIX is required for BAR configuration changes notification. Therefore, it is advised to assign 1 MSIX out of the PF's global pool (
free_msix) for every assigned queue, and one more as configuration MSIX.In summary, the best practice for queues/MSIX ratio configuration is:
-
For NVMe –
num_queues=vf_num_msix -
For virtio –
num_queues=vf_num_msix-1
-
-
Upon VF teardown, release MSIX back to the free pool:
snap_rpc.py nvme_controller_destroy_ --release_msix … -
Set SR-IOV on the host driver:
echo <N> > /sys/bus/pci/devices/<BDF>/sriov_numvfsIt is highly advised to open all VF controllers in SNAP in advance before binding VFs to the host/guest driver. That way, for example in case of a configuration mistake which does not leave enough MSIX for all VFs, the configuration remains reversible as MSIX is still modifiable. Otherwise, the driver may try to use the already-configured VFs before all VF configuration has finished but will not be able to use all of them (due to lack of MSIX). The latter scenario may result in host deadlock which, at worst, can be recovered only with cold boot.
There are several ways to configure dynamic MSIX safely (without VF binding):
-
Disable kernel driver automatic VF binding to kernel driver:
# echo 0 > /sys/bus/pci/devices/sriov_driver_autoprobeAfter finishing MSIX configuration for all VFs, they can then be bound to VMs, or even back to the hypervisor:
echo "0000:01:00.0" > /sys/bus/pci/drivers/nvme/bind -
Use VFIO driver (instead of kernel driver) for SR-IOV configuration.
For example:
# echo 0000:af:00.2 > /sys/bus/pci/drivers/vfio-pci/bind # Bind PF to VFIO driver # echo 1 > /sys/module/vfio_pci/parameters/enable_sriov # echo <N> > /sys/bus/pci/drivers/vfio-pci/0000:af:00.2/sriov_numvfs # Create VFs device for it -
Recovery
NVMe Recovery
NVMe recovery allows the NVMe controller to be recovered after a SNAP application is closed whether gracefully or after a crash (e.g., kill -9).
To use NVMe recovery, the controller must be re-created in a suspended state with the same configuration as before the crash (i.e., the same bdevs, num queues, and namespaces with the same uuid, etc).
The controller must be resumed only after all NSs are attached.
NVMe recovery uses files on the BlueField under /dev/shm to recover the internal state of the controller. Shared memory files are deleted when the BlueField is reset. For this reason, recovery is not supported after BF reset.
Virtio-blk Crash Recovery
The following options are available to enable virtio-blk crash recovery.
Virtio-blk Crash Recovery with --force_in_order
For virtio-blk crash recovery with --force_in_order, disable the VBLK_RECOVERY_SHM environment variable and create a controller with the --force_in_order argument.
In virtio-blk SNAP, the application is not guaranteed to recover correctly after a sudden crash (e.g., kill -9).
To enable the virtio-blk crash recovery, set the following:
snap_rpc.py virtio_blk_controller_create --force_in_order …
Setting force_in_order to 1 may impact virtio-blk performance as it will serve the command in-order.
If --force_in_order is not used, any failure or unexpected teardown in SNAP or the driver may result in anomalous behavior because of limited support in the Linux kernel virtio-blk driver.
Virtio-blk Crash Recovery without --force_in_order
For virtio-blk crash recovery without --force_in_order, enable the VBLK_RECOVERY_SHM environment variable and create a controller without the --force_in_order argument.
Virtio-blk recovery allows the virtio-blk controller to be recovered after a SNAP application is closed whether gracefully or after a crash (e.g., kill -9).
To use virtio-blk recovery without --force_in_order flag. VBLK_RECOVERY_SHM must be enabled, the controller must be recreated with the same configuration as before the crash (i.e., same bdevs, num queues, etc).
When VBLK_RECOVERY_SHM is enabled, virtio-blk recovery uses files on the BlueField under /dev/shm to recover the internal state of the controller. Shared memory files are deleted when the BlueField is reset. For this reason, recovery is not supported after BlueField reset.
Improving SNAP Recovery Time
The following table outlines features designed to accelerate SNAP initialization and recovery processes following termination.
|
Feature |
Description |
How to? |
|---|---|---|
|
SPDK JSON-RPC configuration file |
An initial configuration can be specified for the SPDK configuration in SNAP. The configuration file is a JSON file containing all the SPDK JSON-RPC method invocations necessary for the desired configuration. Moving from posting RPCs to JSON file improves bring-up time. For more information check SPDK JSON-RPC documentation. |
To generate a JSON-RPC file based on the current configuration, run: The If SPDK encounters an error while processing the JSON configuration file, the initialization phase fails, causing SNAP to exit with an error code. |
|
Disable SPDK accel functionality |
The SPDK accel functionality is necessary when using NVMe TCP features. If NVMe TCP is not used, accel should be manually disabled to reduce the SPDK startup time, which can otherwise take few seconds. To disable all accel functionality edit the flags |
Edit the config file as follows: |
|
Provide the emulation manager name |
If the |
Use |
|
DPU mode for virtio-blk |
DPU mode is supported only with virtio-blk. DPU mode reduces SNAP downtime during crash recovery. |
Set |
SNAP ML Optimizer
The SNAP ML optimizer is a tool designed to fine-tune SNAP’s poller parameters, enhancing SNAP I/O handling performance and increasing controller throughput based on specific environments and workloads.
During workload execution, the optimizer iteratively adjusts configurations (actions) and evaluates their impact on performance (reward). By predicting the best configuration to test next, it efficiently narrows down to the optimal setup without needing to explore every possible combination.
Once the optimal configuration is identified, it can be applied to the target system, improving performance under similar conditions. Currently, the tool supports "IOPS" as the reward metric, which it aims to maximize.
SNAP ML Optimizer Preparation Steps
Machine Requirements
The device should be able to SSH to the BlueField:
-
Python 3.10 or above
-
At least 6 GB of free storage
Setting Up SNAP ML Optimizer
To set up the SNAP ML optimizer:
-
Copy the
snap_mlfolder from the container to the sharednvda_snapfolder and then to the requested machine:crictl exec -it $(crictl ps -s running -q --name snap) cp -r /opt/nvidia/nvda_snap/bin/snap_ml /etc/nvda_snap/ -
Change directory to the
snap_mlfolder:cd tools/snap_ml -
Create a virtual environment for the SNAP ML optimizer.
python3 -m venv snap_mlThis ensures that the required dependencies are installed in an isolated environment.
-
Activate the virtual environment to start working within this isolated environment:
source snap_ml/bin/activate -
Install the Python package requirements:
pip3 install –-no-cache-dir -r requirements.txtThis may take some time depending on your system's performance.
-
Run the SNAP ML Optimizer.
python3 snap_ml.py --helpUse the
--helpflag to see the available options and usage information:--version Show the version and exit. -f, --framework <TEXT> Name of framework (Recommended: ax , supported: ax, pybo). -t, --total-trials <INTEGER> Number of optimization iterations. The recommended range is 25-60. --filename <TEXT> where to save the results (default: last_opt.json). --remote <TEXT> connect remotely to the BlueField card, format: <bf_name>:<username>:<password> --snap-rpc-path <TEXT> Snap RPC prefix (default: container path). --log-level <TEXT> CRITICAL | ERROR | WARN | WARNING | INFO | DEBUG --log-dir <TEXT> where to save the logs.
SNAP ML Optimizer Related RPCs
snap_actions_set
The snap_actions_set command is used to dynamically adjust SNAP parameters (known as "actions") that control polling behavior. This command is a core feature of SNAP-AI tools, enabling both automated optimization for specific environments and workloads, as well as manual adjustment of polling parameters.
Command parameters:
|
Parameter |
Mandatory? |
Type |
Description |
|---|---|---|---|
|
|
No |
Number |
Maximum number of IOs SNAP passes in a single polling cycle (integer; 1-256) |
|
|
No |
Number |
The rate in which SNAP poll cycles occur (float; 0< |
|
|
No |
Number |
Maximum number of in-flight IOs per core (integer; 1-65535) |
|
|
No |
Number |
Maximum fairness batch size (integer; 1-4096) |
|
|
No |
Number |
Maximum number of new IOs to handle in a single poll cycle (integer; 1-4096) |
snap_reward_get
The snap_reward_get command retrieves performance counters, specifically completion counters (or "reward"), which are used by the optimizer to monitor and enhance SNAP performance.
No parameters are required for this command.
Optimizing SNAP Parameters for ML Optimizer
To optimize SNAP’s parameters for your environment, use the following command:
python3 snap_ml.py --framework ax --total-trials 40 --filename example.json --remote <bf_hostname>:<username>:<password> --log-dir <log_directory>
Results and Post-optimization Actions
Once the optimization process is complete, the tool automatically applies the optimized parameters. These parameters are also saved in a example.json file in the following format:
{
    "poll_size": 30,
    "poll_ratio": 0.6847347955107689,
    "max_inflights": 32768,
    "max_iog_batch": 512,
    "max_new_ios": 32
}
Additionally, the tool documents all iterations, including the actions taken and the rewards received, in a timestamped file named example_<timestamp>.json.
Applying Optimized Parameters Manually
Users can apply the optimized parameters on fresh instances of SNAP service by explicitly calling the snap_actions_set RPC with the optimized parameters as follows:
snap_rpc.py snap_actions_set –poll_size 30 –poll_ratio 0.6847 --max_inflights 32768 –max_iog_batch 512 –max_new_ios 32
It is only recommended to use the optimized parameters if the system is expected to behave similarly to the system on which the SNAP ML optimizer is used.
Deactivating Python Environment
Once users are done using the SNAP ML Optimizer, they can deactivate the Python virtual environment by running:
deactivate
Appendix – DPU Firmware Configuration
Before configuring SNAP, the user must ensure that all firmware configuration requirements are met. By default, SNAP is disabled and must be enabled by running both common SNAP configurations and additional protocol-specific configurations depending on the expected usage of the application (e.g., hot-plug, SR-IOV, UEFI boot, etc).
After configuration is finished, the host must be power cycled for the changes to take effect.
To verify that all configuration requirements are satisfied, users may query the current/next configuration by running the following:
mlxconfig -d /dev/mst/mt41692_pciconf0 -e query
System Configuration Parameters
|
Parameter |
Description |
Possible Values |
|---|---|---|
|
|
Enable BlueField to work in internal CPU model Must be set to |
0/1 |
|
|
Enable SR-IOV |
0/1 |
|
|
Enable PCI switch for emulated PFs |
0/1 |
|
|
The maximum number of hotplug emulated PFs which equals One switch port is reserved for all static PFs. |
[0,2-32] |
SRIOV_EN is valid only for static PFs.
RDMA/RoCE Configuration
BlueField's RDMA/RoCE communication is blocked for BlueField's default OS interfaces (nameds ECPFs, typically mlx5_0 and mlx5_1). If RoCE traffic is required, additional network functions (scalable functions) must be added which support RDMA/RoCE traffic.
The following is not required when working over TCP or even RDMA/IB.
To enable RoCE interfaces, run the following from within the DPU:
[dpu] mlxconfig -d /dev/mst/mt41692_pciconf0 s PER_PF_NUM_SF=1
[dpu] mlxconfig -d /dev/mst/mt41692_pciconf0 s PF_SF_BAR_SIZE=8 PF_TOTAL_SF=2
[dpu] mlxconfig -d /dev/mst/mt41692_pciconf0.1 s PF_SF_BAR_SIZE=8 PF_TOTAL_SF=2
NVMe Configuration
|
Parameter |
Description |
Possible Values |
|---|---|---|
|
|
Enable NVMe device emulation |
0/1 |
|
|
Number of static emulated NVMe PFs |
[0-4] |
|
|
Number of MSIX assigned to emulated NVMe PF/VF The firmware treats this value as a best effort value. The effective number of MSI-X given to the function should be queried as part of the DOCA SNAP-4 Service Guide | id (2.9.2 LTS)DOCASNAP 4ServiceGuide nvme_controller_list RPC command. |
[0-63] |
|
|
Number of VFs per emulated NVMe PF If not 0, overrides |
[0-256] |
|
|
Enable NVMe UEFI exprom driver Used for UEFI boot process. |
0/1 |
Virtio-blk Configuration
Due to virtio-blk protocol limitations, using bad configuration while working with static virtio-blk PFs may cause the host server OS to fail on boot.
Before continuing, make sure you have configured:
-
A working channel to access Arm even when the host is shut down. Setting such channel is out of the scope of this document. Please refer to NVIDIA BlueField DPU BSP documentation for more details.
-
Add the following line to
/etc/nvda_snap/snap_rpc_init.conf:virtio_blk_controller_create –pf_id 0For more information, please refer to section "DOCA SNAP-4 Service Guide | id (2.9.2 LTS)DOCASNAP 4ServiceGuide Virtio blkEmulationManagement".
|
Parameter |
Description |
Possible Values |
|---|---|---|
|
|
Enable virtio-blk device emulation |
0/1 |
|
|
Number of static emulated virtio-blk PFs See WARNING above. |
[0-4] |
|
|
Number of MSIX assigned to emulated virtio-blk PF/VF The firmware treats this value as a best effort value. The effective number of MSI-X given to the function should be queried as part of the DOCA SNAP-4 Service Guide | id (2.9.2 LTS)DOCASNAP 4ServiceGuide virtio_blk_controller_list RPC command. |
[0-63] |
|
|
Number of VFs per emulated virtio-blk PF If not 0, overrides |
[0-2000] |
|
|
Enable virtio-blk UEFI exprom driver Used for UEFI boot process. |
0/1 |
Appendix – Configure Persistent Network Interfaces
To configure persistent network interfaces so they are not lost after reboot. Under /etc/sysconfig/network-scripts modify the following four files, or create them if do not exist, then perform a reboot:
# cd /etc/sysconfig/network-scripts/
# cat ifcfg-p0
  NAME="p0"
  DEVICE="p0"
  NM_CONTROLLED="no"
  DEVTIMEOUT=30
  PEERDNS="no"
  ONBOOT="yes"
  BOOTPROTO="none"
  TYPE=Ethernet
  MTU=9000

# cat ifcfg-p1
  NAME="p1"
  DEVICE="p1"
  NM_CONTROLLED="no"
  DEVTIMEOUT=30
  PEERDNS="no"
  ONBOOT="yes"
  BOOTPROTO="none"
  TYPE=Ethernet
  MTU=9000

# cat ifcfg-enp3s0f0s0
  NAME="enp3s0f0s0"
  DEVICE="enp3s0f0s0"
  NM_CONTROLLED="no"
  DEVTIMEOUT=30
  PEERDNS="no"
  ONBOOT="yes"
  BOOTPROTO="static"
  TYPE=Ethernet
  IPADDR=1.1.1.1
  PREFIX=24
  MTU=9000

# cat ifcfg-enp3s0f1s0
  NAME="enp3s0f1s0"
  DEVICE="enp3s0f1s0"
  NM_CONTROLLED="no"
  DEVTIMEOUT=30
  PEERDNS="no"
  ONBOOT="yes"
  BOOTPROTO="static"
  TYPE=Ethernet
  IPADDR=1.1.1.2
  PREFIX=24
  MTU=9000
Appendix – Building SNAP Container with Custom SPDK
The SNAP source package contains the files necessary for building a container with a custom SPDK.
To build the container:
-
Download and install the SNAP sources package:
[dpu] # dpkg -i /path/snap-sources_<version>_arm64.deb -
Navigate to the
srcfolder and use it as the development environment:[dpu] # cd /opt/nvidia/nvda_snap/src -
Copy the following to the container folder:
-
SNAP source package – required for installing SNAP inside the container
-
Custom SPDK – to
container/spdk. For example:[dpu] # cp /path/snap-sources_<version>_arm64.deb container/ [dpu] # git clone -b v23.01.1 --single-branch --depth 1 --recursive --shallow-submodules https://github.com/spdk/spdk.git container/spdk
-
-
Modify the
spdk.shfile if necessary as it is used to compile SDPK. -
To build the container:
-
For Ubuntu, run:
[dpu] # ./container/build_public.sh --snap-pkg-file=snap-sources_<version>_arm64.deb -
For CentOS, run:
[dpu] # rpm -i snap-sources-<version>.el8.aarch64.rpm
[dpu] # cd /opt/nvidia/nvda_snap/src/
[dpu] # cp /path/snap-sources_<version>_arm64.deb container/
[dpu] # git clone -b v23.01.1 --single-branch --depth 1 --recursive --shallow-submodules https://github.com/spdk/spdk.git container/spdk
[dpu] # yum install docker-ce docker-ce-cli
[dpu] # ./container/build_public.sh --snap-pkg-file=snap-sources_<version>_arm64.deb
-
-
Transfer the created image from the Docker tool to the crictl tool. Run:
[dpu] # docker save doca_snap:<version> doca_snap.tar [dpu] # ctr -n=k8s.io images import doca_snap.tar -
To verify the image, run:
[DPU] # crictl images IMAGE TAG IMAGE ID SIZE docker.io/library/doca_snap <version> 79c503f0a2bd7 284MB -
Edit the image filed in the
container/doca_snap.yamlfile. Run:image: doca_snap:<version> -
Use the YAML file to deploy the container. Run:
[dpu] # cp doca_snap.yaml /etc/kubelet.d/The container deployment preparation steps are required.
Appendix – Deploying Container on Setups Without Internet Connectivity
When Internet connectivity is not available on a DPU, Kubelet scans for the container image locally upon detecting the SNAP YAML. Users can load the container image manually before the deployment.
To accomplish this, users must download the necessary resources using a DPU with Internet connectivity and subsequently transfer and load them onto DPUs that lack Internet connectivity.
-
To download the
.yamlfile:[bf] # wget --content-disposition https://api.ngc.nvidia.com/v2/resources/nvidia/doca/doca_container_configs/versions/<path-to-yaml>/doca_snap.yamlAccess the latest download command on NGC by visiting https://catalog.ngc.nvidia.com/orgs/nvidia/teams/doca/containers/doca_snap. The SNAP tag
doca_snap:4.1.0-doca2.0.2is used in this section as an example. Latest tag is also available on NGC. -
To download SNAP container image:
[bf] # crictl pull nvcr.io/nvidia/doca/doca_snap:4.1.0-doca2.0.2 -
To verify that the SNAP container image exists:
[bf] # crictl images IMAGE TAG IMAGE ID SIZE nvcr.io/nvidia/doca/doca_snap 4.1.0-doca2.0.2 9d941b5994057 267MB k8s.gcr.io/pause 3.2 2a060e2e7101d 251kBk8s.gcr.io/pauseimage is required for the SNAP container. -
To save the images as a
.tarfile:[bf] # mkdir images [bf] # ctr -n=k8s.io image export images/snap_container_image.tar nvcr.io/nvidia/doca/doca_snap:4.1.0-doca2.0.2 [bf] # ctr -n=k8s.io image export images/pause_image.tar k8s.gcr.io/pause:3.2 -
Transfer the
.tarfiles and run the following to load them into Kubelet:[bf] # sudo ctr --namespace k8s.io image import images/snap_container_image.tar [bf] # sudo ctr --namespace k8s.io image import images/pause_image.tar -
Now, the image exists in the tool and is ready for deployment.
[bf] # crictl images
IMAGE                                  TAG                 IMAGE ID            SIZE
nvcr.io/nvidia/doca/doca_snap          4.1.0-doca2.0.2     9d941b5994057       267MB
k8s.gcr.io/pause                       3.2                 2a060e2e7101d       251kB
Appendix – Install Legacy SPDK
To build SPDK-19.04 for SNAP integration:
-
Cherry-pick a critical fix for SPDK shared libraries installation (originally applied on upstream only since v19.07).
[spdk.git] git cherry-pick cb0c0509 -
Configure SPDK:
[spdk.git] git submodule update --init
[spdk.git] ./configure --prefix=/opt/mellanox/spdk --disable-tests --without-crypto --without-fio --with-vhost --without-pmdk --without-rbd --with-rdma --with-shared --with-iscsi-initiator --without-vtune
[spdk.git] sed -i -e 's/CONFIG_RTE_BUILD_SHARED_LIB=n/CONFIG_RTE_BUILD_SHARED_LIB=y/g' dpdk/build/.config
The flags
--prefix,--with-rdma, and--with-sharedare mandatory. -
Make SPDK (and DPDK libraries):
[spdk.git] make && make install
[spdk.git] cp dpdk/build/lib/* /opt/mellanox/spdk/lib/
[spdk.git] cp dpdk/build/include/* /opt/mellanox/spdk/include/
Appendix – PCIe BDF to VUID Translation
PCIe BDF (Bus, Device, Function) is a unique identifier assigned to every PCIe device connected to a computer. By identifying each device with a unique BDF number, the computer's OS can manage the system's resources efficiently and effectively.
PCIe BDF values are determined by host OS and are hence subject to change between different runs, or even in a single run. Therefore, the BDF identifier is not the best fit for permanent configuration.
To overcome this problem, NVIDIA devices add an extension to PCIe attributes, called VUIDs. As opposed to BDF, VUID is persistent across runs which makes it useful as a PCIe function identifier.
PCI BDF and VUID can be extracted one out of the other, using lspci command:
-
To extract VUID out of BDF:
[host] lspci -s <BDF> -vvv | grep -i VU | awk '{print $4}' -
To extract BDF out of VUID:
[host] ./get_bdf.py <VUID>
[host] cat ./get_bdf.py
#!/usr/bin/python3

import subprocess
import sys

vuid = sys.argv[1]

# Split the output into individual PCI function entries
lspci_output = subprocess.check_output(['lspci']).decode().strip().split('\n')

# Create an empty dictionary to store the results
pci_functions = {}

# Loop through each PCI function and extract the BDF and full info
for line in lspci_output:
    bdf = line.split()[0]
    if vuid in subprocess.check_output(['lspci', '-s', bdf, '-vvv']).decode():
        print(bdf)
        exit(0)

print("Not Found")
Appendix – SNAP Memory Consumption
This appendix explains how SNAP consumes memory and how to manage memory allocation.
The user must allocate the DPA hugepages memory according to the section "Step 1: Allocate Hugepages". It is possible to use use a portion of the DPU memory allocation in the SNAP container as described in section "DOCA SNAP-4 Service Guide | id (2.9.2 LTS)DOCASNAP 4ServiceGuide AdjustingYAMLConfiguration". This configuration includes the following minimum and maximum values:
-
The minimum allocation which the SNAP container consumes:
resources: requests: memory: "4Gi" -
The maximum allocation that the SNAP container is allowed to consume:
resources:
  limits:
    hugepages-2Mi: "4Gi"
Hugepage memory is used by the following:
-
SPDK
mem-sizeglobal variable which controls the SPDK hugepages consumption (configurable in SPDK, 1GB by default) -
SNAP
SNAP_MEMPOOL_SIZE_MB– used with non-ZC mode as IO buffers staging buffers on the Arm. By default, the SNAP mempool consumes 1G from the SPDKmem-sizehugepages allocation. SNAP mempool may be configured using theSNAP_MEMPOOL_SIZE_MBglobal variable (minimum is 64 MB).If the value assigned is too low, with non-ZC, a performance degradation could be seen.
-
SNAP and SPDK internal usage – 1G should be used by default. This may be reduced depending on the overall scale (i.e., VFs/num queues/QD).
-
XLIO buffers – allocated only when NVMeTCP XLIO is enabled.
The following is the limit of the container memory allowed to be used by the SNAP container:
resources:
  limits:
    memory: "6Gi"
This includes the hugepages limit (in this example, additional 2G of non-hugepages memory).
The SNAP container also consumes DPU SHMEM memory when NVMe recovery is used (described in section "DOCA SNAP-4 Service Guide | id (2.9.2 LTS)DOCASNAP 4ServiceGuide NVMeRecovery"). In addition, the following resources are used:
limits:
  memory:
Appendix – Host OS Configuration
With Linux environment on host OS, additional kernel boot parameters may be required to support SNAP related features:
-
To use SR-IOV:
-
For Intel,
intel_iommu=on iommu=ptmust be added -
For AMD,
amd_iommu=on iommu=ptmust be added
-
-
To use PCIe hotplug,
pci=reallocmust be added -
modprobe.blacklist=virtio_blk,virtio_pcifor non-built-invirtio-blkdriver orvirtio-pcidriver
To view boot parameter values, run:
cat /proc/cmdline
It is recommended to use the following with virtio-blk:
[dpu] cat /proc/cmdline BOOT_IMAGE … pci=realloc modprobe.blacklist=virtio_blk,virtio_pci
To enable VFs (virtio_blk/NVMe):
echo 125 > /sys/bus/pci/devices/0000\:27\:00.4/sriov_numvfs
Intel Server Performance Optimizations
cat /proc/cmdline
BOOT_IMAGE=(hd0,msdos1)/vmlinuz-5.15.0_mlnx root=UUID=91528e6a-b7d3-4e78-9d2e-9d5ad60e8273 ro crashkernel=auto resume=UUID=06ff0f35-0282-4812-894e-111ae8d76768 rhgb quiet iommu=pt intel_iommu=on pci=realloc modprobe.blacklist=virtio_blk,virtio_pci
AMD Server Performance Optimizations
cat /proc/cmdline
cat /proc/cmdline BOOT_IMAGE=(hd0,msdos1)/vmlinuz-5.15.0_mlnx root=UUID=91528e6a-b7d3-4e78-9d2e-9d5ad60e8273 ro crashkernel=auto resume=UUID=06ff0f35-0282-4812-894e-111ae8d76768 rhgb quiet iommu=pt amd_iommu=on pci=realloc modprobe.blacklist=virtio_blk,virtio_pci
Last updated: